Settings
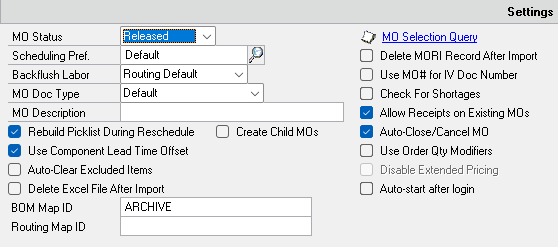
Options in the Settings area are saved per User. If you have multiple MOGen processors running, each one will have a different GP User ID, so the Settings can be (and must be) set up individually after logging-in with each User ID. The settings are listed below in alphabetical order.
Allow Receipts on Exising MOs: This is used by “Table: MO Receipt Integration”. When marked, the MO Receipt Integration can create MO Receipts for MOs which were created and released in GP. When unmarked, the MO Receipt Integration will create a new MO and post a receipt for it all in one step.
Auto-Clear Excluded Items: See section below called Excluded Items. Excluded Items is used by Create Child MOs to prevent some items from having MOs created. If this option is marked, when processing completes, the Excluded Items list will be cleared. You might want to do this if you are excluding some items on a one-time basis so that the list is cleared when you are finished.
Auto-Close/Cancel MO: Only applies to MO Receipt Integration. When marked, MORI will automatically Close the MO when it is fully received. When MORI is creating partial receipts, the MO will be canceled when the final partial receipt MO is created. See the MO Receipt Integration section for more details about the partial receiving process.
When this option is NOT marked, MOs will be left in a Partially Received status until they are manually closed.
Auto-Start after login: This setting applies to all MOGen utilities. After logging-in to GP the MOGen window will open and start processing records. See the “Run MOGen Automatically” section of this document for more detail on how to use this setting.
Backflush Labor: this setting provides an option to override the Routing setting for tracking Labor.
- Routing Default: uses the settings from the Routing
- Backflush: overrides the Routing settings and forces all sequences to Backflush labor
- Do Not Backflush: overrides the Routing settings and forces all sequences to NOT Backflush labor
BOM Map ID: If you have WilloWare’s MFG Import Utility installed you can have any of the MO Generator Suite Utilities run BOM Import before the utility. Set up the BOM Map ID in MFG Import, then enter the BOM Map ID here. When a BOM Map ID is provided, BOM Import will be run before the selected MOGen Import Type (i.e. it will run before “Create MOs” or before “MO Receipt Integration”). When the MOGen Utility is run continuously, BOM Import will be run each time MOGen runs. You MUST use a SQL Table Integration for BOM Import if you want MOGen to run BOM Import automatically.
Check for shortages: Used by MORI. If the Inventory module setting “Allow Adjustment Overrides” is NOT marked, then Check For Shortages will be MARKED and DISABLED. If Inventory does not allow adjustment overrides, you must have enough available inventory to meet the requirements of the Picklist before posting an MO Receipt. If “Allow Adjustment Overrides” is MARKED, then Check For Shortages will be ENABLED and you can choose how you want MORI to handle Picklist shortages. In this case the default behavior will be to NOT check for shortages, thus overriding shortages and driving inventory negative if needed.
Create Child MOs: After creating an MO, MO Generator will read the Picklist for the Parent Item’s MO to see if there are subassemblies that are set to Make To Stock. If so, it will also create MO’s for those items. See MO Generator Overview for a detailed description of this process.
Delete Excel File After Import: Only applies to the Excel import utilities. When marked, the Excel file will be deleted after it has been imported. This option may be used when running MOGen in an unattended mode where another process regularly creates a new file to import.
Delete MORI Record After Import: Only applies to MO Receipt Integration. When marked, records in the MORI integration tables will be deleted when an MO Receipt is successfully integrated (i.e. there are no errors).
Disable Extended Pricing: This setting applies to posting MO Receipts, and will only be available when the Extended Pricing module is enabled. Posting an MO Receipt causes an update to the Item Master costing fields, which in turn triggers an Extended Pricing routine to run which updates IV00107 and IV00108. The Extended Pricing routine should only run for new items, or when there are changes to the UofM Schedule. Client reports indicate that the Extended Pricing routine locks tables, which can cause failures if you are running multiple MORI processors, as well as in other parts of the system. Disabling Extended Pricing applies ONLY to the GP client running MORI, and it will be re-enabled when the MOGen window is closed. It has no impact on other GP clients. NOTE: if you mark “Disable Extended Pricing”, whenever the MOGen window is open the Extended Pricing functionality will be disabled. You should NOT do anything else in the GP client while the MOGen window is open and Extended Pricing is disabled (for example, do not create a Sales Transaction when the MOGen window is open).
MO Description: Provides the MO Description for the top-level MO, if a Description is not provided in the import. When Child MO’s are created, the Description will contain the MO Number of the Parent MO.
MO Doc Type: MO Generator integrates with MFG PowerPack from WilloWare. MFG PowerPack has an MO Document Types feature which provides support for automatically generating different MO Numbering Sequences. If the module is installed, the MO Type field will be enabled and you can pick from one of the available MO Document Types. If the module is not installed, this field will be locked and set to Default (which uses the normal GP Manufacturing MO Number).
MO Selection Query: This setting applies to the Core Utilities and the MO Receipt Integration. The Excel-based utilities read the Excel data into the corresponding SQL table(s), then run the table-based integration. For example, “Excel: Create MOs” populates the W7158Import table and then runs “Table: Create MOs”. The MO Selection Query can therefore be used with any of the utilities.
The Selection Query is stored by User ID, so you can have two separate GP clients running MOGen utilities and each can have a different Selection Query. There is only one Selection Query per User ID, so you cannot have a Selection Query for “Create MOs” and a different query for “MO Receipt Integration”.
When running multiple MORI processors, we recommend using the MO Selection Query to help ensure the processors cannot attempt to process the same record. In high volume environments the latency caused by a “fat client” such as Dynamics GP can create enough delay that two processes can grab the same record before either has returned any changes to the database. See MO Selection Query in the MO Receipt Integration section for more detail on this setting.
MO Status: Options are Quote, Open, Released. This defaults to Released. If Manufacturing is set up to Allocate On Release (see Tools >> Setup >> Manufacturing >> System Defaults >> Manufacturing Orders), a Manufacturing Component Transaction – Allocate transaction will be created to allocate the inventory when the MO is created.
Rebuild Picklist During Reschedule: This setting applies only to the MO Scheduler utility. There is a system setting that applies to manually scheduled/rescheduled MOs. See the Setup chapter for more information on the system setting.
When this option is marked, the MO Scheduler utility will delete the existing Picklist and rebuild it from the Bill of Materials. You may want to do this if an MO is created a long time before it is released and there is a chance that the BOM has changed over time. Another example would be a scenario where an MO is created before the BOM is even complete.
Routing Map ID: If you have WilloWare’s MFG Import Utility installed you can have any of the MO Generator Suite Utilities run Routing Import before the utility. Set up the Routing Map ID in MFG Import, then enter the Routing Map ID here. When a Routing Map ID is provided, Routing Import will be run before the selected MOGen Import Type (i.e. it will run before “Create MOs” or before “MO Receipt Integration”). When the MOGen Utility is run continuously, Routing Import will be run each time MOGen runs. You MUST use a SQL Table Integration for Routing Import if you want MOGen to run Routing Import automatically.
Scheduling Preference: Scheduling Preference is used to retrieve the Scheduling Method (Forward/Backward), and the Draw From and Post To Sites.
MOGen looks for Scheduling Preference in the following order:
- Import (either from Excel or in the import table)
- MOGen Settings section (on the MOGen window)
- Manufacturing’s Default Scheduling Preference
If you have multiple manufacturing locations, create a Scheduling Preference with the Draw From and Post To sites for each location, then either provide that in the import, or have different GP User IDs that run MOGen for each facility, and set Scheduling Preference appropriately for each User ID/Location.
The Scheduling Preference must have BOTH the Draw From Site and Post To Site specified. If either is blank, this will be reported in the Error Log and processing will stop.
As shown below, a Scheduling Preference for the NORTH location has the Draw From and Post To sites set to NORTH.

Use Component Lead Time Offset: This setting is used when creating Child MOs. The Date Due for a subassembly MO will be offset by the LTO specified on the BOM of the parent item.
As shown below, if the Offset From setting is MO Start Date, the Due Date for BA100G will be the Start Date of 100XLG plus 30-days. If the Offset From setting is MO Due Date, the Due Date for BA100G will be the Due Date of 100XLG minus 30-days.
MOGenerator schedules differently than Manufacturing does. GP Manufacturing simply subtracts LTO from the Start Date (or End Date), then checks if the resulting day is a Down Day. If so, it moves the date backward by one day until it arrives at an up date.
MOGenerator subtracts LTO Up Days. In other words, down days/holidays are not included when it subtracts LTO. So if LTO is 3, and given Start Date is Monday, and Saturday & Sunday are down days, the Start Date would be moved back to Wednesday (three “work days” before the Start Date).

Use MO# for IV Doc Number: This setting is used by MORI. When Manufacturing posts an MO Receipt it creates two Inventory Adjustments—one to consume raw materials, and a second to produce the finished good. Manufacturing normally uses the Next IV Adjustment Number from the Inventory Setup window. Enabling this option will cause the IV Document Number on these inventory adjustments to be based on the MO Number. More example, posting an MO Receipt for MO00123 would create Inventory Adjustments numbered MO00123*1 and MO00123*2.
The IV Document Number field allows 17 characters while the MO Number field allows 30. For this option to work, your MO Number must be 15 characters or less. If you will post partial receipts, those MOs will have a suffix based on the partial receipt, such as MO00123-001, MO00123-002 and so on. The Inventory Adjustments would then be MO00123-001*1 and MO00123-001*2.
In the event the resulting IV Document Number would exceed 17 characters, MORI will let Manufacturing use the default IV Adjustment Number from Inventory Setup.
When running multiple MORI processors, we recommend enabling this open to help ensure the processors cannot both use the same IV Document Number. In high volume environments the latency caused by a “fat client” such as Dynamics GP can create enough delay that two processes can grab the same IV Document Number before either has returned any changes to the database.
Use Order Quantity Modifiers: When marked, creating MOs will be goverened by the Item Resource Planning “Order Quantity Modifier” settings for the Item-Post To Site. For example, if an Item has a Maximum of 10 and a multiple of 10, the Create MOs and Create Child MOs utilities will create five MOs for 10 each rather than one large MO for 50. Please refer to the Inventory and Manufacturing documentation for complete details on how the OQM settings work.