IV Mass Transaction
HelpID: 502622067
The IV Mass Transaction feature creates an Inventory Transaction (Adjustment or Variance) or Inventory Transfer for all inventory in a specified Site, or Site-Bin if multi-bins is enables.
IV Mass Transaction is used when a business process puts inventory into a “staging” location (which could be a site or bin), and a subsequent process requires moving all of that inventory into a different location (again, this could be a different site, or bin).
For example, a PO Receipt puts inventory into a QA Site-QA Bin. When the material passes QA inspection, it is transferred (using a Bin-to-Bin Transfer) into the QA Site-Released Bin. When a truck arrives to transport the inventory to the distribution center, all of the inventory needs to be transferred from the QA Site-Released Bin into an In-Transit Site/Bin or into a Finished Goods receiving site/bin.

IV Mass Transfer would be used to create the transfer of all inventory in the QA Site-Released Bin into the next location.
IV Mass Transaction may be used to clean out a site of “remnant” inventory. For example, due to rounding in material usage on manufacturing orders, small amounts of inventory can be left in a material issue bin. All inventory can be quickly adjusted out using IV Mass Transaction.
Setup
Navigation: Tools >> Setup >> Company >> Setup GP PowerPack
Mark the box next to MODULE: IV Mass Transaction and/or MODULE: IV Mass Transfer. Mass Transfer and Mass Transaction can be enabled individually. After marking the checkboxes, click DONE.
The feature will be enabled for the current user. Other users must restart their Dynamics GP client to enable this feature.
Using IV Mass Transaction
IV Mass Transaction is accessed from the Item Transaction Entry window (Transactions >> Inventory >> Transaction Entry).

Start a transaction by selecting the Document Type (Adjustment or Variance) and clicking into the Document Number field. IV Mass Transaction will not start until a Document Number exists on the window. The only difference between the two transaction types is the offsetting GL Account. For Adjustments the transaction will credit Inventory and debit Cost of Goods. For Variance the transaction will credit Inventory and debit IV Variance.
The Mass IV Transaction will use the account(s) from the Item, if present, or default accounts from Posting Account Setup. In the event appropriate accounts cannot be found, those items will not be placed on the transaction and an error log report will print showing the items with missing accounts.
Open IV Mass Transaction by selecting Additional >> Mass IV Transaction.

IV Mass Transaction works with or without multi-bins enabled. If multi-bins is enabled you will have to select both a From Site and Bin.
Click CREATE. You will be prompted to confirm you are ready to proceed.
The utility will search for available inventory in the From Site/Bin, and add it to the Transaction. If there are any items which cannot be added, they will appear on an error log report.
The Item Transaction Entry window will redisplay showing all of the added inventory items. If Serial and Lot controlled inventory is present, all of the available serial numbers or lot numbers will be auto-selected and added to the transaction.
The transaction can be reviewed and edited prior to posting.
IV Mass Transaction can quickly remove a large amount (all) inventory from a site. To prevent accidents, consider removing Inventory Posting permissions for users who also have access to the IV Mass Transaction window.
Using IV Mass Transfer
IV Mass Transfer is accessed from the Item Transfer Entry window (Transactions >> Inventory >> Transfer Entry).

IV Mass Transfer will not start until a Document Number exists on the window. Make sure a Document Number exists before opening the IV Mass Transfer window.
IV Mass Transfer can be used together with WilloWare’s Bin-to-Bin Transfer Module. Enable Bin-To-Bin Transfers BEFORE starting the IV Mass Transfer utility.
Open IV Mass Transaction by selecting Additional >> Mass IV Transfer.

Select the From and To Sites and bins (if multi-bins is enabled).
Select the From Site ID and Bin.
If WilloWare’s Bin-to-Bin Transfer is being used the To Site ID will be locked and automatically set to match the From Site ID. Otherwise, when performing a site-to-site transfer, select the To Site ID.
To Bin is a default bin. It must be populated. This bin will be used in the event the method selected for To Bin Source cannot locate a bin.
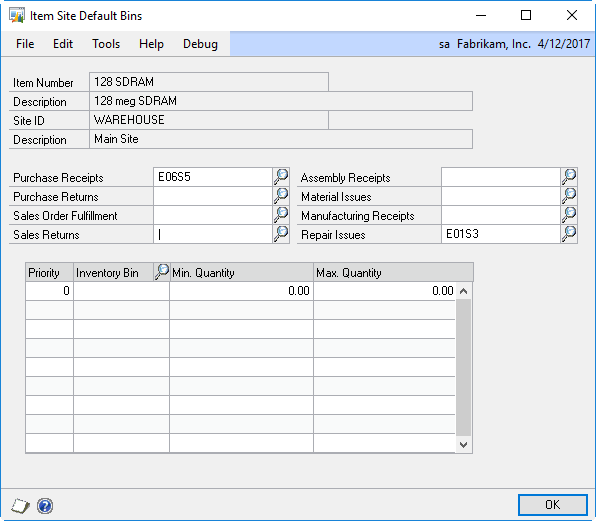
To Bin Source: When the transfer is created, it will attempt to locate a bin using an option selected from the To Bin Source drop-down list. The drop-down list contains all of the Bins listed on the Item Site Default Bins window. Selecting “Purchasing Receipts” will create a transfer into the Item-Site “Purchase Receipts” bin.
Additionally, the first item in the list is “To Bin Field”, which indicates the transfer should use the default bin. And the last option in the list is “Custom”. See Custom Bin Source below.
The From/To Bins cannot be the same when doing a same-site bin-to-bin transfer. Also, all items in the from Site/Bin must be assigned to the To Site. If an Item-Site record does not exist for an item, it will not be included on the transfer and an error log report will print.
Click CREATE. You will be prompted to confirm you are ready to proceed.
The utility will locate all available inventory and add it to the transfer.
If there are any items which cannot be added, they will appear on an error log report. The Item Transfer Entry window will redisplay showing all of the added inventory items. If Serial and Lot controlled inventory is present, all of the available serial numbers or lot numbers will be auto-selected and added to the transfer.
Custom Bin Source
The GP PowerPack installation routine creates a stored procedure called wspGPPPToBin. The out-of-the-box stored procedure simply returns the Default Bin, however you can make changes to the stored procedure to return a bin based on your unique business requirements.
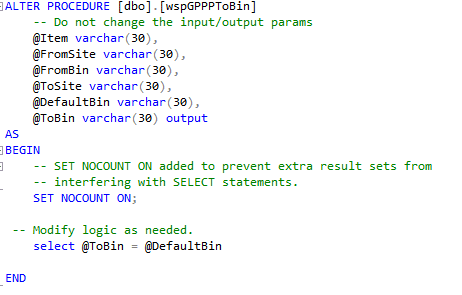
The unedited stored procedure is shown above.

A simple example is shown above where the ToBin returns the PO Receipt Bin.
The table below lists several important bin-related tables.
| SQL Name | Dexterity Name | Description |
| IV00102 | IV_Item_MSTR_QTYS | Item Quantity Master |
| IV00112 | ivItemSiteBinMstr | Item Site Bin Master |
| IV00117 | ivItemSiteBinPriority | Item Site Bin Priorities |
| IV00200 | IV_Serial_MSTR | Item Serial Number Master |
| IV00300 | IV_Lot_MSTR | Item Lot Number Master |
As an example, the Custom To Bin stored procedure could be used to retrieve a bin from the Bin Priorities table, perhaps selecting a bin based on a given priority, or by determining an available bin by looking at the Min/Max quantities.