PO Selection
HelpID: 834822006
The PO Selection window displays all Purchase Order lines that can be used to meet the Sales Order line requirement.
Steps for Creating a new link
-
Click the ADD (

) button on the top-right corner of the scrolling window on the SOP-POP Linking window. This will open the PO Selection window.
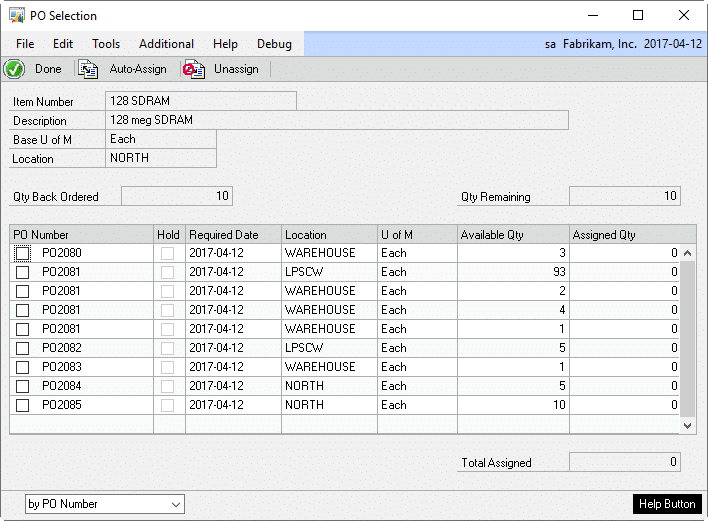
|
Field |
Description |
|
Header Region |
Duplicated from the SOP-POP Linking window. Displays the Sales Line Item Number, Description, etc. |
|
PO Number |
Displays all purchase orders that have a quantity available. |
|
Hold |
Displays the Hold status of the purchase order. |
|
Required Date |
Displays the purchase order’s required date. |
|
Location |
Displays the receiving location of the purchase order. |
|
U of M |
Displays the unit of measure for the item on the PO. Only PO Lines with the same unit of measure as the sales order line can be linked. |
|
Available Qty |
PO line quantity that is not already assigned to a sales line. |
|
Assigned Qty |
Enter or change the quantity assigned to the sales line from the selected PO line. The assigned quantity cannot exceed the available PO line quantity, or the remaining sales line quantity. |
|
Total Assigned |
Displays the total assigned from SOP-POP Linking plus PO Selection. |
|
Sort By |
Sorts the purchase orders by PO Number or by Required Date. |
- Mark the checkbox next to a purchase order to assign it. The utility will assign as much of the purchase order line as either available on the PO or remaining on the Sales Order.
- Alternatively, enter a specific value in the Assigned Qty field. This will mark the checkbox automatically.
- To un-assign a PO, either unmark the checkbox or enter a zero in the Assigned Qty Field.
- If there are several purcahse orders to assign, use the AUTO-ASSIGN button to perform a mass purchase order assignment. The Auto-Assign button will automatically mark purchase order lines, starting from the top of the list. The list can be re-sorted by using the dropdown at the bottom of the window. The two sort options are by PO Number or by Required Date.
- To remove all assignments, use the UNASSIGN button.
- Click DONE to return to the SOP-POP Linking window.