Contents
The following instructions use our MFG PowerPack as an example. The process is the same for all WilloWare products/custom projects, but the screens will display a different product name—the installation steps will be identical.
The steps below describe the most cautious approach to installing new products into a Dynamics GP environment and provide the maximum level of “recovery” capacity. Not all steps are required, and experienced GP consultants may choose to by-pass some steps.
- SERVER: Preparation steps are performed on the server
- SERVER: Installation steps performed on the server
- CLIENTS: Installation steps repeated on each GP client
The “server” install can be read as “the first client”. The first client will require logging-in to GP as “SA” or “DYNSA” with no users in the system so that necessary database changes can be made.
You must have ALL users out of ALL companies when running a “full install”. This is required when:
- Installing a module for the first time
- Enabling the software in a new company database
- Installing an update with a Minor Version change (i.e. You are on MFG PowerPack v18.1.20 and updating to MFG PowerPack v18.2.21)
- Installing an update with a Major Version change (i.e. You are on MFG PowerPack v16.1.20 and upgrading to MFG PowerPack v18.2.21)
Subsequent client installations will only require running the EXE installer then launching GP to “un-chunk” the dictionary.
If you are upgrading GP (i.e. GPv16 to GP18.5) you can complete the GP Upgrade and install the latest version of your WilloWare module after completing the entire GP upgrade process. If the GP upgrade requires upgrade in multiple steps through multiple versions, you can wait to update your WilloWare module until the GP upgrade is complete.
Special Considerations
Terminal Server/Citrix Server
If you are installing on a Terminal Server/Citrix Server make sure there are no user sessions with Dynamics GP running (there should be no dynamics.exe processes visible). There must be no users in Dynamics GP. Inactive or stranded sessions can still have an active dynamics.exe process. If dynamics.exe is running it will lock files needed to run the installation, and the installation will fail.
This is the most common cause of installation problems.

Open Task Manager, select all DYNAMICS.EXE processes and click END TASK.
Multiple SET Files
If your environment has multiple SET files, such as Dynamics_Company1.SET, Dynamics_Company2.SET, and so on, after installing the code you must launch GP using the default DYNAMICS.SET file.
Dexterity code (chunk files) are hard-coded to add product information to DYNAMICS.SET, if you launch GP after adding a CNK file using a SET file with a different name, the code will not un-chunk.
If you do not have a GP shortcut that uses DYNAMICS.SET, you can drag-and-drop the DYNAMICS.SET file onto dynamics.exe to launch GP with the default SET file. The code will un-chunk, and add product information to DYNAMICS.SET. After completing all of the installation steps described below, then copy the new product entries from DYNAMICS.SET into your other SET files.
Preparation Steps
- Do NOT install the new code yet.
- Log-on to the computer as a Windows User with Domain Administrator-level permissions. The installation must be able to make changes to the “Programs Folder”. If you have a network share for GP containing modified forms and reports, the Windows User must be able to access that share—a Local Administrator User might not have access to the share.
- Make sure all users are logged-out of GP. The only user in the system during the installation should be “SA” to “DYNSA”.
- Make backups of:
- The DYNAMICS database.
- All Company databases.
- All Modified Forms and Reports dictionaries. Verify whether a shared forms/reports dictionary folder is being used, and if so, backup the shared files.
- The GP Client folder. Use Windows Explorer to locate the installation folder for Dynamics GP. This is usually c:\Program Files\Microsoft Dynamics\GP. Right-click on the GP folder, then select COPY. Right click in an empty area below the folders, and select PASTE. The backup copy can be used to restore the GP client to its original state. If you need to recover, rename the original GP folder to GP_Bak, and rename the copied folder to GP.
- The red circle above shows the “empty area” where you can right-click before selecting PASTE.
- If you are on Citrix or Terminal Services make sure that there are no active sessions with GP open, and no disconnected sessions with GP open.
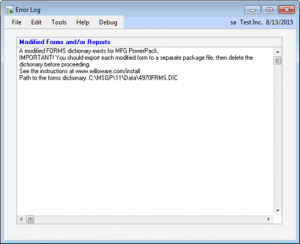
- Export any modified Forms or Reports for MFGPowerPack to individual package files.
- Log-in to Dynamics GP
- Go to Tools >> Customize >> Customization Maintenance
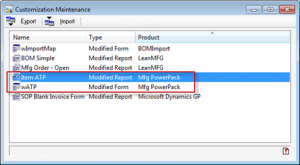
- Sort by Product. If there are no modified Forms or Reports for the product you are installing, you can continue to Step 7.
- Select a modified form/report, click the Export button. While exporting each modification separately is more time consuming, it can save time later when you import the package files. If any of the modified forms/reports cannot be re-imported, that file can be left out while all of the others can be imported.
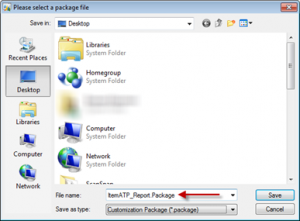
- Give the package file an informative name so you know what it is. Such as ItemATP_Report.Package
- Repeat these steps until all modified Forms and/or Reports have been exported.
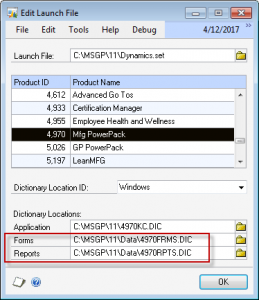
- Delete or rename the modified Forms and Reports dictionaries. WilloWare names the modified forms and reports dictionaries using the Product ID. For MFG PowerPack the two files are 4970RPTS.DIC and 4970FRMS.DIC. You can find the file names in the Edit Launch File window: Tools >> Setup >> System >> Edit Launch File. Locate the WilloWare product (i.e. MFG PowerPack) in the Products list. Select it. The Dictionary Locations will display the location and file names.


Server Installation Steps
-
- Extract the installer. The installer is shipped in a ZIP file. The zip file may contain another zipped file with the version number. For example, MFGPowerPack.zip contains another file, such as MFGPowerPack_v11_0_26.zip. Unzipping this second file produces MFGPowerPack.exe.
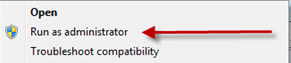
- Right-click on MFGPowerPack.exe and select Run As Administrator
- You may receive a User Account Control warning that asks: Do you want to allow the following program from an unknown publisher to make changes to this computer? Answer YES
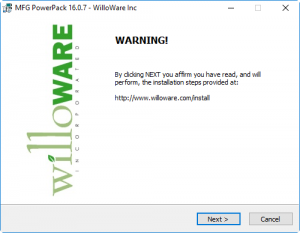
- The first screen will look like one of the image below. Read the screen and click NEXT.
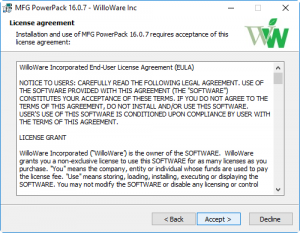
- End User License Agreement. Read the Agreement. Click ACCEPT to proceed.
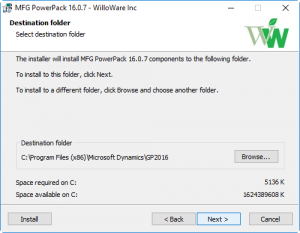
- Destination Folder. The installer uses the default location for GP. Confirm this is the correct location. If it is not, click the BROWSE button and locate the folder that contains DYNAMICS.EXE. If you select a different installation folder than the default, you will receive a message: “The destination directory already exists and is not empty. Some files may be overwritten. Are you sure you wish to proceed?” Click YES.
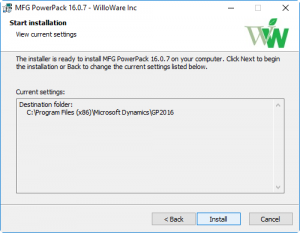
- Start Installation. Verify the correct Destination Folder has been selected. Click INSTALL.
- The installation process will put the product chunk file (a *.CNK file) into the Dynamics GP folder. The READ ME file and other documentation will be placed into the GP\Documentation folder. Click the FINISH button.
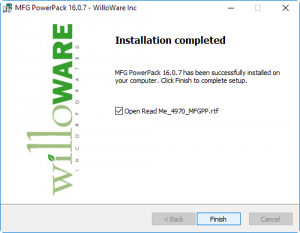
- If you would like to open documentation and other files, leave the checkboxes marked. Otherwise, unmark the files and click FINISH.
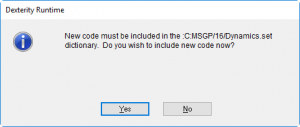
- Launch Dynamics GP. You will receive a message similar to the one below. Click YES to include the new code.
- PRIVILEGE ERROR. If you receive a Privilege Error warning message after clicking YES on the window above, you are probably performing the installation on a Citrix or Terminal Server and have one or more active or disconnected sessions with Dynamics GP open. The only cause of this error is that a lock exists on the GP program files. Click OK on the message, then close GP. Immediately get all users out of the GP, and ensure there are no disconnected sessions with GP running. If you did not log-in as a Domain Administrator, do so now. Re-launch GP and continue with the installation.
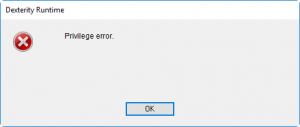


Open Task Manager, select all DYNAMICS.EXE processes and click END TASK.
-
-
- You can log-in to any company database. After logging-in you will see a message similar to the one below. NOTE: this message only appears if the version number of the product you are installing is higher than the currently installed version. Such as, if you install v11.0.26 and the previous version was v11.0.20. If you re-install the same version as is currently installed, this message will not appear. If you install a lower build number (v11.0.20 when the last installed version was v11.0.26) you will receive a warning message and the product will disable itself. Click OK.
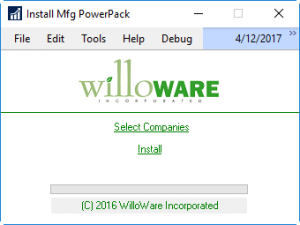
- The WilloWare Install window will open.
- If you have modified forms and/or reports for the WilloWare product, and you did not follow the instructions above to export modified forms and reports, you will see window below. STOP. At this point you should log-in to GP from a different GP client that does not yet have the new code. Then follow the instructions above for exporting modified forms and reports. After you have deleted the modified forms and/or reports dictionaries for the WilloWare product, continue with the next step.
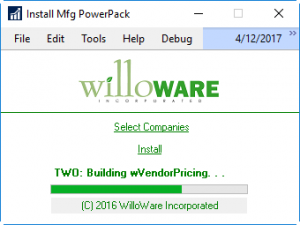
- Click SELECT COMPANIES
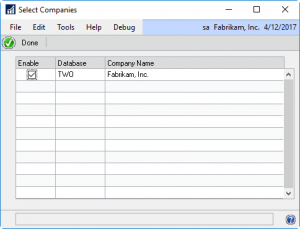
- Mark the companies into which you want to install the product. If a company is NOT marked, tables for the product will not be created in that company. Unmarking a company will DISABLE the product for that company. To ENABLE the product for that company at a later date you must add a shortcut to the Install window, open the Select Companies window, mark the company (leaving the other companies marked too), then run the install. You cannot run different versions of the product in different company databases. MARK ALL COMPANIES THAT WILL BE USING THE PRODUCT, NOT JUST A “NEW” COMPANY THAT IS BEING ADDED. Click DONE.
- Click INSTALL. You will be asked to confirm the database selection(s).
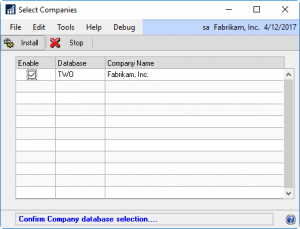
- Click INSTALL
- The progress bar will display progress as the WilloWare Installer creates tables in the Dynamics, and selected Company Databases.
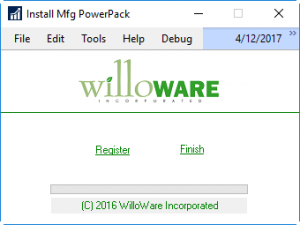
- When the installation process is complete, the Install window may present a Registration link. If so, click REGISTER and continue with step 21. If not, click FINISH, and when asked to restart GP, click NOW. After re-starting GP, refer to the product documentation for entering the Registration Key, and performing Setup.
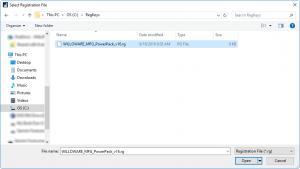
- If the Registration window has the Get Key Online button, you can click that button to automatically retrieve (or renew) your registration key over the internet. Otherwise, click the FOLDER button and browse to the location where you saved the registration key. When you registered, you recevied a Registration Key file that ends with a .RG extension (such as WilloWare_MFGPowerPack_v16.rg).
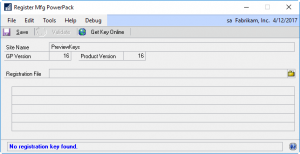
- Select the Registration Key file, then click OPEN
- If you clicked Get Key Online, it will automatically Validate the key. If you manually selected a key, click the VALIDATE button. The status bar at the bottom of the window will confirm whether or not the key is valid. Depending on which Registration window you have, it will show which parts of the key pass or fail each validation check. If the key is valid, click SAVE. If the key is not valid, contact your Reseller or WilloWare (www.WilloWare.com).

- IMPORTANT: If you are in Fabrikam, they key will always be valid because our software is always functional in Fabrikam. As shown above, the key can have several errors, but if you are logged-in to Fabrikam the status message will indicate the key is valid. If you see any errors, you may be able to resolve them yourself:
- Site Name: if you have a Site Name error, it means the Site Name used to register the product does not match the Site Name in GP. Contact WilloWare and provide the Site Name as shown in the Dynamics GP Registration window.
- Version: if you have a Version error, the major version of our software does not match the major version of GP (for example, you installed MFG PowerPack for GP2013 into a GP2015 environment). Download the correct version and restart the installation. You do NOT need to remove the currently installed code.
- Product ID: if you have a Product ID error, either the Registration Key you loaded is not for this product, or, you installed the wrong product.
- Expiration Date: if you have an Expiration Date error, you have a temporary, time-limited key. Contact WilloWare for an updated key.
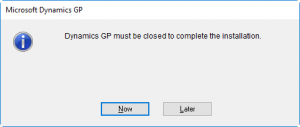
- Click FINISH on the Install window. You will be asked to restart GP. The GP client must be restarted for the new product’s navigation to be added and other features to activate.
- Log-in to GP as SA and import any modified Forms and Reports package files. If you exported modified forms and reports for the WilloWare product, import them now to re-create the modified forms and reports dictionaries.
- Go to Tools >> Customize >> Customization Maintenance
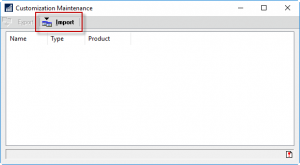
- Click the IMPORT button.
- Click the BROWSE button. Select a package file exported at the beginning of the installation. Click OK on the Import Package File window. If any of the modifications cannot be re-imported you will need to re-do the modifications. Sometimes reports and forms modifications cannot be re-imported if there was a substantial change to the report or window in the new release of the software.
- Go to Tools >> Customize >> Customization Maintenance
- Refer to the product’s documentation for further Setup and Configuration instructions.
- You can log-in to any company database. After logging-in you will see a message similar to the one below. NOTE: this message only appears if the version number of the product you are installing is higher than the currently installed version. Such as, if you install v11.0.26 and the previous version was v11.0.20. If you re-install the same version as is currently installed, this message will not appear. If you install a lower build number (v11.0.20 when the last installed version was v11.0.26) you will receive a warning message and the product will disable itself. Click OK.
-


Client Installation Steps
-
-
- Extract the installer. The installer is shipped in a ZIP file. The zip file may contain another zipped file with the version number. For example, MFGPowerPack.zip contains another file, such as MFGPowerPack_v11_0_26.zip. Unzipping this second file produces MFGPowerPack.exe.
- Right-click on MFGPowerPack.exe and select Run As Administrator
- You may receive a User Account Control warning that asks: Do you want to allow the following program from an unknown publisher to make changes to this computer? Answer YES
- The first screen will look like one of the image below. Read the screen and click NEXT.
- End User License Agreement. Read the Agreement. Click ACCEPT to proceed.
- Destination Folder. The installer uses the default location for GP. Confirm this is the correct location. If it is not, click the BROWSE button and locate the folder that contains DYNAMICS.EXE. If you select a different installation folder than the default, you will receive a message: “The destination directory already exists and is not empty. Some files may be overwritten. Are you sure you wish to proceed?” Click YES.
- Start Installation. Verify the correct Destination Folder has been selected. Click INSTALL.
- The installation process will put the product chunk file (a *.CNK file) into the Dynamics GP folder. The READ ME file and other documentation will be placed into the GP\Documentation folder. Click the FINISH button.
- If you would like to open documentation and other files, leave the checkboxes marked. Otherwise, unmark the files and click FINISH.
- Launch Dynamics GP. You will receive a message similar to the one below. Click YES to include the new code.
- Installation is complete. You do not need to log-in to GP.
-