Entering Releases
HelpID: 731922006
From the Blanket PO Entry window select Actions >> Blanket Release
There are three sections to the PO Release Entry window:
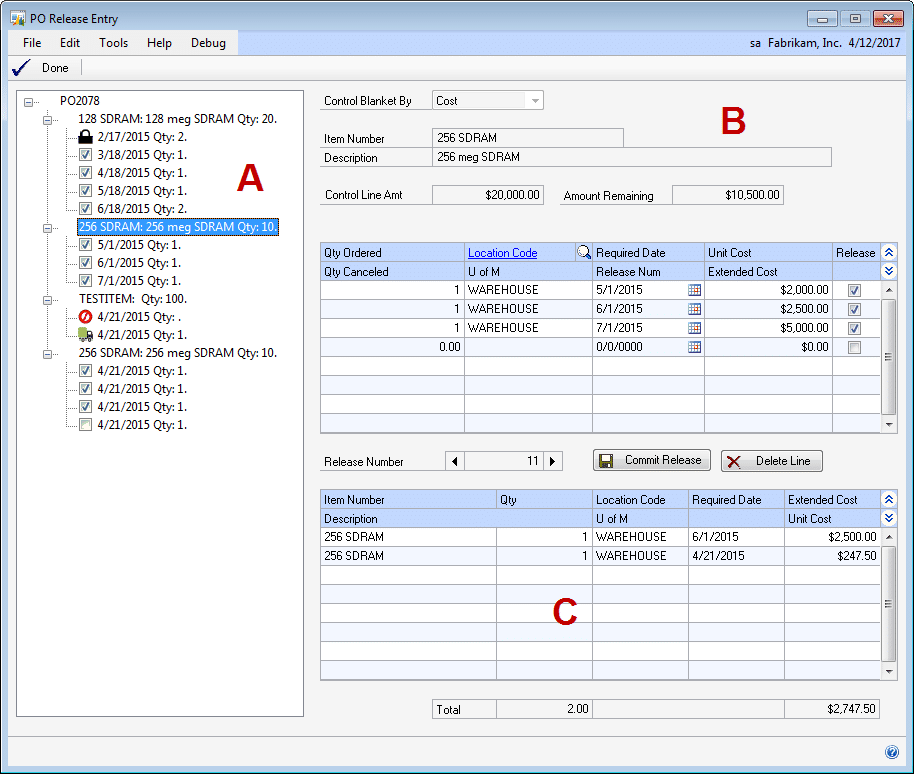
- A: the tree view shows an overview of all of the Control Lines on a PO. Each Control Line can be expanded to view the Release Lines below it.
- B: Planned Releases. Use this section to enter Planned Releases. A Planned Release is later “Released”, which creates a Firmed Release.
- C: Firmed Releases. When Planned Releases are Firmed they are added to the Firmed Release window. Clicking Commit Release creates a “release event”—which is a group of released lines that can all be printed together on a PO.
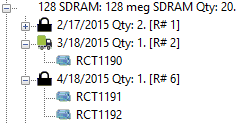
Treeview
The following icons will display in the Treeview to indicate different statuses of the PO Line.
![]() PO Line Closed
PO Line Closed
![]() PO Line Canceled
PO Line Canceled
![]() PO Line Received
PO Line Received
![]() Not Released
Not Released
![]() Released
Released
Clicking on the Control Line will make the Planned Releases window display all releases for the selected Control Line.
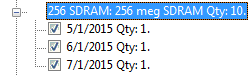

Click on a Release Line (Planned or Firmed) will make the Planned Releases window display only the selected release.
When Receipts and/or Invoices have been entered for a Release Line you will be able to expand the Release Line to view those documents. Double-click on a Receipt/Invoice to open the document in an Inquiry window. Also, once a Planned Release line has become a firmed release, the Release Number will display next to each line.
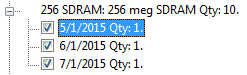
Planned Releases
Depending on the Control By setting (either Quantity or Cost), the Planned Releases section will show either the Quantity or Dollar Amount remaining. Enter the Quantity, Required Date, and Unit Cost for each Planned Release.
Location Code will default to the Site used on the Control Line, but it can be changed for Release.
When you are ready to firm a Planned Release and print a PO, mark the Release checkbox. This will add the line to the Firmed Release window.
Until you click the Commit button, you can remove lines from the Firmed Release window. Either select a line and click the Delete Line button, or unmark the Release checkbox in the Planned Release window.
You can put multiple items on a Release. Select a new item from window A (the treeview), then mark the Release box for a line to Release.
If Releases Minimums are specified, you will not be able to commit the release until the minimums are met.
If the Blanket Settings specify an End Date, and that date has passed, you will not be able to create a new release.
Repeat this process until all of the items you need to release have been added to the Release. The click COMMIT RELEASE.
DOUBLE-CHECK YOUR WORK FIRST! Once you firm a release by clicking the Commit Release button, you cannot “un-firm” the release. In the event such lines do need to be removed, cancel the quantities for the released lines in the Planned Release window.
Firmed Releases
As described in the Planned Releases section, add lines to a Firmed Release by marking the Release checkbox in the Planned Releases window. You can add several lines from the Planned Releases to a Firmed Release. For example, you could mark two Planned Releases for 128 SDRAM on different required dates, then switch to 256 SDRAM and add a couple more lines. Continue in the manner until you have included all Planned Release lines onto the Firmed Release before clicking the COMMIT RELEASE button.
If the Commit Release button has not been clicked, you can select a line in the Firmed Release window and remove it by clicking the Delete Line button.
If Release Minimums are specified in the Blanket Control Settings, you will not be able to commit the release until the minimums are met.
The Release Number increments by 1, automatically, when each new Firmed Release is created.
Use the Release Number dropdown list to select and view earlier releases.
Printing Releases
The procedure for printing a Blanket PO is the same as printing regular Purchase Orders. Click the Print button on Blanket PO Entry.
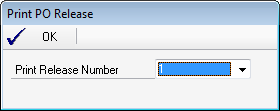
Before the Print Options window opens, you will have to select which Release Number you want to print. The drop-down box will contain all Releases for the PO, with the most current release already selected. To re-print an earlier release, select the Release Number from the drop-down.
The first option in the dropdown list is “Control Lines”. Select this option to print a Purchase Order showing only the Control Lines.
After selecting an option, click OK.
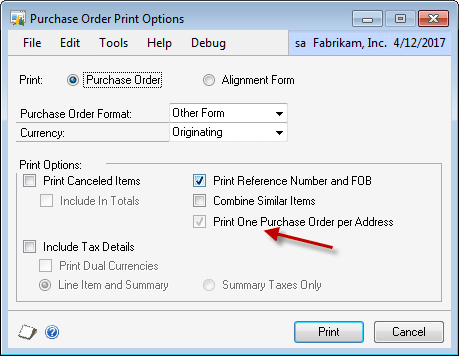
The Print One Purchase Order Per Address checkbox may be automatically marked, or unmarked, and/or locked depending on whether or not Control Lines are being printed, and whether or not a Release includes multiple Addresses.
| Print One PO per Address | ||
| Control Lines | Multiple Sites or One Site | Unmarked, locked.
All Control Lines are always printed on one PO, even if the Control Lines are for different sites. |
| Release Lines | One Site | Marked, locked.
If a Release includes only one site, the checkbox will be marked and locked. |
| Release Lines | Multiple Sites | Unmarked, editable.
If a Release includes multiple sites, you can choose to include all lines on one PO (the addresses will print below the Item Number), or to one PO per site (the address will print in the Ship To address box). |
The printing process will also populate to Blanket PO tables with the PO Number and the PO Lines to be printed. These tables can be used when creating a custom Purchase Order (such as in Crystal Reports or SSRS) so that the report will pull the Release Lines or Control Lines selected by the User.
The BPO report tables are:
- BPO Report Header (W7319BPORptHdr)
- User ID
- PO Number
- BPO Report Detail (W7319BPORptDtl)
- User ID
- PO Number
- Ord (PO Line Number)
Blanket POs cannot be printed from the Print Purchasing Documents window.