Reporting Integration
Release Number
Release Number can be added to any POP Report Form by using the Report Writer User Defined function called rw_TableLineString. Follow the steps below to add Revision Level to any POP Report.
Step-1: Create a calculated field to change the datatype of ORD (the PO Line) to be currency. The rw_TableLineString function require the input for this field using the currency datatype, but ORD are long integer. The following steps explain how to create the conversion fields.
- Open the POP Report Form (such as POP Purchase Order Other Form) in Report Writer
- Select Calculated Fields from the Toolbox, then click NEW
- Name the field: cyORD
- Result Type = Currency
- Click the FIELDS tab.
- In the Resources list, select Purchase Order Line Rollup Temp. Select the ORD field.
- Click Add
- Click OK to save the Calculated Field.
Step-2: Create a calculated field for Release Number.
- Select Calculated Fields from the Toolbox, then click NEW
- Name the field: sRelNum
- Result Type = String
- Click the FUNCTIONS tab, click User-Defined, select Core = System, then Function = rw_TableLineString
- Click Add
- Add the Product ID
- Click the CONSTANTS tab, select Type = Integer, enter 7319, then click ADD.
- Add the Report Name
- On the Contants Tab, select Type = String, enter POP, then click ADD.
- Add the PO Number
- On the Fields tab, select Resources = Purchase Order Line Rollup Temp, select Field = PO Number, then click ADD.
- Add the Document Type (this is not used)
- On the Constants tab, select Type = Integer, enter 1, then click ADD.
- Add the ORD
- This is where you use the cyLineSeq created above. Click the Fields tab, select Resources = Calculated Fields, select Field = cyORD, then click ADD.
- Add the Sequence (this is not used)
- On the Constants Tab, select Type = Currency. Enter 0 (zero), then click ADD.
- Add the Data Control
- This is an integer that tells GP PowerPack which piece of data to return. In this case there is only one, Release Number, so add an Integer Constant of 1. Click the Constants tab, select Type = Integer, enter 1, then click ADD.
- Click OK to save the calculated field.
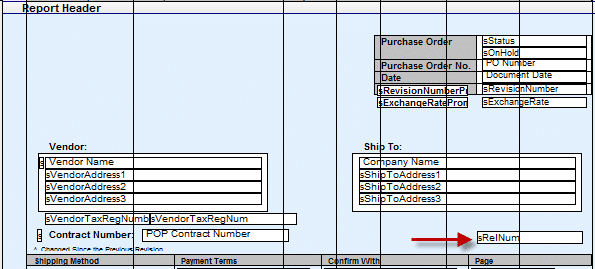
Add sRelNum to the modified POP Form, and format as needed. Release Number should be added somewhere in the Report and Page Header sections, as shown below:
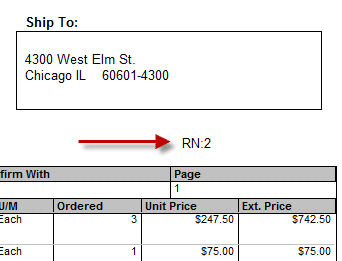
The Release Number Label from Setup (see Setup) will automatically be added to the Release Number returned by the rw_TableLineString function.
The sRelNum calculated field output is shown below. Note that “RN” is added automatically because “RN” was entered as the Release Number Label in the Setup window. You can hard-code a prefix onto the report if desired, and leave the Release Number Label field blank on the Setup window.
PO Settings – Numeric
The numeric values from the PO Settings window (Blanket PO control values) can be added to GP reports by using the report writer function: rw_TableLineCurrency.
Values for the Control Number:
1 = Blanket Control. Returned values are:
1 – Control by Line Quantity
2 – Control by Line Cost
3 – Control by PO Quantity
4 – Control by PO Cost
2 = Control Amount. Either the total of Control Lines (for a Line Control method), or the PO Control Amount from PO Settings.
3 = Total Release value (either Total Cost, or Total Quantity in the Base UofM)
4 = Release Minimum Quantity
5 = Release Minimum Cost
Steps to create a calculated field for numeric PO Settings
Open the GP report in Report Writer
In the Toolbox, select Calculated Fields, click NEW
This example will create a field to display Release Minimum Cost.
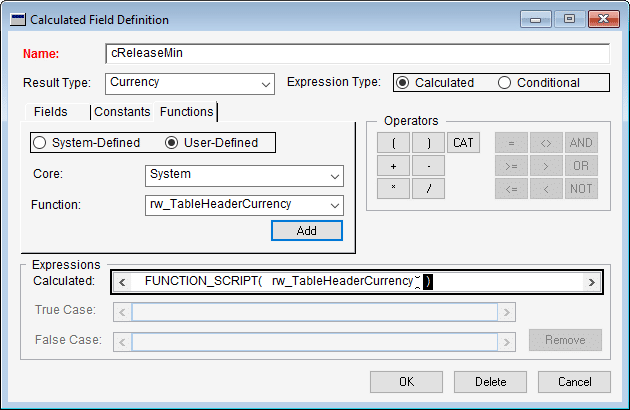
- Name: cReleaseMin
- Result Type: Currency
- Select Functions >> User Defined. Core = System. Function = rw_TableHeaderCurrency. Click ADD
- Click Constants. Type = Integer. Constant = 7319. Click ADD
- Click Constants. Type = String. Constant = empty (don’t enter anything). Click ADD
- Click Fields. Resources = Purchase Order Work (or other table containing the PO Number). Field = PO Number. Click ADD
- Click Constants. Type = Integer. Constant = 0. Click ADD
- Click Constants. Type = Integer. Constant = 5. Click ADD. NOTE: see the Control Number values listed above for the values to enter in this field. 5 returns the Release Minimum Cost.
- Click OK to save the Calculated Field.
- Drag it onto the report
- Close the report to save it
PO Settings – Strings
String values from the PO Settings window (Blanket PO Control Values) can be added to GP reports by using the report writer function: rw_TableHeaderString.
Values for the Control Number:
1 = Previous Blanket PO Number
2 = Contract Number
3 = End Date
Steps to create a calculated field for string PO Settings
Open the GP report in Report Writer
In the Toolbox, select Calculated Fields, click NEW
This example will create a field to display Previous Blanket PO Number
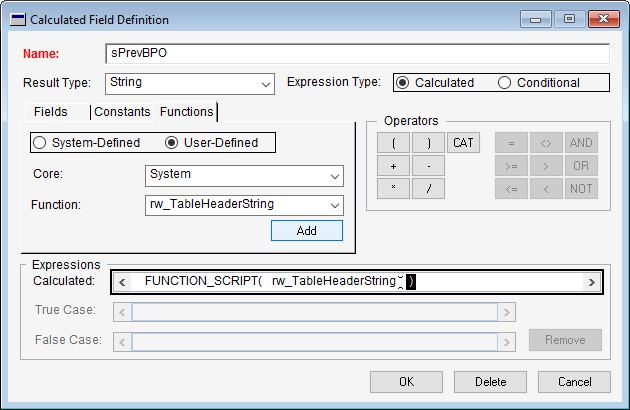
- Name: sPrevBPO
- Result Type: String
- Select Functions >> User Defined. Core = System. Function = rw_TableHeaderString. Click ADD
- Click Constants. Type = Integer. Constant = 7319. Click ADD
- Click Constants. Type = String. Constant = empty (don’t enter anything). Click ADD
- Click Fields. Resources = Purchase Order Work (or other table containing the PO Number). Field = PO Number. Click ADD
- Click Constants. Type = Integer. Constant = 0. Click ADD
- Click Constants. Type = Integer. Constant = 1. Click ADD. NOTE: see the Control Number values listed above for the values to enter in this field. 1 returns the Previous Blanket PO Number.
- Click OK to save the Calculated Field.
- Drag it onto the report
- Close the report to save it