Creating New Alerts
Creating Custom Alerts requires a high degree of familiarity with Dexterity. WilloWare Support can create Custom Alerts for you. Please contact support@willoware.com for rates.
Alerts are, in general, created using two types of “triggers”.
- A trigger on a “form” (a GP window) which adds the Additional menu option to Add/Edit or View the Alert. This is a FORM Trigger.
- A trigger on a field change script which causes an Alert to pop-open. This is a FOCUS Trigger.
When creating a new Alert the first step is to create a Form Trigger. The Form Trigger adds the Additional Menu navigation to open the Alert Entry window or Alert View window. If you are adding the Alert to a Maintenance or Transaction Entry window, you should add navigation to the Alert Entry window. If you are adding the Alert to an Inquiry window, you should add navigation to the Alert View window.
However, you can have the Alert Entry window open from Inquiry windows too, if you want users to have the ability to Add/Edit Alerts, but not have access to the Maintenance or Transaction window where the records are created.
Each Alert usually requires at least one other trigger—a trigger to make the Alert pop open. This is usually a Focus Trigger on a field on the window. For example, a Focus Trigger on the CHANGE of Item Number on Item Maintenance could be used to pop-open Alert View.
The following steps will add a new alert on Kit Maintenance. Before creating a new Alert you need to gather information about the location where the Alert will be added. You will need to know the dexterity technical name of the form, window, and field. A good way to get this information is to open the desired window in Modifier.

In Modifier you can see several important pieces of information:
-
- Series = Inventory
- Form Name = IV_Item_Kits
- Window = IV_Item_Kits
- Field = Item Number
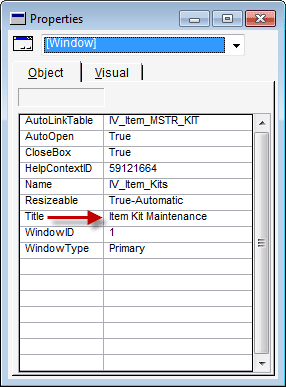
In the Properties window (below) you can see the Title of the window is “Item Kit Maintenance”. This is what will appear in the Window Name field in the Resource Lookup window.
Click the NEW button on Alert Builder to generated the next Alert ID.
Alert ID: This must be generated by the system. User Alerts are numbered 22,000 and up. The System Alerts are numbered 1 to 21,999. The System Alerts can be viewed, but cannot be changed or deleted. Viewing the existing System Alerts is a good way to see how to create new alerts.
Alert Type: select Custom.
Alert Window: select Alert Entry. The Alert View window is used for the “pop-up” Alert display. As described in more detail below, the Alert View is usually launched by a field change trigger. The Alert Entry window is used to create and maintain an Alert, and is usually accessed only via the Additional menu on the primary window associated with the Alert Type.
Trigger Type: select FORM. Form triggers are used to add navigation to manually open the Alert Entry or Alert View window.
Hot Key: This is used only for Form Triggers (Additional Menu navigation), and provides a keyboard shortcut to open the window. Acceptable hot keys are:
-
- 0-9
- A-Z
- p-z (these map to F1 to F11, so the p = ctrl + F1, q = ctrl + F2, etc)
Enter Hot Key = E, and Menu Name = Add/Edit Alert
Trigger Point: For a Form Trigger the Trigger Point is just the name of the form. We found this earlier by opening the form in Modifier, so you can enter IV_Item_Kits. The capitalization needs to match exactly. You can also lookup the form.

Keys For Record: Select one or more fields from the window that are the record key. You may need to look up the Table Definition to see what the primary key is. For an Item Alert the key is the Item Number field. For a SOP Alert the key is SOP Type and SOP Number. For Alerts that have multiple keys, such as a SOP Alert, it is important that the key fields be entered in the correct order. Look at the System Alerts if you are unsure what the key fields are.
If you are familiar with Dexterity syntax you can manually type in the field name. However, to ensure correct spelling and punctuation, use the Lookup.

Select the Item Number field, then click SELECT.
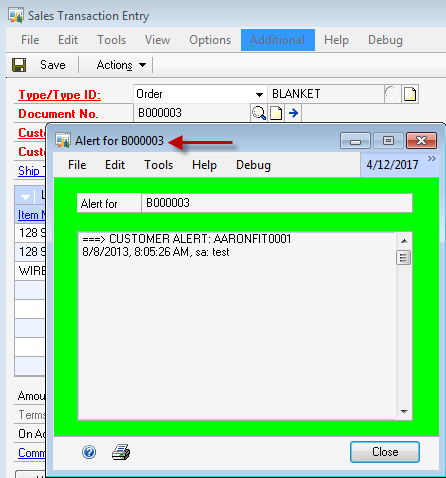
Keys For Display: The Keys for Display will fill-in automatically as you select the Keys for Record. The Keys for Display have no effect on the storage or retrieval of the alert. Normally they are the same as the Keys For Record, but they do not need to be. For the SOP Alerts, for example, the only field selected for Keys for Display is the SOP Number field. If both SOP Number and SOP Type were included in the Keys for Display the top of the Alert window would show “Alert for B000003~2”, which is a combination of the SOP Number and the numeric value which corresponds to “Order”.
Your Alert Builder window should now look like the sample shown below.
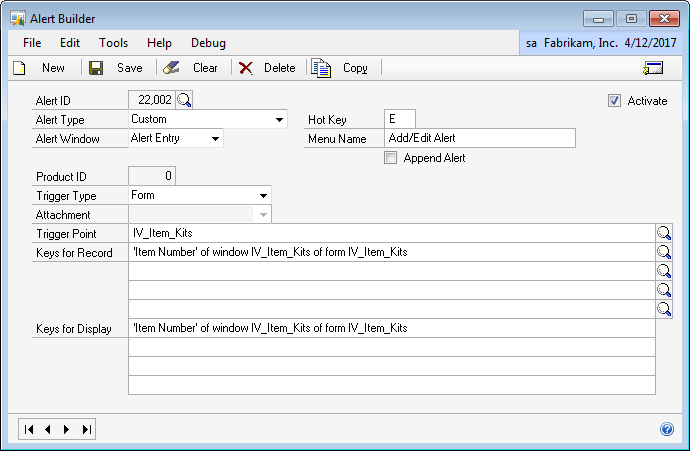
Click the SAVE button.
The second trigger is the one that makes the Alert pop-open automatically. On Item Kit Maintenance the obvious place to put this trigger is on the Item Number field. It appears that when you enter an Item Number, select one from the Lookup, or use the scrolling buttons, the Item Number field “changes”.
However, this is often not the case. The auto-open Alert trigger requires more investigation. The best way to do this is with a dex script log. If you are not familiar with editing the dex.ini file or how to create a dex script log,

As shown above, add the following line to the dex.ini file: ScriptDebugger=TRUE. This will add a new Menu to GP through which you can enable/disable script logging from inside GP so that you can capture a log of just the activity you want to examine.
Log-in to GP and open the Item Kit Maintenance window.

From the Debug menu, select Log Scripts. Save the file to your Desktop (or another location you can find easily).
Type in a Kit Item Number and press the TAB key. This will cause the Item Number “change script” to run. Go back to Debug and unmark Log Scripts.

Open the script log. You can see that the first line (IV_Item_Kits Item_Number_CHG) is the Item Number “change script” running. Then “Display() of form IV_Item_Kits” runs. When you see parentheses after a word that means it is a FUNCTION. ExistsForItemID() and Create() are also functions. SetRangeItemID does not have parentheses, so it is a PROCEDURE.
Record another script of clicking once on the scrolling buttons. In that script you will also find Display() of form IV_Item_Kits, but you will NOT find IV_Item_Kits Item_Number_CHG. This means that the Item Number “change script” does not run each time the Item Number changes. However, Display() of form IV_Item_Kits does run regardless of how the Item Number is entered/selected.
So, the “pop up Alert” trigger will need to be a Function Trigger.
Click NEW to start a new trigger.
Alert Type: Select Custom
Alert Window: Select Alert View
Trigger Type: Select Function
Trigger Point: enter the following:
Display of form IV_Item_Kits
There is no Lookup to find this—it must be manually entered. Note that the parentheses are NOT included.
Keys for Record: This is the same key used for the Additional Menu trigger. The Alert is attached to the Kit Item Number.

Keys for Display: this will populate automatically with the Item Number.
Click SAVE.
To activate newly created Alerts, click the GoTo button and select Re-Register Alerts Triggers. On the Register window click the Register Alerts Triggers button.
This will only activate the new Alerts for the current user. Other logged-in users must restart GP for the changes to take effect.