Select Checks Filters
HelpID: 502622099
Select Checks Filters adds a sophisticated query builder, to the Select Checks (Build Payment Batch) window. The Select Checks Filters window creates Filters used to identify a group of documents to pay which are then submitted to the Select Checks/Build Payment Batch window.
You can create and save an unlimited number of Filters, and each Filter can have an unlimited number of criteria.
Select Checks Filter also has the ability to import a list of Vendor Documents to pay either from Excel or directly from a SmartList favorite.
NOTE: In earlier releases of GP PowerPack this feature was called Mass Apply AP.
Setup
Navigation: Tools >> Setup >> Company >> Setup GP PowerPack
Mark the box next to MODULE: Select Checks Filters, then click DONE.
Restart your Dynamics GP client to enable this feature. Other users must restart their Dynamics GP client to enable this feature.
Using Select Checks Filters
Navigation: Transactions >> Purchasing >> Select Checks / Build Payment Batch >> Additional >> Select Checks Filters

The Select Checks Filters window is used to select an existing Filter, preview the documents selected by the filter, manually exclude specific documents if needed, and Apply the filter.
To create a filter, click the FILTERS button.

Filter ID: enter a new ID, or select one from the Lookup

To create a new criteria for the Filter, click the NEW button. The drop-down boxes correspond to the column headers directly below each one.
Field: A large number of fields from the payables transactions and vendor master are available, including all of the Receivings User Defined fields. Note that the Receivings User Defined fields only appear in the Field List if a label has been created for the field in Purchase Order Processing Setup. The available UDF fields appear at the bottom of the Fields List, prefaced with “UDF”. “Distribution Account” has special properties and is discussed in more detail below.
Distribution Type: this is only enabled when Distribution Account is selected (see below).
Compare: There are two options: “Does/Is” and “Does/Is Not”. This field is used together with the Operator to create expressions like “Is Equal To”, “Does Contain”, “Does Not Begin With” or “Is Not Equal To”.
Operator: The operators include Equal To, Begins With, Ends With, Contains, and so on. The available operators will change depending on the Field selection. For example, if a date Field is selected the Operator will include “On or Before” and “On or After”. If Distribution Account is selected the Operator will include “Contains Only” (see below).
Date Option: If a date Field is selected, the Date Option will be enabled. The Date Options are “Today”, “End of Month”, “Date”, and “Today +Days”. “Date” is selected when you want to provide a list of specific dates in the Values list. When “Today +Days” is selected, enter one integer value into the Values list for the number of days to add.
Values: For most Operators you can specify a List of Values. For example, if the Operator is “Contains”, you might have a list of values, such as this:
- “Transaction Description” “Does” “Contain”: “Meals”, “Ent”, “Fuel”
After selecting a Field, Compare option, Operator option (and the others as appropriate), click into the Values window and enter one or more Values.
The Values window will show either a date field, string field, or account number, depending on the selected Field.
After entering values, click the SAVE button. The filter criteria will be added to the “criteria list” (the scrolling window on the bottom left).
To modify existing criteria, click on in the Criteria List.

This will select it, as shown above, and put it up into the entry fields. You can also add/edit/delete the Values after selecting criteria.
To remove a record from the Criteria List, select it, then click the DELETE button located immediately above the Criteria List. The Delete button at the top of the window deletes the entire Filter.
To remove a value from the Values list, click into the row you want to delete, then select Edit >> Delete Row.
When a Filter is applied the “criteria” are added together with “and” clauses. So:
- Where Vendor ID = “ABC” and
- Vendor Class ID = “MAIN” and
- Due Date = End of Month
If the Compare Option is “Does/Is”, the Values are added together with “or” clauses. For example:
- Where Vendor ID Is Equal To “ACE” or Is Equal To “BLUE” or Is Equal to “HARRIS”…and….
- Vendor Class ID Is Equal To “MAIN” or Is Equal To “SOUTH” or Is Equal To “WEST”….and…
- Document ID Does Begin With “A460” or Begins With “A470” or Begins With “A480”
If the Compare Option is “Does/Is NOT”, the Values are added together with “and” clauses. For example:
- Where Vendor ID Is Not Equal To “ACE” and Is Not Equal To “BLUE” and Is Not Equal to “HARRIS”…and….
- Vendor Class ID Is Not Equal To “MAIN” and Is Not Equal To “SOUTH” and Is Not Equal To “WEST”….and…
- Document ID Does Not Begin With “A460” and Does Not Begin With “A470” and Does Not Begin With “A480”
Working with Distribution Accounts
When “Distribution Account” is selected as the Field it enables the Distribution Type drop-down. You must select a Distribution Type. Since criteria are added together with “and”, you should only use one Distribution Type per Filter. When documents are selected the query will include a clause like “where Distribution Type is PURCH”. If you have multiple Distribution Account criteria, one using Distribution Type = PURCH and another using TAX, the resulting query would include “where Distribution type is PURCH and Distribution Type is TAX”. This would return no records because a Distribution Type cannot be both values at the same time.
Selecting Distribution Account also adds “Contains Only” to the Operators. If your payables transactions could be coded to multiple PURCH accounts, you could select transactions that have one and only one PURCH distribution by creating this filter:
- Distribution Account PURCH Does Contain Only “200-100-01”
The account numbers entered into the Values list can be complete accounts, or just one segment, or a portion of a segment.

The criteria shown above would select documents where the PURCH distribution(s) for a transaction use only accounts beginning with “NP” or “NF”.

You can even provide partial values for multiple segments. The example shown above would locate accounts beginning with NP or NF in the first segment, and beginning with “2” in the second segment.
If you build a criteria that uses “Does/Is Not” and “Contain Only”, the resulting query will find transactions where there distributions contain multiple purchases distributions to different accounts where at least one of the distributions meets the specified criteria. In the example above this would be transactions having more than one PURCH distribution where at least one of the distributions has an account number like:
- NP**-2**-** or
- NF**-2**-**
Applying Filters
Once you have created a Filter, select it on the Select Checks Filters window. The window will display the documents located by the Filter.
Documents that are On Hold or Voided will not be included, and Vendors which are On Hold will not be included. There are additional rules used during the Build Batch process that may cause documents shown in Select Checks Filters to NOT be included in the Check Batch. Some examples are:
- In a multicurrency environment if Select Checks window is set to Batch Currency Only and the Currency ID on the Batch is not used on any of the selected transactions.
- If the Check Batch is EFT but none of the selected transactions are for an EFT Vendor.
- If after displaying documents in Select Checks Filters another user creates a Check Batch that includes one of the documents.
The Select Checks Filters window displays a list of POTENTIAL documents to be included in a Check Batch. GP is going to apply additional rules when building the Check Batch which may cause one of the selected documents to not be included in the Batch, but it will not include any documents that are NOT displayed by the Filter (the Filter results are the only documents from which GP can choose for inclusion in the Check Batch).
You can unmark specific documents if you wish to exclude them. The “X” column header will mark all/un-mark all when the X is clicked.
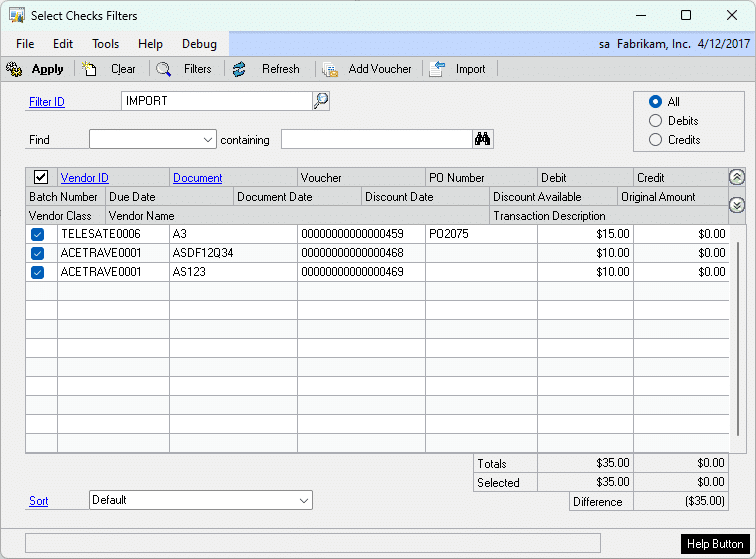
FIND: locate specific documents by using the Find….Containing search fields. Select a Field from the Fields dropdown list, then enter a search term. A “contains” search will locate all documents where the selected field contains the value entered. In the example above a search for Document Number containing “AS” would locate two documents. Clear the search term field to redisplay all documents.
ADD VOUCHER: single documents can be manually added to the list of selected documents. You might use this when the Filter selects most, but not all, of the documents you want to apply.
REFRESH: The Refresh button re-executes the Filter’s query. If documents have been marked/unmarked, that work will be lost. Refreshing the query will pull in new documents if additional documents were created after the Filter was selected.
CLEAR: Clearing the window will un-apply a currently applied Filter, and clear any currently selected documents.
SORT: You can build custom sorting options. By default the window sorts by Document Type then Voucher Number.
To create a new Sort, either type a name for the new sort into the Sort box, or click the Sort Zoom (blue underlined “Sort”).

Sort: Enter a Description for the Sort. The Sort options are visible within the GP Company database (they are not specific to the user but are visible to anybody who has access to the Select Checks Filters window).
Field: Select the field on which you want to sort. Click the PLUS button to add the field to the sort. Add fields in the order by which you want the documents sorted. As shown above, the documents will be sorted first by Transaction Description then by Document Date.
You cannot re-order the fields. If you make a mistake in the fields selected, or the order of the fields, you must delete the Sort and re-enter it.
Delete: deletes the Sort.
Applying Filters:
When you are ready to create a Check Batch for the selected documents, click the APPLY button. The Select Checks Filters window will remain open.
Build a Check Batch as you normally would using the Select Payables Checks window.
You can select a different Filter, apply it, and add additional transactions to the batch.
The filter will remain active until you click CLEAR on the Select Checks Filters window, or until you close the Select Checks Filters window. If you close Select Checks Filters before clicking Build Batch on Select Payables Checks it will clear the filter and the batch will be built with NO filter.
IMPORT: Vouchers to pay can be imported from Excel or from SmartList. When importing from Excel the first three columns must be:
- Vendor ID
- Document Number (the Vendor’s Document Number, not the GP Voucher Number)
- Current Trx Amount
The import will validate that the Vendor ID exists, the Document Number exists for the Vendor, and the imported Current Trx Amount matches what is in GP. The Current Trx Amount is not used beyond performing this verification step. If there are any errors they will be written into column D in the spreadsheet.
Importing from SmartList requires that the first columns be:
- Vendor ID
- Document Number (the Vendor’s Document Number, not the GP Voucher Number)
- Current Trx Amount
The same validation steps are performed as with the Excel import, however there is no reporting of individual errors. If any errors are encountered a warning box will be displayed indicating that there were errors in the import.
To use either import method you need to create a Filter ID called IMPORT. Setup the Filter as shown below:
- “Due Date “
- “Does/Is”
- “On or Before”
- 12/31/9999
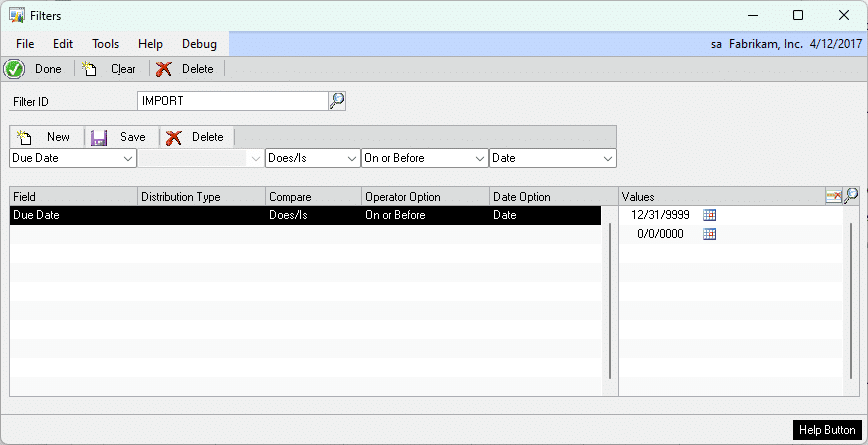
The purpose of the IMPORT filter is to pull all possible documents into Select Checks Filters. The import routine will keep the documents provided in the import and remove the remaining documents from the Select Checks Filters window.