Purchase Order Revision Levels
HelpID: 497022032, 497022027, 497022026, 497022079
PO Revision Levels enables tracking Item Revision Levels on the PO Line. Normally Dynamics GP pulls the current Revision Level from Item Engineering when the PO is printed, and the Revision Level is not stored on the PO Line. If the Revision Level changes and the PO is reprinted, the new Revision Level will display. Since PO Rev Levels tracks the revision saved with the PO Line, the PO can be reprinted at any time with the correct Rev Level. Also, since PO Rev Levels tracks changes, a complete historical record is maintained of the rev level from the time the line was created.
PO Revision Levels tracks the Revision Level of the part at the time it was ordered, supports tracking a history of revision level changes per line, and supports ordering the same part at different Revision Levels.
PO Rev Levels can be used with or without GP Manufacturing.
Setup
Navigation: Tools >> Setup >> Manufacturing >> MFG PowerPack Setup
Mark the box next to “PO Revision Levels*”.
Double-click on “PO Revision Levels*” to open the Setup widow.

Allow Entering PO Rev on-the-fly: PO Rev Levels has a window for entering the current Revision Level for an item, and for tracking the revision history. When entering a new PO Line the current revision level for the item will be assigned automatically. You can open the PO Rev Level Entry window to select a different rev level (i.e. if you need to order an earlier rev of a part). The Allow Entering PO Rev on-the-fly determines whether or not you can manually add a new rev through the PO Rev Level Entry window, or if you can only select from existing revs entered through the Item Revision Maintenance window.
Prompt when adding a new PO Rev: this option is only enabled if Allowed Entering PO Rev on-the-fly is enabled. If enabled, when a new rev is manually entered the system will check whether or not it exists in the Item’s Revision History, and if it does not exist, the user will be prompted:

Show In Title Bar: For each of the windows in the list, “Show In Title Bar” will display the Item’s Revision Level when PO Line is selected.

Add to Item Description: when enabled, the Item’s Rev will be added to the Item Description field. The Item Description field will be disabled to prevent manually editing the Rev Level. As shown below, the Rev Level is A1.

Because the Rev Level is added to the Item Description is gets saved to the database. It will therefore print on documents, such as the PO or PO Receipt.
Another effect of having the Rev Level in the Item Description is that it flows through the rest of Purchase Order Processing. So if Add to Item Description is marked for PO Entry, all POP windows downstream from PO Entry (i.e. PO Receiving, PO Inquiry, etc.) will also display the Rev Level in the Item Description. If you mark Add to Item Description for PO Entry, all checkboxes below that will become marked automatically, and disabled.
Likewise, if Show In Item Description is marked at the PO Receiving level, all PO Receiving windows below that will be auto-marked and disabled.
Add to Vendor Item Description: See Add To Item Description.
Rev Level on Reports
There are three methods for displaying the Revision Level on the purchasing reports. The first method is to use the Alternate Reports included with MFG PowerPack. See the Report Security for using the Alternate Dynamics GP reports provided with MFG PowerPack, and for using the Word Template (GP2010 and above).
The second method is to use the Report Writer User Defined Function called rw_TableLineString. This allows you to add Revision Level to an existing PO Form. See the Report Writer section for more details.
The third method is to enable Show Revision Level in Item Description or Vendor Item Description. The Rev Level will then print on any existing PO form without further modification because the Rev Level will be contained in the Item Description field.
Item Revision Maintenance
When PO Rev Levels is installed with manufacturing, it will synchronize with the Revision Levels from Item Engineering. The Revision Level field will then be locked on Item Engineering, and changes to Revision Level must be made in the Item Revision Maintenance window. Item Revision Maintenance can be opened from Item Engineering via the Additional menu.
Navigation: Cards >> Inventory >> Item Revision Maintenance

The Current Rev is displayed in the upper-right hand corner of this window.
Add a new Rev Level by filling in the New Rev Level and Description fields. Then click SAVE. There is no way to delete an Rev Level. If you make a mistake, enter another “new” Rev. You may want to note in the description that the prior Rev was a mistake and that it should not be used.
When Manufacturing is present, the New Rev Level is also written to the Item Engineering table (IVR10015). This ensures that the current rev is still visible within manufacturing.
Using PO Revision Levels

The Purchasing Revision Entry window is available from the following windows:
- Purchase Order Entry
- Purchasing Item Detail Entry
It is accessed from Extras >> Additional >> PO Line Rev Numbers. It can also be opened directly by pressing CTRL + 9.
- Item Rev – The current Revision Level from Item Revision Maintenance.
- Initial Rev – First Revision Level entered for the PO Line.
- Current Rev – Last Revision Level entered for the PO Line.
- Scrolling Region – Revision Level history for the PO line Item.
When an Item is added to Purchase Order Entry (or through the Line Detail window) the system will automatically record the current Rev Level from Item Revision Maintenance. This is recorded as the “Initial” Rev in Purchasing Revision Entry.
Depending on PO Rev Level Setup, you may be able to add a new Rev Level by typing the Rev Level into the NEW REV field. If you manually enter a Rev that does not exist in Item Rev Maintenance, you will be warned of the condition and asked if you would like to continue. You may use a Rev that does not exist in Item Rev Maintenance. Whether or not the system alerts you after entering a Rev Level that does not exist in the Item’s Revision History depends on Setup.
To select an existing, historical rev, click the drop-down button (shown above by the red arrow) and select one from the list.
To change the Rev Level you must provide a description of the change in the Comment field. The User ID and Date/Time of the change are recorded automatically.
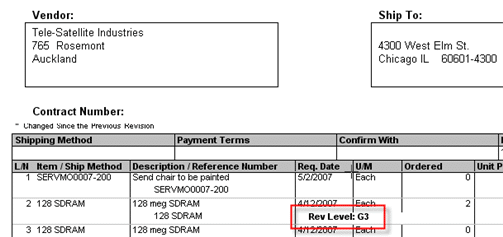
The most recently entered Rev in the PO Rev Entry window (the Current Rev Level) will print on the PO.
Once any quantity of a PO Line is received the PO Rev Level for the line may not be changed. The PO Rev Level Inquiry window will open, instead of the Entry window, if the PO Line is fully or partially received.
If the Rev Level needs to be changed on a partially received line you must cancel the remaining quantity and enter a new line.
Revision Inquiry
The Purchasing Revision Inquiry window is available from the following windows:
- Purchase Order Inquiry Zoom
- Purchasing Item Detail Inquiry Zoom
- Receivings Transaction Entry
- Receivings Item Detail Entry
- Select Purchase Order Items (“Auto Receive”)

It is accessed from Extras >> Additional >> PO Line Rev Numbers, or by pressing CTRL + 9.
Fields
- Item Rev – Revision Level from Item Revision Maintenance.
- Initial Rev – First Revision Level entered for the PO Line
- Current Rev – Last Revision Level entered for the PO Line.
- Scrolling Region – Revision Level history for the PO line Item.
Report Security
MFG PowerPack contains Alternate Dynamics GP Report versions of three Purchasing reports:
- POP Purchase Order Blank Form
- POP Purchase Order Other Form
- POP Receivings Posting Journal
Use of these Alternate Dynamics GP Reports is OPTIONAL. PO Rev Levels also has an integration to a report writer function which will allow you to print the Current Rev Level on your existing POP report forms. See section Report Writer, and skip this section.
Security must be granted to these reports when using PO Rev Levels to be able to print the Current Rev Level on the reports. Follow GP instructions for creating a Security Task that grants access to these reports, and assign that Task to user Roles.
If using the Word Template for POP Purchase Order Blank Form, skip ahead to the Word Template section.
The alternate reports will display the current item Revision Level on the reports.
The POP Purchase Order Other Form is modified to display the Current Rev Level of the Item as shown:
The POP Purchase Order Blank form:

The POP Receivings Posting Journal is modified to display the Current Rev Level of the Item as shown:

Report Writer
Revision Level can be added to an existing PO Report Form by using the Report Writer User Defined function called rw_TableLineString.
Step-1: Create a calculated field to change the datatype of ORD to be currency.
The rw_TableLineString function requires an input for the “line number” that has a currency datatype. ORD is a long integer.
- Open the PO Form in Report Writer
- Select Calculated Fields from the Toolbox, then click NEW
- Name the field: cyLineSeq
- Result Type = Currency
- Click the FIELDS tab.
- In the Resources list, select Purchase Order Line Rollup Temp. Select the ORD field.
- Click Add
- Click OK to save the Calculated Field.
Step-2: Create a calculated field for Revision Level.
- Select Calculated Fields from the Toolbox, then click NEW
- Name the field: sRevLevel
- Result Type = String
- Click the FUNCTIONS tab, click User-Defined, select Core = System, then Function = rw_TableLineString
- Click Add
- Add the Product ID
- Click the CONSTANTS tab, select Type = Integer, enter 4970, then click ADD.
- Add the Report Name
- On the Contants Tab, select Type = String, enter the name of the report, then click ADD. MFG PowerPack is expecting one of the following values depending on which report your are modifying. If you are modifying any of the Purchase Order Forms, use PO. Likewise, if you are adding Rev Level to a PO Receipt report, use RECEIPT.
- PO (passing in PO Number and ORD)
- RECEIPT (passing in Receipt Number, PO Number and ORD).
- On the Contants Tab, select Type = String, enter the name of the report, then click ADD. MFG PowerPack is expecting one of the following values depending on which report your are modifying. If you are modifying any of the Purchase Order Forms, use PO. Likewise, if you are adding Rev Level to a PO Receipt report, use RECEIPT.
- Add the Document Number
- On the Fields tab, select Resources = Purchase Order Line Rollup Temp, select Field = PO Number, then click ADD.
- Add the Document Type
- Since there is not a “Type” value for a PO, add a Constant = 0. Click the Constants tab, select Type = Integer, enter 0 (the number zero), then click ADD.
- Add the Line Sequence
- This is where you use the cyLineSeq created above. Click the Fields tab, select Resources = Calculated Fields, select Field = cyLineSeq, then click ADD.
- Add the second Line Sequence
- Purchase Orders only have one line sequence number, so here add a Currency Constant of 0. Click the Contants tab, select Type = Currency, enter 0 (zero), then click ADD
- Add the Data Control
- This is an integer that tells MFG PowerPack which piece of data to return. In this case there is only one, Rev Level, so add an Integer Constant of 1. Click the Constants tab, select Type = Integer, enter 1, then click ADD.
- Click OK to save the calculated field.
Add sRevLevel to the modified PO Form, and format as needed.
Using the technique above, Rev Level can be added to any report, as long as you can pass in the PO Number and ORD.
To add Rev Level to the POP Receivings Posting Journal, follow the instructions above, with the following changes:
Step-1
Use Purchasing Posting Journal TEMP.ORD
Step-1a: Create a calculated field to concatenate Receipt Number and PO Number. Since there is only one string field to pass in the document number, these two values must be combined into a single field.
- Select Calculated Fields from the Toolbox, then click NEW
- Name the field: sKeyFields
- Result Type = String
- Click the FIELDS tab, select Resources = Purchasing Posting Journal TEMP, Field = POP Receipt Number. Click ADD.
- Click the CAT button
- Click the Constants tab, select Type = String, enter ~ (the tilde sign), then click ADD.
- Click the CAT button
- Click the FIELDS tab, select Resources = Purchasing Posting Journal TEMP, Field = String6. Click ADD. (PO Number is stored in String 6).
- Click OK to save the calculated field.
Step-2:
7.a: Report Name = RECEIPT
8.a: use the calculated field created above called sKeyFields
Word Template
For Version 11 (GP2010) and above a Word Template is available for the POP Purchase Order Blank Form.
Step-1
Grant security to the Alternate Dynamics GP reports as described above.
Step-2
Set the WilloWare Word Template as the Default Template.
Select Reports >> Template Maintenance.
In the Report Name field click the drop-down and select More Reports.

Select Product = Mfg PowerPack, Series = Purchasing, and Status = Alternate.
Click on POP Purchase Order Blank Form, then click Select.
On the Report Template Maintenance window click the ADD button:
![]()
The installation placed the WilloWare template into the GP\Data folder. The default location for this is:
C:\Program Files\Microsoft Dynamics\GP2010\Data
Locate the template: “WW POP Purchase Order Blank Form.docx”
In the Template Maintenance window select the WilloWare template, then click ASSIGN >> Company.
Mark the Company database(s) where you want to use the template.
Click the DEFAULT button. Select the Template to use as default. Click SAVE.
Click SAVE on Company Assignment.
Close the Report Template Maintenance window.
Purchasing must be set up to use the BLANK PAPER report for the template to work. Go to Tools >> Setup >> Purchasing >> Purchase Order Processing.
