Quick Disassembly
HelpID: 497022009
Quick Disassembly uses the GP Manufacturing BOM, or the Picklist from a Manufacturing Order, to disassemble a finished good item. It creates an Inventory Adjustment to adjust the Finished Good item out of GP and add the Components into stock.
Setup
Navigation: Tools >> Setup >> Manufacturing >> MFG PowerPack Setup
Mark the box next to “Quick Disassembly”. Restart the GP client to activate this feature.
Using Quick Disassembly
Navigation: Transactions >> Inventory >> Transaction Entry
Quick Disassembly uses the Inventory Transaction Entry window to create the disassembly transaction. Start by creating a new transaction. Assign a Batch ID. Later in the process an Edit List will print for the Batch, so it may be helpful to create a Batch ID assigned only to the disassembly transaction.

In the first row of the scrolling window, enter the Item Number to be disassembled (such as 100XLG). Enter the quantity to disassemble (this should be a negative quantity, since the units will be adjusted out), and select serial/lot numbers and bins as needed.
The disassembled item does not have to be the first row, but this will be the most common way to use Quick Disassembly.
Press the Tab key until your cursor enters a new line, which saves the previous line. Click back into the line with the disassembly Item Number. With the disassembly Item selected, go to Extras >> Additional >> Quick Disassembly.
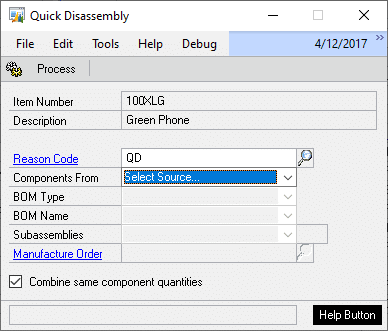
Reason Code: Select a Reason Code to be applied to the components. The Reason Code must allow “Increase Adjustments” because the components will be ADDED to GP Inventory. If a GL Offset Account is provided, it will be used on all of the component lines.
Quick Disassembly does not do anything with labor, machine or overhead costs. If there is a cost difference between the Finished Good removed from the system and the Raw Materials added into the system, that difference will hit the Offset Account. As shown above, a Quick Disassembly Reason code can be used that has an associated “Disassembly Variance” account. Any cost difference associated with labor, machine and overheads will remain in that account after the transaction is posted. With Actual Cost materials the total Finished Good cost could be manually allocated to the components, however the software does not perform this calculation.
Components From: select the source of components for the disassembly transaction. Components can be retrieved from a Manufacturing Bill of Materials (using any of the BOM Types), or the Picklist from a Manufacturing Order. See below for more detail on disassembling By Bill of Materials or By Manufacturing Order.
The Quick Disassembly window will remember the settings listed below. Each time the window opens, the settings used previously will be selected automatically. For example, if the Components From option is Manufacturing Order, it will default to Manufacturing Order. The settings are remembered on a per-User ID basis.
- Components From
- BOM Type
- Subassemblies
By Bill of Materials
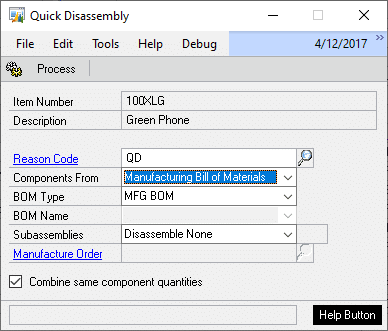
By default, the system will use the MFG BOM, however, you can also select any of the other BOM Types. The disassembly process will use the selected BOM to add components into inventory.
BOM Type: select from one of the available BOM Types. If ARCH BOM or CONFIG BOM is selected, you will also need to select a BOM Name.
BOM Name: provide a BOM Name if BOM Type is set to ARCH BOM or CONFIG BOM.
Subassemblies: select how you want to handle the disassembly of subcomponents. The options are:
- Disassemble None: adds only the first level components below the top level parent. NOTE: this is the same as using Disassemble All To Level with Level = 1.
- Disassemble Phantoms: this works in a manner similar to a manufacturing order where built subassemblies that have a “Regular” BOM are drawn from inventory, so with Quick Disassembly they are put back into inventory. “Phantoms” are made while producing the top-level finished good, so with Quick Disassembly a Phantom component is itself disassembled into the raw materials.
- Disassemble All: any item on the BOM that has a Bill of Materials will be disassembled into its subcomponents.
- Disassemble All To Level: any item on the BOM that has a Bill of Materials will be disassembled into its subcomponents, but the process will stop at the specified level (enter level in the field adjacent to the Subassemblies dropdown).
Combine Same Component Quantities: If the Bill of Materials can have the same item in multiple places on the BOM, you can mark this to have all of the quantities merged into a single line on the adjustment.
Components from the BOM will be added to the Inventory Adjustment. Only “Sales Inventory” type items will be added.
When ready to create the disassembly click PROCESS.
The Quick Disassembly window will display process information in the Status Bar at the bottom of the window. When it is finished making the disassembly transaction, the Inventory Transaction window will refresh and the Inventory Transaction Edit List will print. It is important to review this report as it will show which lines need to have serial or lot numbers entered. You will not be able to post the transaction until serial/lot number information is complete.
U of M: Components are always added to the transaction in the Base Unit of Measure.
Quantity: The BOM Quantity is multiplied by the quantity of the finished good item being disassembled, plus the Fixed Quantity.
Unit Cost: The Item’s Current or Standard Cost, depending on the Item.
Site ID: The Transaction Location for each component is pulled from one of the following locations (listed in order of preference):
- The Default Site ID on the Inventory Transaction. If the item-site combination is not valid, or there is no Default Site ID then #2.
- The BOM “Issue From” location specified at the component level. If this is empty, then #3.
- The item’s Default Site from Item Quantities Maintenance. If this is empty, then #4.
- The default Manufacturing Scheduling Preference Draw From site. If this results in an invalid item-site combination, then #5
- The first Item-Site combination specified in the Item Quantities Master table (effectively the first Item-Site in alphabetical order by Site).
Multi-Bins: If multi-bins is enabled, the outputs will be assigned to a default bin using the following logic (in order of preference). The Site was assigned as described above.
- The Item-Site Default Bins setting for the MO Receipts bin
- The first Item-Site-Bin record (i.e. the first bin alphanumerically assigned to the Item-Site).
- The first Bin assigned alphanumerically to the Site
GL Accounts: Quick Disassembly uses the Inventory and Inventory Offset Accounts from the Item. If a Reason Code is used which has an Offset Account for Adjustment Transactions, that account will be used for every component. It also considers the GL Site segment assigned to the Site ID and it will attempt to change the GL account accordingly.
By Manufacturing Order
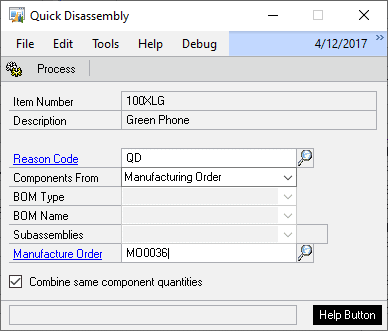
Manufacture Order: Enter a Manufacture Order Number or select one from the Lookup. The Lookup shows only the MO (or MOs) that made the item.

For Serial/Lot numbered finished goods, the lookup will show only the MO (or MOs) that made the Serial Number or Lot Number.
The MO must be Partially Received, Completed or Closed, and it must have a Picklist. If the Picklist has been deleted, the MO cannot be used for the disassembly transaction.
Components from the Picklist will be added to the Inventory Adjustment. Only “Sales Inventory” type items will be added.
Combine Same Component Quantities: If the Picklist can have the same item in multiple places on the picklist, you can mark this to have all of the quantities merged into a single line on the adjustment.
When ready to create the disassembly click PROCESS.
The Quick Disassembly window will display process information in the Status Bar at the bottom of the window. When it is finished making the disassembly transaction, the Inventory Transaction window will refresh and the Inventory Transaction Edit List will print. It is important to review this report as it will show which lines need to have serial or lot numbers entered. You will not be able to post the transaction until serial/lot number information is complete.
U of M: Components are always added to the transaction in the Base Unit of Measure.
Quantity: The Picklist Quantity is divided by the MO Start Quantity, and then multiplied by the quantity being disassembled. This number is rounded based on the Component’s Quantity Decimals setting. If the BOM used for the Picklist had a Fixed Quantity, or manual changes were made to the Picklist (changing a quantity, or adding components), this calculation may not arrive at the correct quantity on the Inventory Adjustment. Be sure to check the quantities after the transaction has been created.
Unit Cost: The Item’s Current or Standard Cost, depending on the Valuation Method. For Current Cost Items, the cost will be the average unit cost of the material issued to/consumed by the Manufacturing Order to date. The Unit Cost is retrieved from the posted “Material Issue” Inventory Adjustments.
The Average Cost is calculated based on the average Unit Cost of all “Issues” of a component, as recorded on the Inventory Adjustment created by the Issue (which includes Backflushing). It uses an average because GP does not keep track of the individual unit costs, so even though two components may have come from two different receipts and have two different costs, the posted Issue transaction records an average. Additionally, if there are multiple issue transactions, it is not possible to identify the specific cost layer of an individual component.
This is also true for serial/lot numbered components. Once posted to history, GP records only a combined average unit cost of the components.
Site ID: The Transaction Location for each component is pulled from one of the following locations (listed in order of preference):
- The Default Site ID on the Inventory Transaction. If the item-site combination is not valid, or there is no Default Site ID then #2.
- The Picklist Draw From location for the component. If this is empty, then #3.
- The item’s Default Site from Item Quantities Maintenance. If this is empty, then #4.
- The default Manufacturing Scheduling Preference Draw From site. If this results in an invalid item-site combination, then #5
- The first Item-Site combination specified in the Item Quantities Master table (effectively the first Item-Site in alphabetical order by Site).
Multi-Bins: If multi-bins is enabled, the outputs will be assigned to a default bin using the following logic (in order of preference). The Site was assigned as described above.
- The Item-Site Default Bins setting for the MO Receipts bin
- The first Item-Site-Bin record (i.e. the first bin alphanumerically assigned to the Item-Site).
- The first Bin assigned alphanumerically to the Site
GL Accounts: Quick Disassembly uses the Inventory and Inventory Offset Accounts from the Item. If a Reason Code is used which has an Offset Account for Adjustment Transactions, that account will be used for every component. It also considers the GL Site segment assigned to the Site ID and it will attempt to change the GL account accordingly.
NOTE: Quick Disassembly does not keep track of the quantity disassembled for an MO. For example, if the MO produced 1-unit, and you disassemble that unit, you could create another disassembly transaction using that same MO.