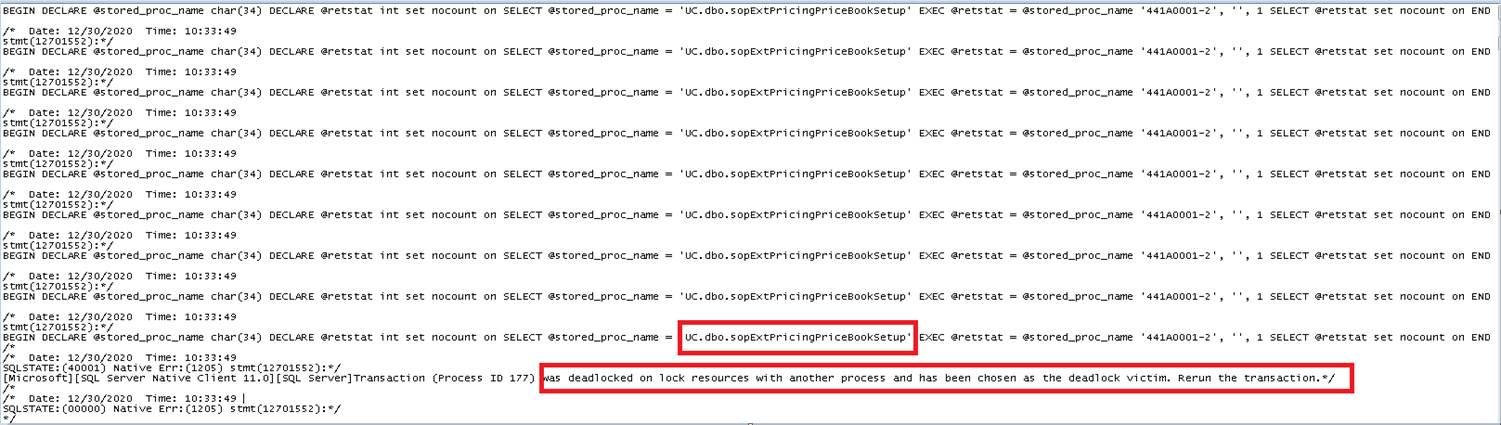
V12.1.38 / 14.1.27 / 16.1.17 / 18.1.9
* MO Doc Type Setup: Added two new options, “Disassembly Wizard: Remove Non-IV Items” and “Disassembly Wizard: Reverse Non-IV Costs”. The first option will cause the Wizard to create a Disassembly MO that does not include any non-inventory type items. The second option will cause the Wizard to add non-inventory type items to the Outputs tab and then during posting to create a non-inventory Journal Entry that reverses the debits/credits from the original MO.
Author: admin
MFG PowerPack Release 2019-08-01
V12.2.149 / 14.2.96 / 16.2.62 / 18.2.23
* Vendor Pricing: (1) Addressed issue with import utility that caused it to use an incorrect currency decimals setting which resulted in the price list being invalid (#20192485), (2) Added new error check to look for missing Item-Currency ID assignment records.
* SVC Equipment Suite: (1) Rebuild Configurations Utility: addressed issue that could cause very slow performance/freeze, (2) Added a routine to insert a default SVC Master Records (SVC00999) record if it is missing so that the Field Service stored procedure that creates a New Equipment ID does not fail.
More information about: Vendor Pricing
More information about: Service Equipment Suite
Engineer To Order Release 2019-07-30
V12.1.33 / 14.1.16 / 16.1.9 / 18.1.5
* ME: (1) Added reports for Estimated Quantities, Router, and Other Costs. (2) Addressed duplicate key error caused by copying an ME BOM to a new ME BOM where the BOMID being used would create a duplicate of a subassembly BOM (#20192452)
The PRINT button on the Mfg Estimation window used to print a Bill of Material report. It now opens the new Print Options window shown below.
Print Options provides access to the original Bill of Material report along with the three new reports (Routing, Other Costs, and Estimation Quantities).
GP PowerPack Release 2019-07-22
V12.1.135 / 14.1.78 / 16.1.46 / 18.1.18 Changes 22-JUL-2019
* Select Checks Filters: (1) addressed issue with filtering on Voucher Number that caused error “Incorrect syntax near keyword ‘like'” (#20192402), (2) Added a Delete Row button to the Values list, (3) Added additional controls to the Values List and the Filter Save button to ensure a Filter ID has been entered.
Select Checks Filters works with the Dynamics GP Select Payables Checks window to provide a large number of inclusion/restriction criteria for filtering payables when creating a check run.
If you also have GP PowerPack Tweaks, consider enabling the “PM Select Checks Status Message” tweak to have a status message displayed during the long running check batch building process so you can tell that GP is still working on it!
GP PowerPack Release 2019-07-18
V12.1.134 / 14.1.77 / 16.1.45 / 18.1.17 Changes 17-JUL-2019
* SalesPro Item Lookup: (1) addressed issue that cause the GoTo menu options to not open the selected window (#20192232), (2) Added Ship To Address to the window so that Customer Item Sales can be restricted by Ship To Address, (3) The GoTo button options are now dynamically added based on products installed and user security.
SalesPro Item Lookup is an enhanced Inventory Item Lookup for Sales Transaction Entry.
The new Ship To field will default to the Ship To Address Code from Sales Transaction Entry. It restricts the items shown in the Customer History window (A), and both views shown in window C (Invoices with selected Item, and Items Purchased with selected Item). Clearing the Ship To field makes the window display information based on all sales invoices for the Customer.
The GoTo button now only shows options that opens windows to which the user has security, and only for products that are installed (i.e. it will not show Manufacturing options if GP Manufacturing is not installed).
LeanMFG Release 2019-06-26
V12.1.37 / 14.1.26 / 16.1.16 / 18.1.8 Changes
* MO Inquiry: Addressed issue that caused it to not show correct Totals at the bottom of the Outputs scrolling window.
* MO Entry: Addressed issue in the Posting routine that was not correctly retrieving the Journal Entry from posted Finished Good Inventory Adjustment if there was also a Non-Inventory Journal Entry (i.e. for labor) and/or a Variance Journal Entry. Although the transactions posted OK, this issue then caused the MO Inquiry window to not show the Posted Output JE (appearing as if it wasn’t created), which caused the window to show that there was a variance even though a Variance JE had not been created. (#20192152)
Manufacturing Order Picklist Draw From Site
The Manufacturing documentation has this to say about specifying sites:
If no issue-from or issue-to site is specified for a component, default sites will be used.
Default values for the issue-from site site
Refer to the following information about how the issue-from site is determined.
- The issue-from site from the bill of materials line entered in the Bill of Materials Entry window is used.
- If a site hasn’t been specified in the Bill of Materials Entry window, the DEFAULT SITE for the item entered in the Item Quantities Maintenance window is used.
- If a Default Site hasn’t been specified in the Item Quantities Maintenance window, the Draw Inventory From entered in Manufacturing Order Entry window is used. (The default site comes from the scheduling preference you’ve selected for the manufacturing order, but you can change it.)
However, if you leave the BOM Line Issue From Site blank, you cannot get Manufacturing to use the Item’s Default Site when creating a Picklist. Here’s why…
The BOM Line “Issue From” for CORDG is blank:
The “Default Site ID” for CORDG is SOUTH:
The “Draw Inventory From” site on the Scheduling Preference is WAREHOUSE:
The “Draw Inventory From” site on the Manufacturing Order is populated from the Scheduling Preference, so it is set to WAREHOUSE:
Below is the “Build Picklist” code that sets the Draw From Site:
In plain English this says:
If the “Draw From” site on the BOM Line is empty then
If the Draw From Site on the Manufacturing Order is NOT empty then
Use the Draw From Site on the Manufacturing Order
Else
Use the Item Quantity Maintenance “Default Site”
Else
Use the BOM Line “Draw From” site
Note that while we can leave the “Issue From” site blank on the BOM Line, we cannot leave the “Draw From” site blank on the Manufacturing Order–it is a REQUIRED FIELD (shown by the Red, Bold font). This means that the “Draw From” site on the Manufacturing Order will NEVER be empty.
Re-reading the logic above considering that the “Draw From” site on the Manufacturing Order will always have a value we can see that the “Build Picklist” code will never reach the line that tells it to use the Item’s Default Site.
If the “Draw From” site on the BOM Line is empty (which it is…) then
If the Draw From Site on the Manufacturing Order is NOT empty (which it isn’t…) then
Use the Draw From Site on the Manufacturing Order
Else
Use the Item Quantity Maintenance “Default Site”
Else
Use the BOM Line “Draw From” site
Which means the Draw From Site has two options: Either it is provided by the BOM Line site, or it is provided by the Manufacturing Order.
Engineer To Order Release 2019-06-17
V12.1.32 / 14.1.15 / 16.1.8 / 18.1.4 Changes
* ME: Addressed rouding issue in variable & fixed over-head calculations that caused it to round those values to zero when using OH based on percentage (rather than amount) (#20191994)
MFG PowerPack Release 2019-06-10
V12.2.148 / 14.2.95 / 16.2.61 / 18.2.22
* MO Split: Addressed issue in installation routine that can cause error “Cannot insert duplicate key into object W4970901” (#20191977)
MFG PowerPack Release 2019-05-16
V12.2.147 / 14.2.94 / 16.2.60 / 18.2.21
* Service Equipment Suite: addressed issue that caused error “Cannot insert the value NULL into column INSTDTE” in non-US date format environments.
MFG PowerPack Release 2019-05-06
V12.2.146 / 14.2.93 / 16.2.59 / 18.2.20 2-MAY-2019
* Item Copy: (1) Routing Map now has options for how it creates the Routing Name. Under the “Routing” option, click the image next to the “Default Routing Name” setting to change the default between Destination Item Number and Source Routing Name (2) Under “Item Currency Maintenance” added a new option to zero List Price (3) The installer will now add a stored procedure to the database (wspItemCopyPost) that will run after all other copying tasks. The stored procedure can be edited to include any custom ‘post copying’ updates that are needed.
NOTE: The Minor Version number increments with this release, so the full installation routine needs to be run to create new SQL objects.
Zero List Price appears below the Item Currency Maintenance option:
The Routing Name Default setting appears under the Routing option:
Click on the image to the left of “Default Routing Name” to toggle between the options.
The new stored procedure (wspItemCopyPost) has no executable code–it is an empty stored procedure that is called at the end of the Item Copy routine. The stored procedure can be edited to add any additional updates you need to run.
MFG PowerPack Release 2019-04-09
V12.1.145 / 14.1.92 / 16.1.58 / 18.1.19
* Item Copy: (1) the window now remembers the “Zero Standard Cost” setting rather than defaulting to enabled. “Zero Standard Cost” setting has been moved off the header section of the window and is in now under “Item Maintenance” (2) Performance improvements, (3) Under “Item Price List Maintenance” added a new option to zero the price list after copying it. (4) Routing Map now creates a default mapping for the primary routing using the Destination Item Number as the Routine Name if no mapping is provided, (5) The Routing Map now clears after copying an item
* MO Split: Added routine to check that default separator character gets set when the MO Split Setup window is never opened.
Consulting ToolKit Release 2019-04-09
V12.1.24 / 14.1.18 / 16.1.14 / 18.1.6 Changes
* Updated Registration Key module to address issue that caused the product to not recognize the registration key (#20191132)
* Virtual Triggers: Added a visual indicator to the Databases pop-out to show when databases have not been marked (red) versus when at least one database is selected (green)
The Virtual Triggers Setup window now highlights the DATABASES pop-out to help remind you to select databases. When no Trigger is displayed the tab is white:
When a Trigger is displayed that has no databases selected, the tab is red:
When a Trigger is displayed that has at least one database selected, the tab is green:
MFGImport Release 2019-04-08
V12.1.44 / 14.1.27 / 16.1.15 / 18.1.8
* Added option to control Zeroing Standard Costs when creating new items with the Item Copy utility in MFG PowerPack.
CompleteCount Release 2019-04-03
V12.1.39 / 14.1.29 / 16.1.22 / 18.1.12 Changes
* Excel Link: fixed issue that allowed importing a count Kit Item Numbers.
MFG PowerPack Release 2019-03-27
V12.1.144 / 14.1.91 / 16.1.57 / 18.1.18
* Addressed issue #20190930 (Invalid object name mops0100). Error caused by “TWK: Edit MO Status Allocation Override” which wasn’t checking if GP Manufacturing was installed.
* Setup Window: (1) Added ability to display both Registered and Unregistered modules in the Suite. (2) Window now checks if MFG and/or Field Service are installed and only displays Modules and Tweaks that require those modules if they are installed.
* Capable To Promise (CTP): Added additional menu on SOP Inquiry to open the CTP window.
* Where Used Inquiry: addressed issue when zooming to a new Inventory BOM when a current BOM is displayed and it has changes.
The MFG PowerPack Setup window now has radio buttons to display Registered and Unregistered modules.The Unregistered Modules view shows all modules contained in the Suite that are not available with the current Registration Key.
MFG PowerPack contains many modules that required the Dynamics GP Manufacturing module and/or the Field Service module. The Setup window will not only display MFG PowerPack modules that can be used (i.e. it will not show a module if it requires Manufacturing and the Manufacturing module is not installed).
GP PowerPack Release 2019-03-26
V12.1.133 / 14.1.76 / 16.1.44 / 18.1.16
* Setup window: (1) moved Alerts, Login Monitor, and System Access Lock from the GoTo button into main window, (2) The main window now has an option to view both registered and unregistered modules
The GP PowerPack Setup window has new radio buttons to show Registered and Unregistered modules.
The Unregistered view shows all modules in GP PowerPack that are NOT registered. Additionally, the setup windows for several modules previously appeared only on the GoTo button and not in the main list of Registered Modules. These include: Alerts, Login Monitor, and System Access Lock. This was a frequent source of confusion because if you were registered only for Alerts, the main setup window was blank because Alerts was on the GoTo button. Now these three modules will appear in the main GP PowerPack list of registered modules.
Blanket PO Release 2019-03-24
V12.1.35 / 14.1.24 / 16.1.10 / 18.1.3 Changes 24-MAR-2019
* NEW: Planned Release Wizard. This utility will calculate and create a number of releases, such as creating a release on the first Monday of every month. It can create planned releases using a fixed quantity until the Control Quantity is met, or, it can divide the Control Quantity evenly over releases in a specified time frame.
* NEW: Auto-Firm Releases Utility. This utility will automatically create Firmed Releases when the Required Date meets selection criteria. Releases can be created before the Required Date by using the Vendor Lead Time and/or Purchasing Lead Time.
The new Release Wizard window is shown below.
The Release Wizard is accessed from the PO Release Entry window. In the example above, it calculated Planned Releases for each Monday between 4/12/2017 and 6/12/2017. When the desired scheduled is achieved, the Release Wizard can create a Planned Release for each Date/Quantity, adding them to the PO Release Entry window.
MFG Import Release 2019-03-21
V12.1.43 / 14.1.26 / 16.1.14 / 18.1.7
* Changes to log-out routines to prevent resource conflict with Rockton Security Auditor
* BOM Import: if the Component Quantity column in the import spreadsheet was formatted as Text, the import routine converted the string to a currency value using the dexterity function called value(). This fuction interprets any non-numeric character as a “stop” value, so 1,255.55 is returned as “1”. We replaced all use of the value() function with our own routine that correctly parses a complete number from a string.
* Routing Import: the change described above for BOM Import was also applied to the Routing Import utility.
GP PowerPack Release 2019-03-13
V12.1.132 / 14.1.75 / 16.1.43 / 18.1.15 Changes
* Shortage Inquiry: NEW-when zooming to a Sales Transaction the window will automatically scroll so that the select short item is displayed at the top of the scrolling window.
EZImport Release 2019-03-11
V12.1.12 / 14.1.5 / 16.1.3 / 18.1.1 Changes
* First GP2018 Release
* Added Query window: a new GoTo button on the EZ Import Inquiry windows provides direct access to query the EZ Import tables using the new Query window. For example, from the EZ Import Sales Inquiry window, select GoTo >> View Sales Lines, and the query window will show all of the data in the Sales Lines table for the selected Sales Order. The Query window provides a quick way to see all of the “extra” data assocated with a record that is not visible on the Inquiry windows.
GP PowerPack Release 2019-02-20
V12.1.131 / 14.1.74 / 16.1.42 / 18.1.14
* U of M Schedule Change: added a check the update routine for all tables so it skips records that have a blank UofM field. This prevents the update from failing on that table if there is bad data in the table.
GP PowerPack Release 2019-02-14
V12.1.130 / 14.1.73 / 16.1.41 / 18.1.13 Changes
* UPDATE: POP-Tweak: Purchasing Distributions Override–previously contained “PURCH Distributions Override” and “PURCH Distributions By Line”. In this release the second is split out into a separate Tweak (POP-Tweak: Purchasing Distributions By Line). When Purchasing Distributions By Line creates the new distributions, it previously populated the GL Reference with the PO Line’s Item Number. A new setup option allows choosing to fill the Reference field with (1) Item Number, (2) Item Description, (3) Vendor Item Number, and (4) Vendor Item Description. If you currently have Purchasing Distributions Override, the new Tweak “Purchasing Distributions By Line” will be enabled automatically.
GP PowerPack Release 2019-02-11
V12.1.129 / 14.1.72 /16.1.40 / 18.1.12 Changes 11-FEB-2019
* SOP-Tweak: Sales Doc Print Options Defaults-addressed issue that cause the “Print Backordered Items” setting to not be saved/retrieved correctly (#20190390).
CompleteCount Release 2019-02-10
V12.1.38 / 14.1.28 / 16.1.21 / 18.1.11 Changes
* Tag Submit Routing – Lot Reconciliation: a new routine “allocates” the total counted quantity of a Lot Number across the available receipts of a Lot Number (assuming there are multiple receipts of the same Lot Number). Previously the module attempted to “consolidate” split receipts by putting all of the counted quantity onto one lot receipt record and zeroing the others. The new routine eliminates the potential to create a cost variance even through the total count matches the captured quantity. It handles the valuation methods as follows:
** LIFO: it counts forward from oldest receipt to newest so any shortages come out of the most recent recent (the LIFO receipt)
** FIFO: it counts backwards from newest receipt to oldest so any shortages come out of the oldest receipt (the FIFO receipt)
** AVG is treated like FIFO
* Tag Submit Routine now uses ‘User Date’ instead of system date.
* Tag Submit window UI update
MFG PowerPack Release 2019-02-07
V12.1.143 / 14.1.90 / 16.1.56 / 18.1.17
* BOM History Inquiry: addressed issue that prevent setup options from being recognized for BOM History Inquiry.
* MO Split: added a NEW setup option to choose what the Suffix Separator is. Previously the module was hard-coded to use a DASH (i.e. MO00123-001). If MOSplit is already in use, installing this build will detect that and automatically update MO Split Setup to use a DASH as the seprator. Setup will allow using any single character as the separator. This change also addresses a conflict between MOSplit and WilloWare’s MO Generator “Create Child MOs” utility, which also uses a DASH.
MOGenerator Release 2019-01-10
V12.1.90 / 14.1.65 / 16.1.43 / 18.1.10
* MO Receipt Integration: addressed issue in the 7-JAN-2019 build that caused the Build Picklist routine to fail.
* MOGen-Create Child MOs: addressed issue that could cause the routine to run a second time on a Sales Order.
ETO Release 2019-01-18
V12.1.31 / 14.1.14 / 16.1.7 / 18.1.3
* Add/Edit Component: addressed issue that caused error “This BOM Line is already in use” when tabbing out of the BOM Line field.
* ME: Added visual indicator to show when one or more Est Qtys have been marked as Accepted
* ME: Added GoTo option “Create MO”. The ME window can now create a Manufacturing Order for the Item on an Accepted status estimate. If the Estimate is linked to a Sales Line, it will link the MO to the Sales Line.
* ME Notes Windows: added text to the Save and Delete buttons
MFG PowerPack Release 2018-12-05
V12.1.142 / 14.1.89 / 16.1.55 / 18.1.16
* Capable to Promise (CTP): Added integration to SOP Entry. CTP can pull in a selected item, or all items, from a Sales Transaction.
* MO Split: Updated the routine that creates the MOP-SOP record for each split so that it repeats attempting to create the MOP-SOP record until it can confirm the record exists. This was done to address a rare, sporadic issue at a high volume site where a single MOP-SOP (i.e. 1 out of 20 splits) would not get recorded into the MOP-SOP Links table.
* NEW: BOM History Inquiry: This is a “most recently used” list for GP Manufacturing BOM Entry and BOM Inquiry. Also, it adds a hot key (CTRL + Z) to zoom to a selected subassembly. Use CTRL+Z instead of the “Select Item” button on the BOM windows. “Select Item” only works when zooming to a subassembly that has the same BOM Type & BOM Name as the Parent Item (i.e. if the Parent is a MFG BOM and the child is an ENG BOM, it will not zoom to the ENG BOM). The CTRL+Z zoom will load any selected subassembly and as BOMs are viewed they are recorded in the new BOM History window. To return to any previously viewed BOM, simply double-click on it in the BOM History window.
MFG PowerPack BOM History Inquiry
The BOM History Inquiry window is a “Most Recently Viewed” list for the BOM Entry and BOM View windows. It provides quick access to a previously viewed BOM, making it easy to drill down into lower level assemblies and then quickly return to the top level.
It also adds a universal Zoom feature. You can drill into any subassembly by clicking on it in the treeview and pressing CTRL+Z. This will work with any BOM, such as MFG BOM or ENG BOM and also Configured and Archived BOMs.
Quickly retrieve a previously viewed BOM by double-clicking on it in the BOM History window, or click BOM Inquiry to open the BOM in the Inquiry window.
BOM History Inquiry works with both the BOM Entry and BOM Inquiry windows.
BOM History Inquiry also adds a hot-key (CTRL+Z) to zoom to ANY selected subassembly. This addresses an issue with the “Select Item” button where it retains the BOM Type and BOM Name from the Parent Item when attempting to zoom to the Component, so that if a MFG BOM Parent contains a subassembly of another BOM Type (i.e. ENG, CONFIG, ARCH), the “Select Items” button will only zoom back to the MFG BOM of the subassembly.
MOGenerator Release 2019-01-10
V12.1.89 / 14.1.64 / 16.1.42 / 18.1.9 10-JAN-2019
* MOGen-MO Scheduler: Altered the restriction that prevents MOs from being rescheduled if they have MFG Component Transactions so that it allows Allocations.
* MOGen-Create Child MOs: Added check of Item Type so it only attempts to create MOs for “Sales Inventory” type items regardless of the SUBCAT_I setting in the Picklist table. This is check prevents the utility from attempting to process bad data when Picklists or BOMs have been imported into the SQL tables with invalid information.
ETO Release 2019-01-09
V12.1.30 / 14.1.13 / 16.1.6 / 18.1.2 Changes
* Cost Rollup: Changed the routine so it only pulls Component BOM Type = 6 (Mfg Est BOM) and treats subassemblies coming from GP Manufacturing as “buy” items and pulls their cost from Item Maintenance (#20185960). Previously it was incorrectly including other BOM Types (i.e. MFG, ENG, etc), attempting to recalculate the cost but arriving at $0 becuase the BOM for the item wasn’t located in the ETO module.
* Delete Estimation BOM: the previous build’s change to separate Child Windows into separate Forms causeD the Delete routine to fail without deleting anything.
* Add Component: Addressed issue that would allow entering and saving invalid BOM information for a Component.
* Copy BOM Utility: Routing Name can now be provided when copying a GP Manufacturing BOM.
MOGenerator Release 2019-01-07
V12.1.88 / 14.1.63 / 16.1.41 / 18.1.8
* MOGen-Create Child MOs: Addressed issue with new routine to process phantoms that caused the Reschedule MOs utility to not be able to traverse a series of related MOs (Parent MO–Child MOs).
* MO Receipt Integration: Addressed issue that caused the picklist creation to fail when importing components using the W7158MOPick table and the LNITMSEQ fields is greater than 32767 (#20186038).
CompleteCount Release 2019-01-04
V12.1.37 / 14.1.27 / 16.1.20 / 18.1.10 Changes 4-JAN-2019
* ExcelLink: (a) The Setup option “Require Starting Count Before Printing Tags” now applies to Exporting the count to Excel. If the option is NOT marked you will be able to select an unstarted count in the Excel Link window and export it to Excel.
MOGenerator Release 2018-12-28
V12.1.87 / 14.1.62 / 16.1.40 / 18.1.7
* NEW: The Installer will now allow installing new builds on a client without requiring all users to be out of the system. Going forward, “running the install” inside GP will only be required when the Major or Minor Version Numbers change, but it will not be required with each Build Number change (12.0.35 is Major 12, Minor 0, Build 35). The module will still disable itself on a Client PC if it has an older Build.
* MOGen-Create Child MOs: The following information ONLY applies if you use Phantoms that are ARCH BOM or CONFIG BOM (i.e. “named” bills of material). We found an issue with how GP Manufacturing populates the picklist with the components of a Phantom where Named BOMs are involved. When adding the components of a Phantom to the Picklist (PK010033), Manufacturing correctly sets the BOMCat on each component but incorrectly sets the BOMName to the BOMName of the Phantom. This was causing the Create Child MOs utility to fail because it could not locate a valid BOM for subassemblies within a phantom. A separate routine has been added to the Create Child MOs utility that will navigate the parent BOM (rather than the picklist) looking for subassemblies that need to be created because the Picklist contains invalid keys to locate the BOM (#20185966).
* MOGen-Create Child MOs: A new setup option has been added to the MOGenerator Setup window to enable the “Create Child MOs” utility on the MO Entry window.
GP PowerPack Release 2018-12-20
V12.1.128 / 14.1.71 /16.1.39 / 18.1.11
* Eliminated use of a core dexterity function called Activity_GetBackgroundStatus because we found that when it was called to see if any processes were running in the background, it was also terminating all such processes. Normally the Timed Queue has several processes that check for a date change and check for reports to publish. The change affects:
— TWK-SYS: SmartList Favorite-Keep Open
— GPTalk
MFG PowerPack Release 2018-12-05
V12.1.141 / 14.1.88 / 16.1.54 / 18.1.15
* Proposed Cost Update: addresses issue that prevented updating overhead values to $0 (#20185862)
BlanketPO Release 2018-12-05
V12.1.34 / 14.1.23 / 16.1.9 / 18.1.2 Changes 5-DEC-2018
* Build for GP2018R2 compatibility
* Updated WW Internal Resources
* NEW: The Installer will now allow installing new builds on a client without requiring all users to be out of the system. Going forward, “running the install” inside GP will only be required when the Major or Minor Version Numbers change, but it will not be required with each Build Number change (12.0.35 is Major 12, Minor 0, Build 35). The module will still disable itself on a Client PC if it has an older Build.
MFG PowerPack EMOS Query
EMOS Query is used to create and save queries that restrict the EMOS (Edit MO Status) scrolling window. For example, a query could select only MOs with Configured BOMs that include the Work Center SAW on the routing. EMOS Query provides a higher level of filtering so you can quickly narrow down the Manufacturing Orders in EMOS window.
EMOS Query works like a SmartList query, but you can add as many restriction criteria as needed. The restriction query can use fields from any of these tables:
- MOP Order Master (WO010032)
- Item Master (IV00101)
- Item Engineering (IVR10015)
- Picklist (PK010033)
- Working Routing (WR010130)
You can also copy a list of MOs from another source, such as Excel, and paste them into the window to restrict Edit MO Status to a list of MOs.
LeanMFG Release 2018-12-03
V12.1.36 / 14.1.25 / 16.1.15 / 18.1.7
* Disassembly: Changed how the disassembly routine calculates output quantities for the original raw materials. Previously it calculated a ratio of the Qty To Disassemble divided by the Original Qty To Build from the MO Header. The the MO was for 10 and you disassemble 5 it would consume half of the raw materials. This calculation did not account for changing the Output Quantity (i.e. you planned to make 10 but only produced 9). Now the disassembly routine calculates the ratio using the Qty to Disassemble and the Output Quantity.
* Posting: adjusted rounding performed in the Outputs calculation to account the Functional Currency Decimal Places issue (see notes for previous release, and also //willoware.com/functional-currency-decimals/).
* NEW: The Installer will now allow installing new builds on a client without requiring all users to be out of the system. Going forward, “running the install” inside GP will only be required when the Major or Minor Version Numbers change, but it will not be required with each Build Number change (12.0.35 is Major 12, Minor 0, Build 35). The module will still disable itself on a Client PC if it has an older Build.
GP PowerPack Release 2018-11-27
V12.1.127 / 14.1.70 /16.1.38 / 18.1.10 Changes 27-NOV-2018
* TWK-SOP: Trade Discount Calculation: Added SOP Additional Menu item to manually execute the calculation
SOP-RMA Link for Core Required Parts
DS1036
SOP-RMA Link for Core Required Parts
Problem Definition
ACME Co sells and services fire, sprinkler and security systems. Repair is an important part of the business. With some items, sale of a new part requires return of an old part (or “core”).
Return of the Cores is managed using the Field Service RMA. When a Salesperson creates a Sales Order for a “core required” part, they notify another employee who creates the RMA. Usually there are one or two lines on the order, but there can be over 20.
Manually creating the RMA is error prone. It is too easy for the salesperson to forget to have the RMA created, resulting in parts that do not get returned because there isn’t an RMA.
ACME Co would like to automatically create an RMA for “core required” parts.
Design Features
Overview
An enhancement will be created that automatically creates an RMA when the Salesperson is done with a Sales Order. The RMA will open automatically for the Salesperson to print the RMA Form, and, any subsequent changes to the Sales Order will be synced to the RMA without user intervention.
Setup
Navigation: Tools >> Setup >> Sales >> ACME Co Setup
Field | Function |
Unit Cost | The Item must have a unit cost >= the amount specified. The amount can be $0. |
Op Codes | This is Item User Category #3. Items must have one of the specified Op Codes to be a “core return required” item. |
This window is used to control the parameters used by the software that determine which Items required a core return.
The following logic is used to determine if an Item Number added to a Sales Order is a “core required” part.
- It ends with -RC in the Item Number
- It has a companion “spare” or “salvage” Item Number that can be found by swapping -RC for -S in the Item Number
- It meets the additional criteria specified in the Setup window (i.e. it has a Unit Cost >= $250, and it has one of the Op Codes listed in the window).
SOP to RMA
There is no user interface for this feature.
As Items are added to an Order, if they meet the Core Required criteria (see Setup), they will be automatically added to an RMA. See Create RMA below.
When an Order is saved, and the Order is linked to an RMA, the user will be prompted: Do you want to view the RMA?
-
- If they answer YES, the RMA will open in the RMA Entry/Update window
An Additional Menu item will be added to Sales Transaction Entry to access the linked RMA: Additional >> View RMA.
Additional Changes to Sales Transaction Entry:
- Changes cannot be made to the Sales Order if the linked RMA is open in RMA Entry/Update
- GP does not normally track when an RMA is open in the RMA Entry/Update window. The enhancement will add activity tracking on RMAs so that it can tell when a user has an RMA open.
- To automatically fix an RMA that gets “stuck” in the activity table (such as the computer loses power when the RMA is open), the enhancement will automatically clear the Activity table for a User ID when the log-in to GP.
- Changes made to the Order automatically update the RMA
- Adding an Item to the Order adds it to the RMA
- Removing an Item from the Order removes it from the RMA. If there are no Items on the Order, the RMA is deleted.
- Changing a Quantity on the Order updates the Quantity on the RMA
- Changes to the Customer information (Address ID, address info, etc) do NOT update the RMA once it has been created. When the first Core Required item is added to an Order, that will cause the RMA to be created. At that point the Customer information is retrieved and set on the RMA.
- An Order cannot be Voided or Deleted until the linked RMA is Deleted/Voided
- The user will be warned of the condition, and the linked RMA will open automatically.
- In the event the RMA cannot be deleted or voided, the link can still be broken by removing the Order Number from the Origin Document field.
- A Sales Batch cannot be deleted if one or more documents in the Batch is linked to an RMA
- The user will be warned that links exist, however no further assistance will be provided in locating the document. The user will need to manually locate the linked RMAs and delete/void the RMAs.
- When an Order is transferred to Invoice, the “Invoice” field on the RMA Additional Fields will be updated
- If an Order is partially transferred, each time it is transferred to Invoice it will update the RMA with the most recent Invoice Number.
Create RMA
As Core Required items are added to an Order, their corresponding “salvage” item will be added to an RMA. The RMA will be created as described below.
Header Field | Source |
RMA Number | Next RMA Number generated by Service |
RMA Type | Hard-coded, always CORE-REC |
RMA Status | Hard-coded, always NEW |
RMA Reason Code | Hard-coded, always COR |
Customer ID | Customer from Sales Order |
Address ID | Ship To Address ID from the Sales Order. Address fields from the Sales Ship To Address Entry window. NOTE: this information is retrieved from the Order when the RMA is field created. Subsequent changes to the Address Info on the Sales Order do NOT synchronize to the RMA. |
Origin | None |
Origin Document | SOP Order Number |
Office ID | Hard-coded, always LOU |
Site ID | Return Location Code from the RMA Type. Return To address fields from the Site Maintenance window for the Return Location Code. |
Bill To Customer ID | Customer ID from Sales Order, unless a different Customer ID is specified in the SVC Customer Extension window. |
Bill To Address ID | Bill To Address ID from the Customer Master |
Currency ID | Multi-currency is NOT used |
Customer PO | Customer PO from Sales Order |
RMA Additional Fields | Source |
Text #1 (Order Number) | SOP Order Number |
Text #2 (Invoice) | When the Order is transferred to Invoice, the SOP Invoice Number will be added to this field. |
Text #3 (Payment Terms) | SOP Payment Terms ID |
Text #5 (Salesperson) | SOP Salesperson ID |
Date/Time Entered | System Date/Time when the RMA is auto-created (System Date is the actual date, versus User Date which may not be the actual date). |
RMA Line Field | Source |
Type | Hard-coded, always CORE-REQ |
Return Item Number | As described in Setup, the -RC item from the Sales Order will be changed to a -S item. The -S item will be added to the RMA. |
Quantity | The SOP Line Quantity Ordered. |
U of M | There is only one U of M for all items, called “One”. The RMA will always be created using the Base U of M for an Item. If needed, the SOP Line Quantity will be converted to the Qty In Base. |
Unit Price | Retrieved from Item Price list |
Unit Cost | The Item’s current Actual/Standard cost |
RMA Line Status | Same as Header |
Office ID | Same as Header |
Return Site ID & Address fields | Same as Header |
Ship to Address ID and Address Fields | Same as Header |
Shipping Method | Customer’s Shipping Method from Customer Maintenance |
Customer PO | Same as Header |
Return Price Level | If Service Setup has Use Return Price Level marked, the Price Level provided is used. The Return Price Level must exist on the Item’s Price List. Otherwise the Price Level from the Order is used. |
Entered Date/Time | Same as RMA Additional Fields window |
Fulfill SOP on MO Receipt
DS1041
Fulfill SOP on MO Receipt
Problem Definition
ACME Co uses CRM to bring sales orders into GP, and if necessary, the process also generates a manufacturing order to produce the sales item. Currently, the standard MOP-SOP linking is used to allocate the inventory when the MO is posted, however since GP allocates the inventory based on the costing layer, the SOP cost is not always the same as the MFG cost. ACME Co needs a solution to ensure the cost on the Sales Order is equal to the cost of the product that was produced by the linked MO.
Design Features
Overview
ACME Co will implement Lot Numbers on their sales items so when the MO is posted, the lot number on the MO can be used to fulfil the linked sales order and ensure the correct costing layer is obtained.
The lot number to produce will need to be pre-assigned on the MO prior to posting.
WilloWare has a Lot Number Pre-Assign feature in MFG PowerPack that may provide the ability to auto-populate the Lot Number on the MO, which can be purchased separate from this this estimate. Testing may be required to ensure it will work with the CRM process.
Alternatively, ACME Co can pre-assign a Lot Number to the MO when it is integrated from CRM.
When the MO is posted, the pre-assigned Lot Number will be used to fulfill the linked sales order.
MFG Posting
The normal Manufacturing Receipt posting process detects when an MO is linked to a Sales Line, and does the following:
- It increases the Qty To Invoice on the sales line
- It allocates the inventory in the GP Inventory tables
This enhancement will also fulfill each SOP Line with the Lot Number produced by the MO linked to the SOP Line. This will:
- Update the Qty Fulfilled on the sales line
- Populate the SOP Serial/Lot table
- Update the Qty Sold in the Lot Master table
When the SOP order is transferred to invoice and posted, the correct cost will be posted to the IV account and COGS.
NOTE: If no Lot Number was found to be pre-assigned to the MO then the enhancement will NOT fulfil the SOP line.
Manufacturing Order Receipt Entry Post Button
The enhancement will put a control on the Post button on the MO Receipt Entry window that will prevent posting if:
- There is a Lot Number pre-assigned to the MO and more than one lot number was selected in the MO Lot Number Entry window.
- There is a Lot Number pre-assigned to the MO and it does not match the lot number that was selected in the MO Lot Number Entry window.
Consignment Inventory
DS1007
Consignment Inventory
Problem Definition
ACME Co makes generator powered lighting units used on construction sites. Each unit is lot numbered, and there is a quantity of 1 for each lot number (the lot numbers are effectively serial numbers). The units are sent out on consignment, but ACME Co still owns the equipment until it is sold.
They need to be able to:
- Create a transaction (Consignment Order) that records movement of inventory from main inventory to “Consignment”
- Record the customer/address receiving the inventory
- Have Sales enter a Consignment Order, and Shipping fulfill it (i.e. select specific Lot Numbers)
- Track Lot Numbers of inventory in consignment
Reporting
- Which Consignment Orders have turned into sales
- Which Consignment Orders are still open
- Where each Lot Number of inventory is currently located
- Consignment Inventory by Customer
Design Features
Overview
The majority of ACME Co’s requirements can be met through the In-Transit Transfer (ITT) transaction. The process is described below.
Creating a Consignment Order
When the TO SITE is set to the Consignment Site, special functionality will be activated to support Consignment. The new functionality will provide the ability to lookup a Customer, and Customer Address, and return that information to the Address fields on the right hand side of the window. See Consignment Orders below for more detail.
Sales will enter the Item(s) to be transferred to the Consignment site.
Sales will print the ITT Picking Ticket to send to the Shipping department.
Shipping will lookup the ITT document, fill in the Qty Picked, select specific Lot Numbers, and “Ship” the ITT. See Consignment Shipping for more detail.
Selling Consignment Inventory
Selling Consignment Inventory will begin by creating a regular Sales Order.
The Default Site ID must be set to the Consignment Site. This will activate the new functionality described below (see Consignment Sales Order below), which will ensure that only inventory on consignment to the selected Customer can be sold to that customer.
Returning Consignment Inventory
See Consignment Returns below for more detail. A new window will be created that will allow a user to select Items and Lot Numbers to return. It will create a regular inventory transfer, add the inventory to the transfer, and post it.
Setup
Navigation: Tools >> Setup >> Sales >> Consignment
Field | Function |
Consignment Site | Enter the Site ID of the Consignment Site |
The Consignment Site is used in the In Transit Transfer window, and Sales Transaction Entry, to identify when the special consignment functionality should be enabled.
Consignment Orders
Navigation: Transactions >> Inventory >> In Transit Transfer Entry
When the TO SITE is set to the Consignment Site, it will activate “consignment order” enhancements on this window.
The Tracking Reference field label will be changed to “Customer Number”. The field will only allow entry of valid Customer Numbers.
CTRL+Z will open the Customer Lookup window. Selecting a Customer Number will return it to the Tracking Reference field, and fill the Customer Name field. Likewise, if a Customer Number if typed into the field, when the cursor leaves the field the entered value will be validated to ensure it is a valid Customer Number, and if so, the Customer Name will be populated.
The Address fields will fill with the Customer’s primary Ship To Address.
CTRL+Q will open the Customer Address Lookup window. A valid Customer Number must already exist in the Tracking Reference field. Selecting a Customer Address will populate the Address fields.
Sales will enter the Item(s) to be transferred to the Consignment site. Qty Picked normally defaults to the Qty Ordered, but with the Consignment Enhancement enabled, it will default to zero. Shipping will fill in Qty Picked.
See Consignment Shipping below for more detail.
When Sales is done entering the Consignment Order, they will print the Picking Ticket:
This report can be modified as needed to ACME Co’s requirements. Modifying the Picking Ticket is not included in this estimate.
Consignment Shipping
A SmartList will be created for Shipping that shows new ITTs that need to be picked and shipped. They will select documents from the SmartList, which will open the document in the ITT Entry window.
Shipping will enter the Qty Picked and make Lot Number selections. They will click the SHIP button to “post” the transaction. Clicking the SHIP button performs the inventory transfer, moving the selected inventory into the Consignment location.
Creating this SmartList is not included in the estimate.
See Assumptions/Requirements for required GP setup.
Consignment Sales
Navigation: Transaction >> Sales >> Sales Transaction Entry
Selling Consignment Inventory will begin by creating a regular Sales Order.
The Default Site ID must be set to the Consignment Site. This will activate the new functionality which will ensure that only inventory on consignment to the selected Customer can be sold to that customer.
- The Item Lookup will show only Items on consignment to that customer
- The Item Number field will only allow Item Numbers to be entered that are on consignment to the customer. This applies to Sales Transaction Entry, and Sales Item Detail Entry.
- The Sales Lot Number Entry window will only show/allow Lot Number on consignment for that customer. This applies to the Lot Number field, Lot Number Lookup, and the “Available Lots” scrolling window.
See Assumptions/Requirements for required GP setup.
When a specific Lot Number is added to an Order, a link between the Sales Line and the Consignment Lot will be recorded in the SVC_Transfer_Line_Serial_Lot_HIST table (SVC30702). The Sales Order Number will be stored in the Call Number field, and the Sales Line in the Equipment Line field. This will allow:
- Linking a consignment Lot Number to the Sales Order on which it was sold (or is allocated to be sold)
- Reporting on which consignment inventory is available to be sold
If the Order is deleted or voided, or inventory unallocated, the changes will be updated in the SVC30702 table. Aside from the special functionality described above, entering a Sales Order will behave like any other Sales Order.
Consignment Returns
A SmartList will be created that shows “unsold” consignment inventory. It will contain the Customer Number, Customer Name, Item Number, Lot Number, and Transaction Date of the Consignment Order (ITT) which put the unit into consignment.
From the SmartList the user will be able to double-click on a line, which will open the Consignment Return Entry window:
Note: the SmartList is used to locate an ITT which placed the inventory into consignment. Selecting a line does not auto-select the inventory in the Consignment Return Entry window.
The process of marking inventory for return is:
- Click on an Item Number in the left-hand scrolling window to select the item.
- The Lots window will fill with Lot number that have not been sold (or are not allocated to an unposted sales order).
- Mark one or more Lot Number.
- Change Item Numbers, if needed, and repeat the process.
- Enter the Return To Site (this is the main inventory location)
- Click POST
Clicking POST will ask the user if they are ready to return the inventory. If YES, it will create and post a regular Inventory Transfer with the selected inventory, transferring it from the Consignment Site into the selected Return To Site.
When a Lot Number is added to the Inventory Transfer, a link between the IV Transfer Line and the Consignment Lot will be recorded in the SVC_Transfer_Line_Serial_Lot_HIST table (SVC30702). The IV Transfer Number will be stored in the Call Number field, and the Line Number in the Equipment Line field. This will allow:
- Linking a consignment Lot Number to the Transfer on which it was returned to inventory
- Reporting on which consignment inventory is available. Any Lots in SVC30702 what have a document number recorded in the Call Number field have either been sold or returned to stock.
ETO Release 2018-11-6
V12.1.29 / 14.1.12 / 16.1.5 / 18.1.1
* First GP2018 Release
* Added Reference Designators
* All Mfg Estimate “child windows” are now in separate dexterity forms so that security can be set individually on each window.
* Sales Link: linking an Estimate to a SOP Quote Line now checks if the sales line is already linked to Estimate and does not allow creating a second link.
* Estimate Copy: addressed error “Cannot insert value NULL into column ROUTINGNAME_I” when copying an Estimate BOM (#20185404)
* NEW: The Installer will now allow installing new builds on a client without requiring all users to be out of the system. Going forward, “running the install” inside GP will only be required when the Major or Minor Version Numbers change, but it will not be required with each Build Number change (12.0.35 is Major 12, Minor 0, Build 35). The module will still disable itself on a Client PC if it has an older Build.
MFG PowerPack Release 2018-10-31
V12.1.140 / 14.1.87 / 16.1.53 / 18.1.14
* OSRC Add To PO: addressed WorkFlow error “Cannot insert duplicate key row into object dbo.WFI10002 with unique index AK2WFI10002”
GP PowerPack Release 2018-10-26
V12.1.126 / 14.1.69 /16.1.37 / 18.1.9
* NEW! TWK-SOP: Trade Discount Calculation-auto-calculates the Trade Discount field in Sales Transaction Entry. Installation creates an empty SQL Stored Procedure which is used by this Tweak to calculate the discount. The proc can be edited to add the custom business logic needed to perform the trade discount calculation to each customer’s specific requirements.
* NEW: The Installer will now allow installing new builds on a client without requiring all users to be out of the system. Going forward, “running the install” inside GP will only be required when the Major or Minor Version Numbers change, but it will not be required with each Build Number change (12.0.35 is Major 12, Minor 0, Build 35). The module will still disable itself on a Client PC if it has an older Build.
* BE-Checkbook Register Inquiry: In GP2016R2 and above the scrolling window, which was populated by the CM_Transaction table, is now populated using an identical temp table copy of CM_Transaction. Updated the BE-Checkbook Register Inquiry to work correctly for both tables.12
MFG PowerPack Release 2018-10-25
V12.1.139 / 14.1.86 / 16.1.52 / 18.1.13
* BOM Archive: Added a new option to enabled/disable requiring the Archive Name to be unique. The default behavior is (and has been) to require that the Archive BOM Name is unique across all BOMs so when an archive is created for 100XLG using BOM Name 20170412, no other BOM for any item could have the BOM Name 20170412. This ensured the entire exploded BOM for an item could be archived. However, in cases where multiple items share common subassemblies, this control could result in having to create identical, differently named archives for the same subassembly. By turning Require Unique Archive Name off, if a subassembly already has an archive named 20170412, the archive utility will use that BOM rather than attempting to create a new archive for the subassembly.
* Sales Forecast Integration: Added a new option to include Unit Cost and List Price in the export and import. This optional setting will allow including projected Cost and Price values in the forecast.
* NEW: The Installer will now allow installing new builds on a client without requiring all users to be out of the system. Going forward, “running the install” inside GP will only be required when the Major or Minor Version Numbers change, but it will not be required with each Build Number change (12.0.35 is Major 12, Minor 0, Build 35). The module will still disable itself on a Client PC if it has an older Build.
SpellCheck Release 2018-10-23
V12.1.23 / 14.1.14 / 16.1.11 / 18.1.3
* NEW: The Installer will now allow installing new builds on a client without requiring all users to be out of the system. Going forward, “running the install” inside GP will only be required when the Major or Minor Version Numbers change, but it will not be required with each Build Number change (12.0.35 is Major 12, Minor 0, Build 35). SpellCheck will still disable itself on a Client PC if it has an older Build.
* NEW: Added dex.ini switch to force use of Word or Web for spellchecking. It can also turn SpellCheck off. Add this switch: SpellCheck=WEB/WORD/EITHER/OFF
MFG Import Release 2018-10-11
V12.0.41 / 14.0.24 / 16.0.12 / 18.0.5
* Routing Import: (1) Addressed issue that caused Labor Code to import blank. (2) Addressed issue in Routing Header Primary flag that prevented unflagging an existing Primary when a new Primary is imported.
* NEW: The Installer will now allow installing new builds on a client without requiring all users to be out of the system. Going forward, “running the install” inside GP will only be required when the Major or Minor Version Numbers change, but it will not be required with each Build Number change (12.0.35 is Major 12, Minor 0, Build 35). MFGImport will still disable itself on a Client PC if it has an older Build.