Customization DS1360 MO Receipt: Import Finished Good Lots

Customization DS1360

MO Receipt: Import Finished Good Lots

Problem Definition:

ACME produces bales of non-wood ag-based fiber using Microsoft Dynamics GP Manufacturing to record the manufacturing activities. Each Manufacturing Order can produce 30-50 bales, each of which is recorded with a separate lot number and weight (the finished good quantity).

They are currently set up with multi-bin turned on, the finished items are lot tracked and many of the components are lot tracked. They backflush the components. Currently they need to manually enter 30-50 separate lots numbers and the quantity (weight) for each lot. They are not recording any lot attributes.

ACME would like to improve the speed and ease of data entry by having a way to copy (or import) the Lots/Quantities from Excel into the MO Receipt.

Solution Overview:

WilloWare will add a custom Copy/Paste window into the MO Receipt Entry process where users can copy/past a list of finished good Lot Numbers (bales) and the quantity (weight) for each bale.

Design Features:

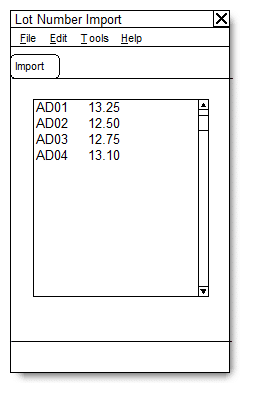
Lot Number Import

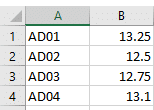
Copy the finished good lot numbers and quantities from Excel. The data must be in two adjacent columns as shown below.

Table

Description automatically generated

Navigation: Manufacturing Lot Number Entry >> Additional >> Lot Number Import

Graphical user interface, text, application

Description automatically generated
Text

Description automatically generated

Paste (CTRL+V) the lots/quantities into the Lot Number Import window as shown above.

Click the IMPORT button.

The import process will first make sure that a BIN has been provided. If not, it will stop and ask the user to enter a BIN. It will then add the list of Lot Numbers and Quantities to the “Lot Numbers Selected” window.

NOTE: if the total of the copy/pasted Lot Quantities is greater than the Quantity Remaining To Select, the import routine will stop when the next lot quantity to import would exceed the Remaining To Select. For example, if the Quantity Remaining To Select is 2 and the next Lot Number to import has a quantity of 12.30, the utility will not attempt to import it.

Assumptions/Requirements:

  1. The functionality described above will not work with eConnect, any software that uses eConnect, or any software that directly writes to, updates, or deletes from SQL tables.
  2. The functionality described above is intended for the GP Desktop client.
  3. National Accounts functionality is NOT used.
  4. Advanced Distribution functionality is NOT used.
  5. Unless otherwise noted in this document, reporting is not included in this estimate.
  6. Unless otherwise noted in this document, Word Template functionality is not addressed.
  7. Unless otherwise noted in this document, the enhancement will not integrate with 3rd party products. Some examples of 3rd party products would be:
  • An ISV plug-in product including WilloWare products
  • A dexterity customization designed by another developer
  • Dynamics GP Modules including, but not limited to:
  • Project Accounting
  • MDA
  • Analytical Accounting
  • Copy functionality found in SOP, POP and Inventory
  • Field Service
  • Extended Pricing

Manufacturing

For information on this customization, or any other WilloWare customization or product, please contact us:

//willoware.com/contact-me/

Customization CR1407- ITT Visibility to MRP

Customization

CR1407

ITT Visibility to MRP

Description of Need:

ACME uses Dynamics GP Manufacturing.

They need to have full visibility to inventory balances, supply/demand and movements throughout the system. They use In-Transit Transfer documents.

In-Transit Transfer documents are not visible to MRP. ACME requires an enhancement that will provide them with visibility to both the demand and supply requirements of unshipped and/or unreceived ITT’s.

Description of Solution:

In-Transit Transfers: Visible to MRP

Please Note: The Regeneration Type must be set to Full Regeneration on the MRP Regeneration window. The enhancement will NOT function properly if this setting is changed to Net Change.

Graphical user interface, text, application

Description automatically generated

The user must manually click the PROCESS button on the MRP Regeneration window to run MRP. Clicking the PROCESS button will run the following processes prior to the MRP Regeneration process. The processes described below create/maintain “bogus” planning documents that make ITT supply/demand visible to MRP:

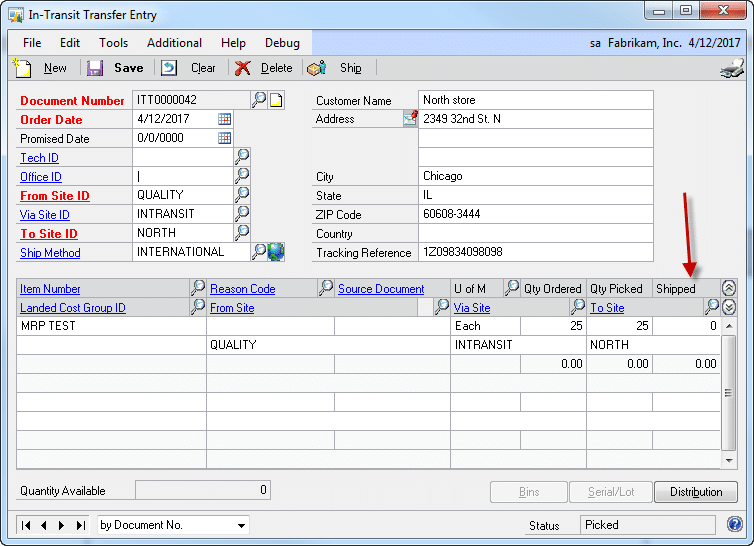
  1. Review unshipped quantities on In-Transit Transfer (ITT) documents to mimic DEMAND. In the ITT example below, there are 25 pieces of item MRP TEST, which have been entered on the ITT document to be supplied from Site QUALITY and shipped to Site NORTH via the INTRANSIT Site. This quantity has NOT yet been shipped.
Graphical user interface, application, table

Description automatically generated

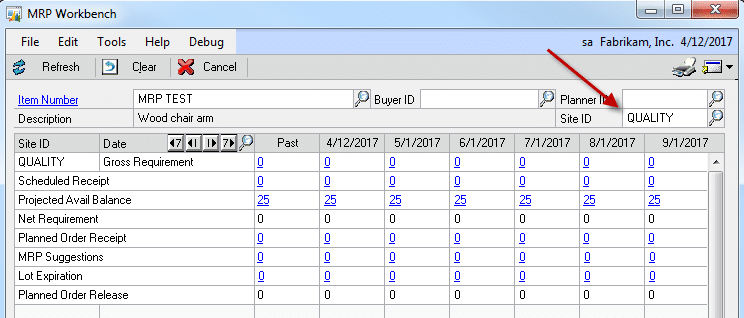
Even though the 25 pieces are allocated to the ITT document, they still show as being available to site Quality as viewed through the MRP Workbench:
Graphical user interface, table

Description automatically generated

To simulate demand, the enhancement will create a dummy Manufacturing Order and Picklist. The Manufacturing Order number will be set to Z-INTRANSIT. The Manufacturing Order Item Number will be set to INTRANSIT. The Routing will be set to INTRANSIT. (This Item does not need to be an Item in the Item Master. This Item does not need to have a MFG BOM or MFG Routing assigned.) The Manufacturing Order will be set to status OPEN and its PICKLIST will be built.

The Manufacturing PICKLIST will contain the unshipped ITT requirements. Each required Item Number/Site combination will appear as a single line item on the PICKLIST. The sum of the requirements for each Item Number will populate the Required Qty field. The PICKLIST Items/Quantities will NOT be allocated. The PICKLIST Required Date will be set to the System Date. The PICKLIST Items/Quantities will be set to Backflush. The ISSUE FROM Site on the PICKLIST will be set to the ITT’s From Site ID. In the example above, because the ITT has not yet been shipped, the ISSUE FROM Site would be set to QUALITY.

  1. Review shipped quantities on In-Transit Transfer (ITT) documents to mimic DEMAND. In the ITT example below, there are 25 pieces of item MRP TEST, which have been entered on the ITT document to be supplied from Site QUALITY and shipped to Site NORTH via the INTRANSIT Site. This quantity HAS BEEN shipped.

Graphical user interface, application

Description automatically generated

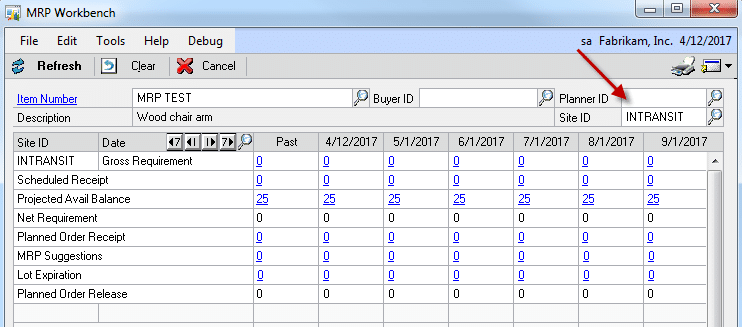
Even though the 25 pieces are allocated to the INTRANSIT Site from the ITT document, they still show as being available to site INTRANSIT as viewed through the MRP Workbench:
Table

Description automatically generated

The enhancement will add these demand lines to the Manufacturing Picklist as described in #1 above. However, for shipped lines the following alteration will be made:

  • The ISSUE FROM Site on the PICKLIST will be set to the VIA SITE ID. In the example above, because the ITT has been shipped, the ISSUE FROM Site would be set to INTRANSIT.
  1. Review shipped and unshipped quantities on In-Transit Transfer (ITT) documents to mimic SUPPLY. In the ITT example below, there are 25 pieces of item MRP TEST, which have been entered on the ITT document to be supplied from Site QUALITY and shipped to Site NORTH via the INTRANSIT Site. This quantity has NOT yet been shipped.

Graphical user interface, application

Description automatically generated

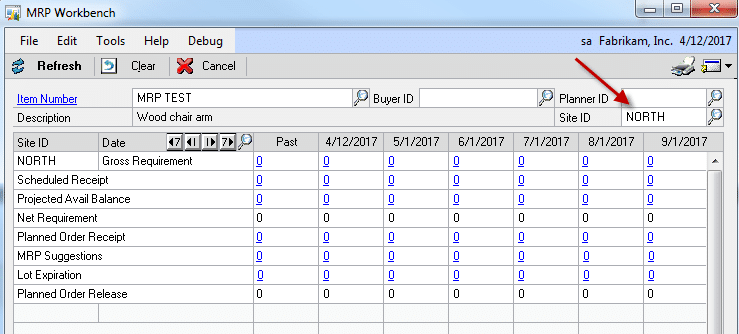
These 25 pieces are NOT visible as supply to Site ID North as viewed through the MRP Workbench.
Table

Description automatically generated

Even when the ITT document has been shipped, MRP still does NOT recognize the supply coming to the final destination Site ID. To simulate supply, the enhancement will create a dummy Purchase Order which will include both shipped and unshipped ITT quantities. The Purchase Order number will be set to Z-INTRANSIT. The Purchase Order will hold the following detail:

  • Purchase Order Date: Will be set to the System Date
  • Vendor ID: INTERNAL. (The enhancement will NOT validate that this Vendor ID exists. It is the responsibility of ACME to ensure that the Vendor ID is setup within Dynamics GP.)
  • Currency ID: Company’s Functional Currency
  • PO Status: RELEASED

The PO Lines will contain the following detail:

  • Item Number: Item Number from the ITT Record
  • Quantity: (Qty Ordered – Qty Received)
  • U of M: UOM from the Requisition record
  • Unit Cost: $0.00
  • Site ID: To Site from the ITT record
  • Required Date: Promised Date of the ITT Document
  • Current Promised Date: Promised Date of the ITT Document
  • PO Line Status: Set to RELEASED
  • Vendor Item Description: Tracking Reference of the ITT Document
  • Ship Method: Ship Method of the ITT Document

Please Note: If the Item Number/Vendor ID assignment does not already exist, the enhancement will auto-create the link.

Internal ACME Process Controls Are Required:

  1. Users should NOT allocate parts, issue parts, receive or close the Z-INTRANSIT Manufacturing Order. The Manufacturing Order should NOT be utilized in actual Manufacturing Processes. The enhancement will NOT prevent users from doing any of the above.
  2. Users should NOT copy, receive, cancel, delete, void, print, invoice or close etc. the Z-INTRANSIT Purchase Order. The Purchase Order should NOT be utilized in actual Purchasing transactions. The enhancement will NOT prevent users from doing any of the above.

Assumptions/Requirements:

  1. The functionality described above will not work with eConnect, any software that uses eConnect, or any software that directly writes to, updates, or deletes from SQL tables.
  2. The functionality described above is intended for the GP Desktop client.
  3. National Accounts functionality is NOT used.
  4. Advanced Distribution functionality is NOT used.
  5. Unless otherwise noted in this document, reporting is not included in this estimate.
  6. Unless otherwise noted in this document, Word Template functionality is not addressed.
  7. Unless otherwise noted in this document, the enhancement will not integrate with 3rd party products. Some examples of 3rd party products would be:
  • An ISV plug-in product including WilloWare products
  • A dexterity customization designed by another developer
  • Dynamics GP Modules including, but not limited to:
  • Project Accounting
  • MDA
  • Analytical Accounting
  • Copy functionality found in SOP, POP and Inventory
  • Extended Pricing

For Information on this customization, or any other WilloWare customization or product, please contact us:

//willoware.com/contact-me/
CompleteCount 2022-03-30

Release Date: 30-MAR-2022
GP Versions: 12/14/16/18
CompleteCount Build: 3.53
* Submit Stock Tags: addressed issue the in Lot Number Over Allocation routine that was incorrectly identifying the over-allocated lot number when multiple lots for an Item exist in one Bin.
* Excel Link: addressed issue that could leave a stranded background Excel process that locks an import file.

MO Generator 2022-02-09

Release Date: 9-FEB-2022
GP Versions: 12/14/16/18
MOGenerator Build: 3.106
* MOGen Core Utilities: (1) NEW-A custom “selection query” can be created to only pick certain records to process. For example, when running two processors each can have a query that pulls a different range of item numbers so there is no chance they can overlap. The query can also be used to allow an integration to “stage” records that are incomplete and have them processed only when certain criteria are met. (2) Addressed issue where the Reschedule MO utility, and MOGenV2 RescheduleMO with RebuildPicklist=false, would reschedule the MO and routing but not update the Required Date on the picklist lines with the new MO Start Date.

Customization DS1150 PO Release Utility

Customization DS1150

PO Release Utility

Problem Definition:

ACME uses Dynamics GP with Nolan’s Intercompany POP-SOP module. Currently they automatically create PO’s which then need to be manually printed, which Releases the PO and triggers Nolan’s POP-SOP to create a Sales Order.

ACME would like to eliminate the time-consuming process of manually printing/releasing PO’s. They would like an automated utility that Releases PO’s and triggers the Nolan software.

Solution Overview:

WilloWare will create a utility that can be run un-attended (using a GP client) that will automatically Release Purchase Orders.

PO Release Utility:

Navigation: Tools >> Utilities >> Purchasing >> PO Release Utility

The PO Release Utility directly “releases” a New Purchase Order without printing the PO.

Field

Function

Run Continuously

In this mode, the utility will keep running until the STOP button is clicked

Run For/Hours

Enter the number of Hours. In this mode, once START is clicked, the utility will run for the specified number of hours, then stop and close GP.

PO Selection Query

The PO Release Utility will use the PO Selection Query to identify the next PO to release. The Utility will be hard-coded to only select PO Status = NEW (POSTATUS=1), so the Selection Query provides additional restrictions.

The Selection Query is free-text entry box and should only contain PO Header fields (POP10100). No check will be performed to control this, but inclusion of other tables/fields will cause an error when START is clicked.

When multiple PO’s are returned by the query, the Utility will take them in order by DEX_ROW_ID. This ensures that the oldest are processed first. Also, the Utility will check the DEX_LOCK table and skip a PO if it is in use.

See this link for information about setting up Windows Scheduler to run GP and the PO Release Utility automatically:

//willoware.com/scheduling-mogenerator/

NOTE: For the PO Release Utility to work correctly, Nolan must be configured to print the NC_IOP_Audit_Trail_Report to file.

Assumptions/Requirements:

  1. The functionality described above is intended for the GP Desktop client.
  2. Reporting is not included in this estimate.

For information on DS1150 or any other WilloWare customization or product, please contact us:

www.willoware.com/contact-me/

MFG PowerPack 2021-12-15

Release Date: 15-DEC-2021
GP Versions: 12/14/16/18
MFG PowerPack Build: 10.189
* THIS BUILD CREATES A NEW SQL STORED PROCEDURE. FULL INSTALLATION ROUTINE REQUIRED FOR THIS BUILD
* Vendor Pricing: (1) Added a new costing method called Custom. This calls a stored procedure (wspVendorPricingGetPrice) where you can add whatever custom pricing logic is needed for an Item. Custom Pricing can be used as the Primary or Secondary pricing method. (2) Vendor Pricing now works with the SOP Purchase Order Preview window.

MO Generator 2021-12-01

Release Date: 1-DEC-2021
GP Versions: 12/14/16/18
MOGenerator Build: 3.105
* Exclude Items Window: Addressed issue caused by a change to the Item Master (IV00101) in GP18.3. In that build (and after) the Item Master now contains a User ID column, which after the upgrade is blank. User ID is set automatically when a Item record is changed to the User ID that made the change. When the Exclude Items window retrieved an Item Number it was also pulling in the blank User ID, which wiped out the User ID already set on the line. The window now ensures that User ID has been reset to the correct value after retrieving them Item record (#202101955).

MFG Import 2021-11-03

Release Date: 3-NOV-2021
GP Versions: 12/14/16/18
MFG Import Build: 2.52
* Added checks for blank records in tables linked-to and populated by the import. This was added as a safeguard to address the following scenario: a client had a blank record in IV00101 (perhaps from a go-live data import) which caused the import utility to link from a blank Template Item Number (blank because it was not being used) to the blank record in the Item Master, which then caused multiple data validation steps to fail and BOM Import would not run. The checks will run before the BOM Import and Routing Import windows open and will warn the user if there are any blanks, and provide instructions on how to fix the problem.

GP18.4 Releases Ready

All of our software is now ready for GP18.4!

We wanted to take this occasion to share with you our thoughts on the 18.x releases.  While this new numbering approach gives the impression that each new “DOT” build (18.2, 18.3, 18.4) is just a “service pack”, this is not the case, and it is not how we treat them.

In short, we treat them as MAJOR releases (like going from GP2016 to GP2018).  Between each DOT release there can be major changes that affect integrating products, such as:

  • New tables in the SQL database
  • New columns added to existing tables
  • Changes to the sort order of Keys on tables
  • New parameters in existing Procedures and Functions (dexterity code)

All of the potential changes mean that integrating software needs to be tested on the latest release of Dynamics GP.

On the topic of software releases, we received a support question recently looking for an explanation of how our build numbers work.  We recently changed our software build numbering logic so that regardless of the GP Major Version (i.e. GP2013, GP2015, GP18.4, and so on), a release of one of our products has the same “core” build number.

For example, MFG PowerPack has the current build numbers:

  • For GP2013:  12.9.186
  • For GP2014:  15.9.186
  • For GP2016:  16.9.186
  • For GP2018:  18.9.186

The first number is the Major Version, and that must match the GP version you are installing into.  For example, if you are on GP2016 you have to install a 16.x.y build of our software.

We think of the next two numbers as the “Internal Major” and “Internal Minor” build numbers, in the example above “9.186”.

The Internal Major number only changes if we need to make changes to the SQL database, such as change a table, adding a table, or creating a stored procedure.  For example, if the internal build changes from “9.186” to “10.187” it means that the new release has changes to the SQL database and the full installation routine needs to be run as “SA” with no users in the system.  If the internal build changes from “9.186” to “9.187” it means that it is a CODE-ONLY change and the new code (the CNK) can be dropped onto the GP client and you will NOT have to run an installation routine after logging in.

Prior to making this change to our release numbers, as each product was upgraded for a new release of GP we would start the build numbering over again.  For example, the first build of MFG PowerPack after upgrading it to GP2018 would be 18.0.1.

We felt this was confusing because MFG PowerPack is actually the SAME code on GP2013 all the way through GP18.4.  We build logic into the software so it knows what version of GP it is on, and what is different about that version of GP, and it changes accordingly.  For example, GP18.4 has new User Defined Fields on GL Transactions that were not present in GP2013.  If MFG PowerPack needs to create a Journal Entry, it checks to see what version of GP it is running in, and then runs the correct “create journal entry line” routine for GP2013 or GP18.4 (one without user defined fields, and one with user defined fields).

We felt that carrying the same internal build number over ALL supported versions of Dynamics GP better reflected the fact that the functionality you get from our product is IDENTICAL across all supported versions of GP.  This is the benefit you receive from WilloWare of staying current on software maintenance–even if you do not upgrade GP you are still getting the latest functionality from WilloWare.

Happy Upgrading!

MFG PowerPack 2021-10-28

Release Date: 28-OCT-2021
GP Versions: 12/14/16/18
MFG PowerPack Build: 9.186
* Updated for GP18.4 Release
* Proposed Cost Update: Added fields in the Excel import template to support setting the “Set To Zero” checkbox on the Standard Cost Changes window when importing new proposed costs.
* PowerATP: fixed issue in Free Forward calculation that was retrieving the correct date but incorrect quantity.

Customization CR0701 MO Number Creation Update

CR0701

MO Number Creation Update

Description of Need:

Currently, the MO Number that is auto-generated from the Sales Order is created as SOPNUMBE_LNITMSEQ. ACME would like the MO Number to also include a prefix which will represent the Site which is entered into the Sales Order Document header.

Description of Solution:

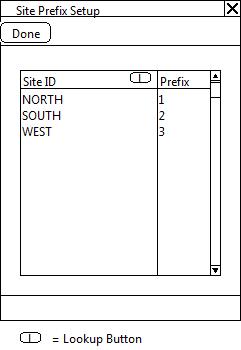
Navigation: Setup > Manufacturing > Site Prefix Setup

This window is used to define a Prefix for each Site ID used in the Sales Order to MO creation process.

C:\Users\Karen\Documents\Clients\Tribridge\ABS\Site Prefix Setup.jpg

Field

Function

Done Button

Click the DONE button to exit the window

Site ID

Enter or select a Site ID from the lookup

Prefix

Enter a one character Prefix to represent the Site ID. A Number or Letter may be entered.

When an MO is created by the enhancement, the MO number will be generated in the following manner:

  • If the Sales Document Header’s Site ID is listed in the Site Prefix Setup window, the first character of the MO will be the Site’s Prefix.
  • If the Site ID is NOT listed in the Site Prefix Setup window, a prefix will NOT be added.

The balance of the MO number will remain as is: SOPNUMBE_LNITMSEQ.

Example #1

Site ID NORTH has a Site Prefix of “1”

Sales Order ORD00012 has 2 Sales Lines entered. Each Sales Line will generate an MO.

Two MO’s will be created:

  1. 1ORD00012_16384
  2. 1ORD00012_32768

Example #2

Site ID WEST has a Site Prefix of “A”

Sales Order ORD00013 has 2 Sales Lines entered. Each Sales Line will generate an MO.

Two MO’s will be created:

  1. AORD00013_16384
  2. AORD00013_32768

Example #3

Site ID EAST does NOT have a Site Prefix set in the Site Prefix Setup window.

Sales Order ORD00014 has 2 Sales Lines entered. Each Sales Line will generate an MO.

Two MO’s will be created:

  1. ORD00014_16384
  2. ORD00014_32768

For more information about this design, or any other WilloWare customization or product, please contact us at:

//willoware.com/contact-me/

GP PowerPack 2021-10-04

Release Date: 19-OCT-2021
GP Versions: 12/14/16/18
GP PowerPack Build: 5.155
* NEW TWEAK: Open IRP with Item’s Default Site – if a Default Site ID is assigned to an Item in Item Quantities Maintenance, when the Item is displayed in Item Resource Planning the window will automatically show information for the Item’s Default Site ID.
* SOP Rules: Secure Batch by User ID: Added additional controls to ensure “restricted” Batches do not become locked in batch activity by users who do not have access

MFG PowerPack 2021-10-18

Release Date: 18-OCT-2021
GP Versions: 12/14/16/18
MFG PowerPack Build: 9.185
* NEW TWEAK: POGen Integration- PO Generator suggests purchase orders based on quantities in the Item Quantities Master table.  However, there are modules, such as GP Manufacturing and Field Service, that create transactions which do not update the Item Quantities until after the transaction posts (for example, unallocated Manufacturing Picklists or unreceived Inter-Site Transfers).  PO Gen Integration can pull additional sources of inventory supply and demand into the PO Gen calculation to arrive at more accurate purchasing suggestions.
* Company Switching: addressed an issue that prevented the software from correctly enabling MFGPP options based on company settings when switching companies.
* FULL INSTALLATION ROUTINE REQUIRED FOR THIS BUILD

MFG PowerPack 2021-10-06

Release Date: 6-OCT-2021
GP Versions: 12/14/16/18
MFG PowerPack Build: 8.183
* Serial Mass Entry: Added mass serial number load into IV Transfer and IV Adjustment rather than automated adding through the UI. This process had been causing the list views to refresh after each addition which caused significant time delays when there are a large number of available serials.
* Vendor Pricing Import: addressed issue that caused date to offset forward by one day

GP PowerPack 2021-10-04

Release Date: 4-OCT-2021
GP Versions: 12/14/16/18
GP PowerPack Build: 5.154
* SOP Rules: Secure Batch by User ID: (1) Changed trigger point to prevent unauthorized users from locking a batch if they attempt to open one they do not have access to. (2) Added a routine to clear batch activity if user scrolls through documents and reaches one that is assigned to a batch to which they do not have access

GP PowerPack 2021-09-30

Release Date: 30-SEP-2021
GP Versions: 12/14/16/18
GP PowerPack Build: 5.153
* Bin-to-Bin Transfers: (1) Added controls to From Site to prevent changing it after a Bin-to-Bin Transfer has been started (i.e. a transaction can only be for one Site, it cannot be used to to bin-to-bin transfers for multiple sites at the same time). (2) Added a warning in Setup to alert user if they attempt to enable Bin-to-Bin Transfers when the Inventory Multi-bin functionality is disabled.
* SOP Rules: Secure Batch by User ID: (1) addressed issue that prevented the Rule from allowing access to a secure batch when multiple users are assigned to the same batch.

Customization DS0798: SOP Display Customer-Friendly Description

Customization DS0798

SOP Display Customer-Friendly Description

Description of Need:

ACME utilizes Dynamics GP to enter its Sales Documents. They would like to provide their Sales team with an alternate, more customer-friendly, Item Description during Order Entry.

The customer-friendly Item Description is held in the Customer-Item Maintenance window. A default Customer ID “999999” is used to store all customer-friendly Item Descriptions.

ACME requires this Item Description to display in the Sales Transaction Entry window’s toolbar during Sales Document Entry. The full Customer Item Description of 51 characters must display.

Description of Solution:

Navigation > Transactions > Sales > Sales Transaction Entry

The Sales Transaction Entry window will be updated to display the customer-friendly Item Description in the toolbar. This will look similar to the “Ship Weight” verbiage displayed below:

The customer-friendly Item Description will display during Sales Document entry when the user tabs out of the Item Number field. It will also display if an existing Sales Line is selected.

The customer-friendly Item Description from Customer ID “999999” will display, regardless of the Customer ID entered on the Sales Document. If an Item-Customer Link does not exist for Customer ID “999999”, no Item Description will display in the toolbar.

Please Note: The Toolbar can display up to 78 characters; there for displaying the full Customer Item Description of 51 characters is achievable.

Assumptions/Requirements

The functionality described above is intended for the GP Desktop client.

For Information on this customization, or any other WilloWare customization or product, please contact us at:

www.willoware.com/contact-me

Customization CR1111- Customer PO and SOP Order Lookup by Customer ID

CR1111

Customer PO and SOP Order Lookup by Customer ID

Description of Need:

Acme would like the following enhancements to the SOP Update Utility:

  1. A Lookup on the Customer PO field that will only show Customer POs on SOP orders that belong to the entered Customer ID.
  2. Restrict the SOP Order From/ To lookups to only sales orders that belong to the entered Customer ID.
  3. A third radio option to allow removing an item number without having to add a new item is needed.

Description of Solution:

  1. A lookup and customer lookup window will be added to the Customer PO field so the user can search for Customer PO values that are found in the Sales Order Header table where the Customer ID equals the ID entered in this window.

  1. The Sales Document Numbers window will be modified so that when opened from the Utility window, it will only display orders where the Customer ID (and Customer PO, if entered) matches the one entered in this window. All other orders will be removed from the list.
  2. A third radio button option will be added to the window to allow removing the item number entered in the top half of the window. When this option is selected, the Add Item Number and fields below it will be disabled.

Assumptions/Requirements:

  1. The functionality described above is intended for the GP Desktop client.

For information on this customization, or any other WilloWare customization or product, please contact us at:

www.willoware.com/contact-me

Customization CR1172 Billing Entry Enhancements

Customization CR1172

Billing Entry Enhancements

Description of Need:

ACME would like to add the following enhancements to the billing entry process. These automations are intended to make Billing Entry more efficient.

#1: Allow entering the Project Number before entering the Customer ID. After the Project Number has been entered, retrieve the Customer ID from the Project and put that into the Customer ID field.

#2: Automatically populate the Customer PO Number field with the Project PO Number.

#3: Automatically create a “Project Level” Billing Note for the Project. Create the note as shown below, replacing the terms in brackets { } with information from the Project.

Contracted Amount for {Project Practice} – {Project Name} – PO Number: {Project PO Number}

The text shown above in bold red comes from the Default Project Billing Note on Project Billing Settings window. That text should remain unchanged and the additional information appended to it.

Description of Solution:

#1: Before entering the scrolling window, Project requires something in the Customer ID and Currency ID fields. When entering the scrolling window, if Customer ID is not already populated with a Customer Number, it will be filled with a period (“.”) and Currency ID, if not populated, will be filled with “Z-US$”.

After the user enters a Project Number, the enhancement will retrieve the Customer ID from Project Maintenance and fill that into the Customer ID field. It will the execute the Customer ID field code (i.e. what would normally run if you manually entered the Customer ID) to ensure all other fields that get updated based on the Customer Number will be updated correctly (i.e. Customer Name, Bill to Address ID, etc).

#2 and #3: After the Project Number has been entered, the Project PO Number will be used to populate the Customer PO Number field (as long as it is empty), and a “Project Level” Billing Note will be updated using the template described above.

Assumptions/Requirements:

  1. The functionality described above will not work with eConnect, any software that uses eConnect, or any software that directly writes to, updates, or deletes from SQL tables.
  2. The functionality described above is intended for the GP Desktop client.

For information on this customization, or any other WilloWare product or customization, please contact us at:

www.willoware.com/contact-me

MFG PowerPack 2021-08-31

Release Date: 31-AUG-2021
GP Versions: 12/14/16/18
MFG PowerPack Build: 8.181
* FULL INSTALLATION ROUTINE REQUIRED FOR THIS BUILD
* Item Copy: (1) Added ability to copy all BOM Types. (2) The options for Manufacturing BOM Copy will revert to defaults after installing this build. Recheck your Item Copy Setup to ensure the correct Manufacturing BOM options are selected/unselected.

Customization CR1102- POP Order Multiple Warning

Customization CR1102

POP Order Multiple Warning

Description of Need:

ACME would like a warning message in Purchase Order Entry when the Quantity entered is not an even multiple of the Item-Site Order Multiple (from Item Resource Planning).

Since the Item-Site Order Multiple quantity is in the Base Unit of Measure, the PO Line quantity needs to be compared to the Order Multiple in the Base Unit. For example, if the PO Line Quantity is in CASE, but the base unit is EACH, the PO Line quantity needs to be compared to the Order Multiple in Eaches.

If the quantity entered is not an even multiple of the Item-Site Order Multiple, the warning should say:

The quantity entered is not a multiple of the Order Multiple. The Order Multiple is 20.”

In this case “20” is an example of the Order Multiple. The warning will show the actual Order Multiple quantity.

If the Quantity IS a multiple of the Order Multiple, no message will appear.

Description of Solution:

A warning will be added, as described above, to the Purchase Order Entry window, and Purchasing Item Detail Entry window.

The warning will appear after the Quantity is entered/changed if it is NOT an even multiple of the Item-Site Order Multiple.

For information on this, or any other WilloWare customization or product, please contact us at:

www.willoware.com/contact-me

MFG PowerPack 2021-08-10

Release Date: 10-AUG-2021
GP Versions: 12/14/16/18
MFG PowerPack Build: 7.180
* Vendor Pricing Import: addressed issue with the Excel integration that could prevent the import routine from terminating the excel.exe process after completing the import. This would leave the import file in a “locked” status with no apparent Excel app running although the process was visible in Process Monitor (#202101356)
* Sales Forecast Import: although no issues have been reported, the same issue may apply to SFI and was addressed by the change above.
* Item Copy: although no issues have been reported, the same issue may apply to Item Copy and was addressed by the change above.

BlanketPO 2021-08-04

Release Date: 4-AUG-2021
GP Versions: 12/14/16/18
BlanketPO Build: 1.39
* PO Close Utility: now automatically cancels the remaining quantity on all lines on the PO so they do not prevent closing the PO, then it closes the PO. Previously it would warn if there were open quantities and then abort closing the PO, which required a user to manually cancel each line (#202101296)

MFG PowerPack 2021-08-04

Release Date: 4-AUG-2021
GP Versions: 12/14/16/18
MFG PowerPack Build: 7.179
* SOP Number to MO Number: Added a control to prevent inserting new SOP lines between existing lines if any of the lines below are already linked to an MO. Because this tweak uses sequential numbering of the MOs based on the SOP lines, inserting a SOP line before a line linked to an MO would break the numbering sequence.

Customization CR0716 SOP User Defined Modifications

Customization CR0716

SOP User Defined Modifications

Description of Need:

ACME requires the ability to track additional Lead Source information during Sales Document Entry. ACME would like two fields added to the Sales User-Defined Fields Entry window:

  1. Lead Source
  2. Lead Source SubType

The Lead Source field should be a dropdown. The field should be required. ACME should have the ability to enter the dropdown options.

The Lead Source SubType field should be a string field, which is not required.

Description of Solution:

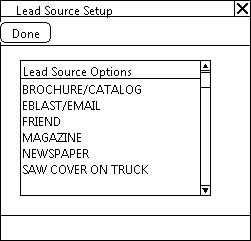
Navigation: Setup > Sales > Lead Source Setup

The Lead Source Setup window is used to define the Lead Source dropdown options available during Sales Document Entry.

C:\Users\Karen\Documents\Clients\MRP\AgriCover\Lead Source Setup.jpg

Field

Function

Done Button

Click the DONE button to exit the window

Lead Source Options

The user will enter Lead Source Options in the scrolling window. This field is a string field which will hold up to 20 characters.

To delete a Lead Source Option, select the option and navigate to EditDelete Row. Lead Source Options which have been assigned to Open or Historical Sales Documents may NOT be deleted.

Navigation: Transactions > Sales > Sales Transaction Entry > Sales User Defined Fields Entry

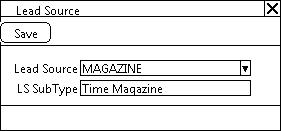
The Lead Source Entry window is used to assign the Lead Source and Lead Source SubType per Sales Document.

C:\Users\Karen\Documents\Clients\MRP\AgriCover\Lead Source.jpg

Field

Function

Save Button

Click the Save button to save the entries and exit the window.

Lead Source Dropdown

The user will select an option from the dropdown. This field is required and will default to blank.

The user will be unable to close the Lead Source or Sales User Defined Fields Entry window without selecting an option from the dropdown.

The Lead Source dropdown will be added to the existing SOP Required Fields Enhancement which does NOT allow the user to save the SOP Document without having certain User Defined Fields entered.

Lead Source SubType

The user will enter the Lead Source SubType. This field is a string field which will hold up to 20 characters.

The Lead Source Entry window will automatically open when the Sales User Defined Field Entry window opens. The Lead Source window will be placed directly to the right of the Sales User Defined Field Entry window similar to the example below. If the user closes the Lead Source window and wishes to reopen it, the Lead Source window may also be opened by navigating to Additional > Lead Source.

Please Note:

  1. If the Sales Document is transferred, the Lead Source information will transfer.
  2. If the Sales Document is deleted, the Lead Source information will be deleted.

Navigation: Inquiry > Sales > Sales Documents > Sales Transaction Inquiry Zoom > Sales User Defined Fields Inquiry

The Lead Source window will automatically open when the Sales User Defined Fields Inquiry window opens from the Sales Transaction Inquiry Zoom window. The window will be placed to the right of the Sales User Defined Fields Inquiry window as described above. The fields on the Lead Source window will not be editable when accessed through the Sales Transaction Inquiry Zoom.

For Information on this or any other WilloWare customization or product, please contact us at:

//willoware.com/contact-me/

CompleteCount 2021-07-29

Release Date: 29-JUL-2021
GP Versions: 12/14/16/18
CompleteCount Build: 3.51
* NEW TABLE added with this release. The COMPLETE INSTALLATION ROUTINE is required.
* Stock Tag Inquiry: can now view both unposted and posted Stock Tags
* Excel Export/Import: (1) added Counted By column in the export/import file (2) imported file name information is now retained with the Stock Count and moved to Stock Tag History when the count is submitted. (3) addressed issue with the Excel Import routine that could leave a stranded Excel process with a file lock on the import file.

MFG PowerPack 2021-07-28

Release Date: 28-JUL-2021
GP Versions: 12/14/16/18
MFG PowerPack Build: 7.178
* Edit MO Status (EMOS) Query: Add Copy/Paste function that supports pasting a list of MOs into the EMOS Query window which can be used to restrict the MOs shown in the Edit MO Status window (CR1334).
* NEW: SOP Number to MO Number: MO’s created from Sales Transaction Entry will be created with the SOP Number and a SOP Line Number (such as ORD1227#0001).

Customization CR0457 Automated Forecast

Customization CR0457

Automated Forecast

Description of Need:

ACME Would Like:

  • Ability to specify Item Classes to include on a Forecast. Specify the item classes linked to a specific Sales Forecast ID.
  • Specify number of months forward to forecast. Forecast quantity is the quantity sold for the same period the previous year.

Requirement:

  • User creates a Forecast “header” containing the Plan Name and Forecast Period. The Start Date/End Date are not important as those will be calculated and updated automatically.

Description of Solution:

Navigation: Tools >> Utilities >> Manufacturing >> Auto-Forecast

Field Function
Plan Name User selects an existing Manufacturing Sales Forecast. The following information must be on the Forecast:

  • Plan Name
  • Period (Quantity and Type, i.e. 2 Weeks)
  • Forecast Start Date

The Forecast End Dates and History Start/End Dates are not important and will not be used. The Forecast End Date will be set automatically when the Auto-Forecast utility is run.

Forecast Periods This is the number of periods to forecast forward.

If the period is “2 Weeks” and the desired forecast should cover 1 year, Forecast Periods should be 24 (i.e. 24 two-week periods.)

Item Class The Item Class or Classes to include on the forecast. All items in the Class(es) will be forecasted and added to the forecast.
SAVE Saves the Auto-Forecast information
UPDATE The user will be prompted to confirm they are ready to update the Forecast before it proceeds. See below.

The forecast quantity will be calculated from sales history for each item during the same period during the prior year. For example, if forecasting 5/1/2020 to 5/14/2020, the total sales (less returns) will be pulled form 5/1/2019 to 5/14/2019.

The first time the utility is run, or if a new item is added to the class, all periods will be populated on the forecast from available sales history (or filled in with zero). For an existing forecast, historical periods will be filled with zeros until the current period is reached. Then all future periods will be populated with data from sales history.

The period size (i.e. 2-weeks) will be used from whatever is on the Sales Forecast. The number of periods to forecast will be stored on the Auto-Forecast window, above. Each time the utility is run, it will add “new” periods to the end of the existing forecast without changing numbers for any currently forecasted periods. Therefore, if it is one month later than the last time the utility is run, and it is forecasting 1-year, the utility will add 1-month to the end of the forecast.

Update

The update process will check if any new items need to be added to the forecast based on the Item Class. If not, the items on the forecast will be used to drive the forecast. If a user manually adds items to the forecast, those will be included in the Auto-Forecast update.

For each item, the utility will:

  • Find the last forecast period on the forecast
  • Calculate how many additional forecast periods need to be added
  • Get sales history for each one of those periods
  • Add the sales history to the forecast
  • Update the Forecast End Date

For Information on this, or any other WilloWare customization or product, please contact us at:

www.willoware.com/contact-me