Release Date: 15-DEC-2022
GP Versions: 12/14/16/18
MFG PowerPack Build: 12.211
* Serial Number Mass Entry: The paste field has a limit of 32,000 characters. To insert a very large number of serials, a user would need to paste close to the capacity of the window, insert, then repeat the process. This build addresses an error where subsequent paste/insert would generate a duplicate key error. (#202202385)
Author: admin
MFG Import 2022-12-12
Release Date: 12-DEC-2022
GP Versions: 12/14/16/18
MFG Import Build: 3.59
* Routing Import: (1) Added ability to export Map, (2) Fixed issue with import from excel where an error occurred because it was incorrectly attempting to execute a status update that occurs with SQL table imports.
* BOM Import: Updated the Map Export routine so it provides the default value used then the field map is “Default”
MFG PowerPack 2022-12-08
Release Date: 8-DEC-2022
GP Versions: 12/14/16/18
MFG PowerPack Build: 12.210
* PowerATP: addressed issue with Item Number zoom that did not correctly identify the Security Role POWERUSER so it could not open Item Maintenance or Item Inquiry (#202202316). However, this issue was not specific to the PowerATP window, any Item Number zoom in MFG PowerPack would have experienced the same issue, as will several other zooms.
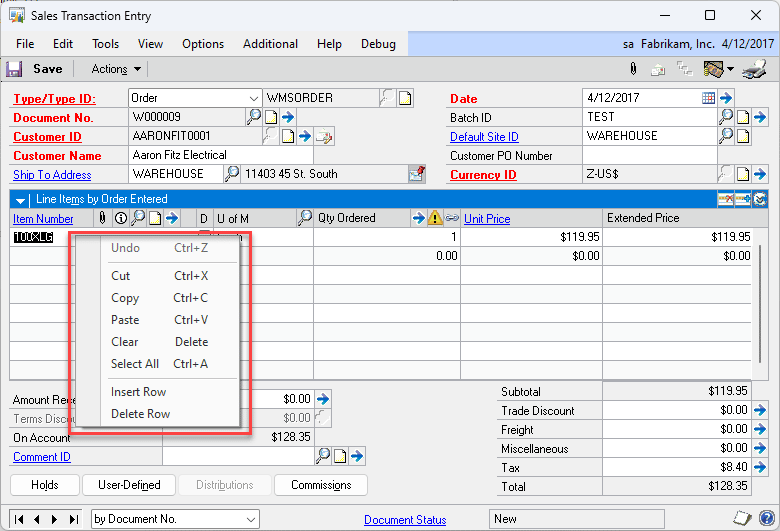
* NEW TWEAK-Turn off Job Cost Menus: this turns off the Job Costing right-click menus which allows GP to again display the normal right-click menu to Insert Row, Delete Row, Copy, etc.
Job Cost Menus ON:
Job Cost Menus OFF:
Consulting Toolkit 2022-12-07
Release Date: 7-DEC-2022
GP Versions: 12/14/16/18
CTK Build: 2.31
* Updated for GP18.5 Release
MOGenerator 2022-12-06
Release Date: 6-DEC-2022
GP Versions: 12/14/16/18
MOGenerator Build: 4.111
* MORI: “Check for Shortages”–fixed an issue in this routine that was not accounting for phantoms and therefore giving an inaccurate “picklist shortage” error when non existed. (#202201984)
Customization DS1394- PO Generator Enhancements
Customization DS1394
PO Generator Enhancements
Problem Definition:
ACME would like to add the following functionality to the PO Generator windows:
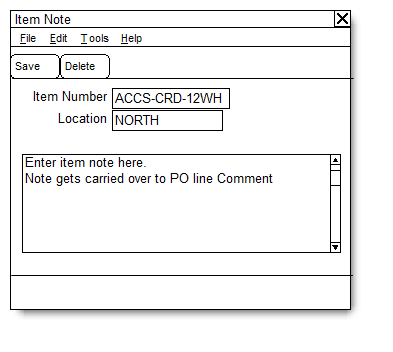
- They need to add a Note to some lines and have the Note added to the PO Line Comment when the PO is created.
- They need an indicator that allows them to quickly see which lines have Notes in the PO
Generator Preview window.
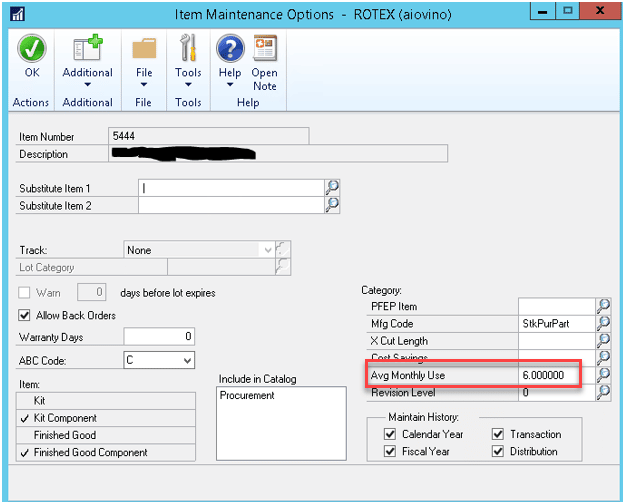
- Item Maintenance Options User Defined #5 is used to store “Average Monthly Use”. They need to see this number on the PO Generator windows.
Additionally, ACME would like to be able to identify which POs came from PO Generator and have them automatically put On Hold until reviewed by a user.
Design Features:
PO Generator Enhancements
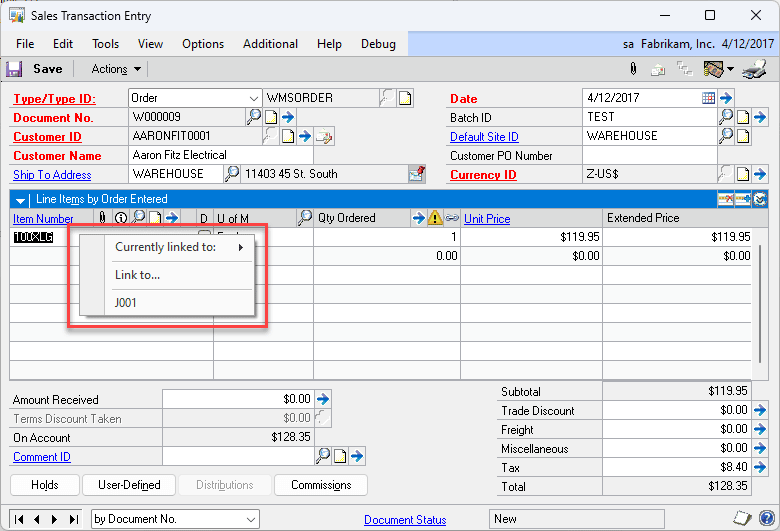
Navigation: from either the Suggested PO Preview window, or the Suggested PO Detail window, select Additional >> Add/Edit Note

A window will open where you can enter a note (up to 500 characters, the PO Line Comment is limited to 500 characters). Once a note has been added, the Vendor Name field will show “** NOTE”—this change is on the user interface only and will not affect the Vendor Master or the Purchase Order (“**NOTE” will NOT flow through to the PO).
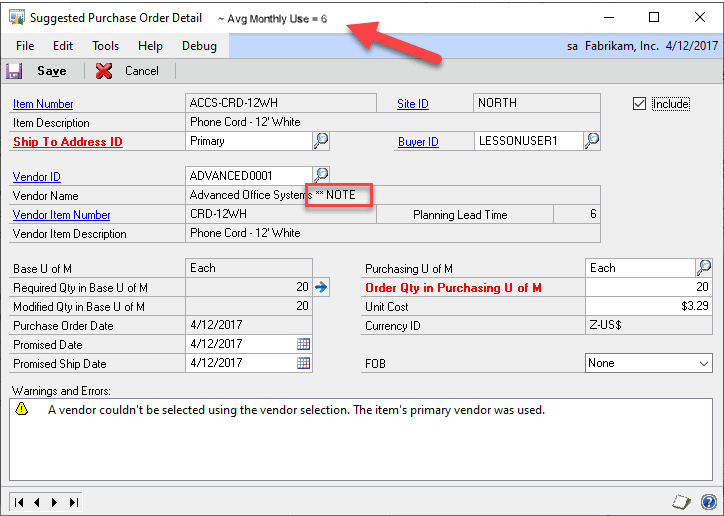
The Average Monthly Use quantity for an Item will be displayed in the Title Bar of the windows. In the PO Generator Preview window the Avg Monthly Use quantity will change when different lines are selected.
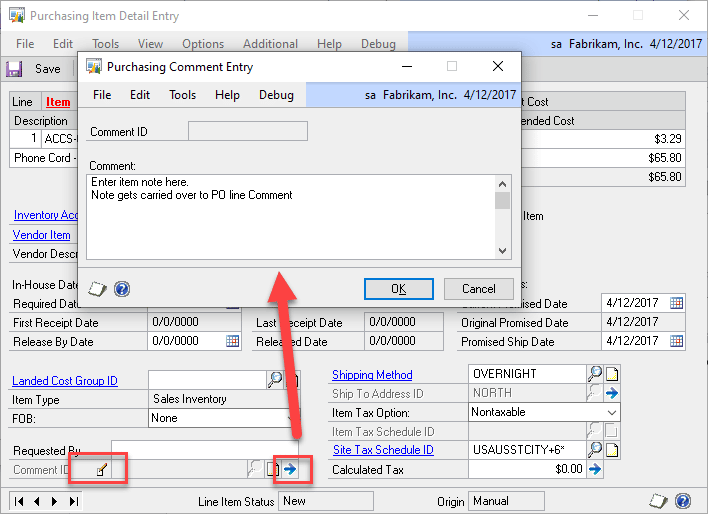
The PO Generator Item Note will be carried over to the PO Line Comment when a PO is created.
Purchase Orders created from PO Generator will automatically have the HOLD flag set on the PO. Doing this will have update the following fields in the PO Header (POP10100):
- HOLD = 1
- ONHOLDBY = User ID who was running PO Generator
- ONHOLDDATE = User Date when the Hold was added
To ensure that POs created by PO Generator can be pulled into a SmartList, the USER2ENT field in the PO Header (POP10100) will be set to POGEN. This does NOT need to exist as a User ID in GP.
Assumptions/Requirements:
- The functionality described above will not work with eConnect, any software that uses eConnect, or any software that directly writes to, updates, or deletes from SQL tables.
- The functionality described above is intended for the GP Desktop client.
- National Accounts functionality is NOT used.
- Advanced Distribution functionality is NOT used.
- Unless otherwise noted in this document, reporting is not included in this estimate.
- Unless otherwise noted in this document, Word Template functionality is not addressed.
- Unless otherwise noted in this document, the enhancement will not integrate with 3rd party products. Some examples of 3rd party products would be:
- An ISV plug-in product including WilloWare products
- A dexterity customization designed by another developer
- Dynamics GP Modules including, but not limited to:
- Project Accounting
- MDA
- Analytical Accounting
- Copy functionality found in SOP, POP and Inventory
- Field Service
- Extended Pricing
- Manufacturing
For Information on this Design, or any other WilloWare customization or product, please contact us at:
MFG PowerPack 2022-11-30
Release Date: 30-NOV-2022
GP Versions: 12/14/16/18
MFG PowerPack Build: 12.209
* Serial Number Mass Entry: Added support for FAST Sales Serial Entry in GP PowerPack
MFG PowerPack 2022-11-22
Release Date: 22-NOV-2022
GP Versions: 12/14/16/18
MFG PowerPack Build: 12.208
* SOP Backorder All: added support “Quote to Order” transfer so that the Order is created with all quantities backordered.
Customization DS1438 SOP Invoice Lines from List
Customization DS1438
SOP Invoice Lines from List
Problem Definition:
ACME is using WilloWare’s SOP-POP Multi-Link module. (SOP-POP MultiLink (willoware.com)
They have Sales Orders with several lines, and as the sales lines are received, SOP-POP Multi-Link automatically moves the quantity bucket form Qty to Back Order to Qty to Invoice. ACME needs the ability to specify which lines get transferred to invoice.
Solution Overview:
This enhancement will be active from the Sales Transfer Documents window when accessed from Sales Transaction Entry (not Sales Batch Entry)
Navigation: Sales Transaction Entry >> Transfer Action Button
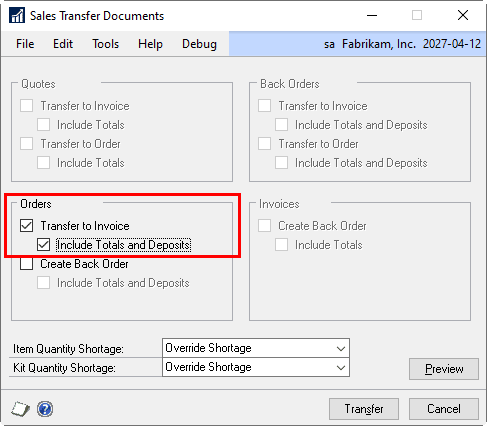
The enhancement will only be active when transferring an Order to an Invoice. See next section for more details.
Design Features:
SOP Transfer Line Selection
Navigation: Sales Transfer Documents>> Additional >> Transfer Line Selection
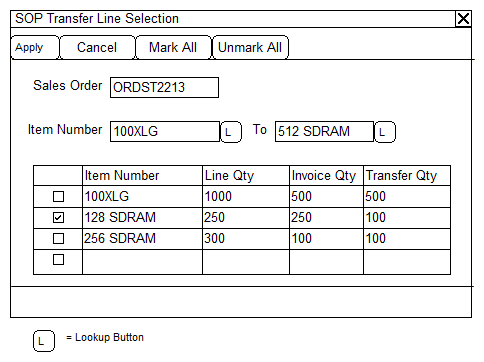
By default, GP will transfer ALL lines that are eligible to be invoiced to a single invoice. The SOP Transfer Line Selection window will allow ACME to select only specific lines and quantities to be transferred. If this window is not used during the transfer process, then all lines will be transferred (default behavior).
|
Field |
Function |
|
APPLY |
Sends the marked/unmarked status back to the sales order. If APPLY is not clicked, then any changes made will not be applied. |
|
CANCEL |
Closes the window without making changes. |
|
MARK All |
Marks all lines in the window. |
|
UNMARK ALL |
Unmarks all lines in the window. |
|
Sales Order |
Displays the sales order being transferred. |
|
Item Number From/To |
Allows the user to enter an item number or a range of item numbers to filter the list. |
|
Scrolling Window |
Displays all the sales lines with a Qty to Invoice > 0. By default, all lines will be unmarked. Use the checkbox to indicate the line should be transferred. |
|
Transfer Qty |
This is the quantity that will be transferred to invoice. By default, this value will be the maximum amount (Invoice Qty), but can be reduced if only part of the line is to be transferred. Partially transferring a line will allow the line to be transferred multiple times until all the Qty to Invoice has been transferred. |
If lines have been marked, the Sales Transfer Documents title bar will be updated to include the text
“ – Sales Line Selections”.

When the user clicks TRANSFER, only line quantities marked will be moved to invoice.
Assumptions/Requirements
- The functionality described above will not work with eConnect, any software that uses eConnect, or any software that directly writes to, updates, or deletes from SQL tables.
- The functionality described above is intended for the GP Desktop client.
- National Accounts functionality is NOT used.
- Advanced Distribution functionality is NOT used.
- Unless otherwise noted in this document, reporting is not included in this estimate.
- Unless otherwise noted in this document, Word Template functionality is not addressed.
- Unless otherwise noted in this document, the enhancement will not integrate with 3rd party products. Some examples of 3rd party products would be:
- An ISV plug-in product including WilloWare products
- A dexterity customization designed by another developer
- Dynamics GP Modules including, but not limited to:
- Project Accounting
- MDA
- Analytical Accounting
- Copy functionality found in SOP, POP and Inventory
- Field Service
- Extended Pricing
- Manufacturing
For Information regarding this customization, or any other WilloWare customization or product module, please contact us at:
MFG PowerPack 2022-11-15
Release Date: 15-NOV-2022
GP Versions: 12/14/16/18
MFG PowerPack Build: 12.207
* Serial Number Mass Entry: (1) changed POP and SOP serial entry to use direct to table SQL updates to optimize speed, (2) Added Excel import
GP PowerPack 2022-11-12
Release Date: 12-NOV-2022
GP Versions: 12/14/16/18
GP PowerPack Build: 6.162
* NEW * FAST Sales Serial Entry: Replaces the Sales Serial Entry window with one that is FAST with large quantities of serial numbers. It has Serial Number and Bin search fields that allow locating records using “contains”, “begins with” and “ends with” search (plus other options). Select multiple serial numbers by “marking” them, rather than having to click on the serial number and then click insert.
GP PowerPack FAST Sales Serial Entry
FAST Sales Serial Entry replaces the standard Dynamics GP Sales Serial Entry window with one that can easily handle very large number of serial numbers. In GP2013 Microsoft added the ability to “multi-select” serial numbers which required changing the “Available Serial Numbers” scrolling window to a list view window. A list view is similar to the SmartList window, it allows multi-select but it is very slow to fill with data. If you have several hundred serial number, or more, the standard Sales Serial Entry window takes a very long time to open because the list of Available Serial Numbers needs to populate first with ALL serial numbers.
The FAST Sales Serial Entry window replaces the list views with scrolling windows which are very quick to load. The FAST Sales Serial Entry also provides:
- The ability to search for serial numbers using contains, begins with, ends with and more
- The ability to restrict by bin using contains, begins with, ends with and more
- The ability to quickly choose a serial number by marking it (rather than having to select and click insert)
The window will open automatically instead of the standard GP Sales Serial Number Entry window. It works with Sales Transaction Entry and Sales Separate Fulfillment.
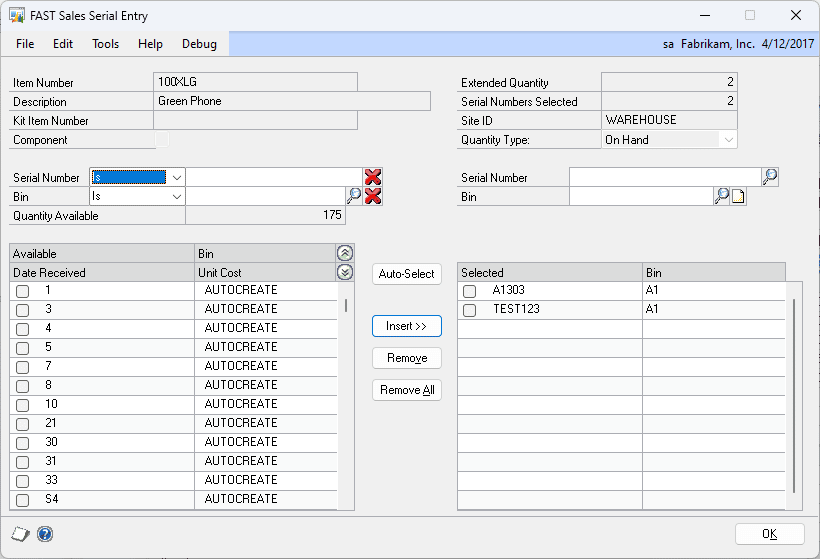
Serial Number Search: Choose a search operation (Is, Is not, Contains, etc), then enter a search term and press the TAB key. The Available Serials window will redisplay. Click the red X to clear the field and refresh the list.
Bin Search: Choose a search operation (Is, Is not, Contains, etc), then enter a search term and press the TAB key. The Available Serials window will redisplay. Click the red X to clear the field and refresh the list.
Auto Select: Auto Select will pick the number of needed serial numbers based on the Item’s Valuation Method. For example, LIFO will pick serials from the bottom of the list first where FIFO will pick from the top of the list.
MFG Import 2022-11-11
Release Date: 11-NOV-2022
GP Versions: 12/14/16/18
MFG Import Build: 3.58
* BOM Import: (1) fixed issue with Valuation Method validation that was preventing import of standard cost components into an actual cost finished good. (2) added ability to export the BOM ImportMap setup (see GoTo Button on Import Map Setup)
MOGenerator 2022-11-08
Release Date: 8-NOV-2022
GP Versions: 12/14/16/18
MOGenerator Build: 4.110
* MORI: (1) Now truncates the error log (note) at the bottom (oldest errors) for an MO if it reaches the maximum length of a note, and then it continues to add new errors to the top, (2) Added check for a locked BOM before attempting to process an MO Receipt, (3) Added a new “next MO” selection routine that is entirely SQL based to reduce the possibility of collisions between two GP client processors.
Should I update GP?
Yes.
There are tens of thousands of GP users poking around every nook and cranny of the software every day. Every release contains not only new features, but bug fixes. Even after decades of heavy use people are still able to come up with unique things to do to the software that shake out a previously unknown issue, and Microsoft fixes it.
A bit off topic for this post…but consider for a moment the implication of usage history (or lack thereof) with a newer ERP package.
A major benefit of Annual Enhancement is being able to get the latest version of the software which includes new features that you may use, and fixes that may be relevant to you now and perhaps ones you WILL wish you had in the future if you postponed updating.
A few years back WilloWare changed our build numbering logic to what we call a “unified build number”. In the past, each build of our software for each GP Major version had its own build number. For example, GP PowerPack would have looked like this:
- v12.2.137 (for GP2013)
- v14.2.80 (for GP2015)
- v.16.2.48 (for GP2016)
- v18.2.20 (for GP2018)
We have always maintained ONE code base for ALL GP versions, and within that one code base were all of the options needed to make it work on the different versions of GP. If something was different in GP2016 versus GP2018 we would add “switches” in our software so it could figure out which version of GP was in use and use the correct version of its code to be compatible with the version of GP.
The single code base means that new features and fixes are available across all supported versions of GP (currently we’re still supporting GP2013). To reflect this, we started using one build number across all versions of GP. We compile the code separately for each GP major version and that is shown in the first part of the build number (i.e. “12”). The next two numbers are internal. For example:
- v12.2.138
- v14.2.138
- v16.2.138
- v18.2.138
The “2.138” is our internal build. “2” will change to “3” if there are SQL object changes, and the final number always increments with each release (so “138” to “139”).
We just completed updating all of our products for GP18.5, and the ReadMe file for the products will note something like “Updated for GP18.5 Release”. Does this mean it only has changes relevant to GP18.5? No.
Our products have a large amount of “common” code–it is the same in every product. If you open the About window for one of our products, at the bottom you will see a section like this:
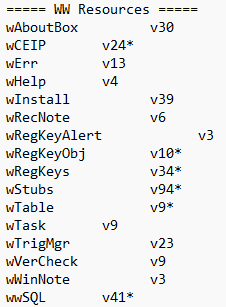
This is reporting on the state of our internal reusable code modules and the asterisk indicates there is a newer version of that module. The WW Resources are how our products interact with GP and SQL Server. For example, they control how we open a window, or execute a query in the database.
We have so many users hammering away in GP and our products that they find things, and we try to fix or improve them quickly. If it is critical, we will roll out new builds of all modules immediately, however many changes are good to have but not critical. For example, we recently made some changes to our SQL module to improve performance and robustness when faced with server-side failures.
This type of change is not noted in the ReadMe file of your WilloWare product, but it is tracked internally in the change history each WW Resource.
Every release of our software applies to every version of GP, so the “GP18.5” releases, at a minimum, contain the latest updates to all of the “internals” of whatever product you have.
The primary benefit of Annual Enhancement is the ability to receive these updates, and we are always working hard to make our software the best it can be. When you ask, “Should I update my WilloWare software?” the answer is Yes.
SpellCheck 2022-11-08
Release Date: 8-NOV-2022
GP Versions: 12/14/16/18
SpellCheck Build: 1.30
* Updated for GP18.5 Release
Preactor Integration 2022-11-08
Release Date: 8-NOV-2022
GP Versions: 12/14/16/18
Preactor Integration Build: 1.18
* Updated for GP18.5 Release
MFG PowerPack 2022-11-08
Release Date: 7-NOV-2022
GP Versions: 12/14/16/18
MFG PowerPack Build: 12.206
* MRP Alternates: added support for adjusting purchasing requirements based on the MRP Picklists from MRP Suggested MOs (#202202037)
MFG Import 2022-11-07
Release Date: 7-NOV-2022
GP Versions: 12/14/16/18
MFG Import Build: 3.57
* Routing & BOM Imports: (1) addressed issue with error reporting module that caused it to incorrectly identify that an import had errors, (2) fixed yellow highlight on Error Log button so it correctly switches between yellow and normal background when there are errors/no errors, (3) changed label on Errors window button from “Re-Process” to “Clear Error Log”, (4) Import button now automatically clears error log if it hasn’t already been cleared by the user.
MFG PowerPack 2022-11-03
Release Date: 3-NOV-2022
GP Versions: 12/14/16/18
MFG PowerPack Build: 12.205
* Quick Disassembly: fixed issue created in build 10.198 which added the an option to merge quantities for the same item into one line. When disassembling from an MO, this change resulted in adding the previous line’s quantity to each new line. (#202201900)
MOGenerator 2022-11-01
Release Date: 1-NOV-2022
GP Versions: 12/14/16/18
MOGenerator Build: 4.109
* Updated for GP18.5 Release
* MORI Error Log Window: (1) addressed issue in the Date Restriction field that cause it to not restrict by the date entered (#202202022), (2) added Date search criteria so window can be restricted by date equal to, greater than/equal to, less than/equal to, or not equal to, (3) Next/Previous buttons in expanded scroll now move between records correctly.
MFG PowerPack 2022-11-01
Release Date: 1-NOV-2022
GP Versions: 12/14/16/18
MFG PowerPack Build: 12.204
* Vendor Pricing: addressed issue where the PO Entry window was not allowed to open after creating a PO from the MRP-Planned Orders window because the Vendor Pricing window was still open. Vendor Pricing now automatically closes after successful creation of the PO so that the PO Entry window can open. (#202202037)
SOPPOPMultiLink 2022-10-31
Release Date: 31-OCT-2022
GP Versions: 12/14/16/18
SOPPOPMultiLink Build: 1.9
* Updated for GP18.5 Release
* Item PO-SO Assignment: addressed issue in scrolling buttons that caused a lock to not be released on the Item
MFG Import 2022-10-31
Release Date: 31-OCT-2022
GP Versions: 12/14/16/18
MFG Import Build: 3.56
* Routing & BOM Imports: addressed issue with error reporting module that could cause an ‘incorrect syntax’ error when importing from Excel and there is invalid data the file. The error reporting would still correctly reports all errors and the import would run fine if the file data is all valid.
* Boo! Happy Halloween from WilloWare!
MFG PowerPack 2022-10-27
Release Date: 27-OCT-2022
GP Versions: 12/14/16/18
MFG PowerPack Build: 12.203
* FULL INSTALLATION ROUTINE REQUIRED
* This release includes a new SQL table
* Updated for GP18.5 Release
* BOM Alternates-Picklist: this release contains a major update to the Picklist Alternates window. Previously the window assumed that Primary-Alternate items were swappable (i.e. if you are short 8 of the Primary you can use 8 of the Alternate). The Picklist Alternates window can now handle two types of Primary-Alternate Relationships. One where the items are interchangeable and you could use some of both in a single Manufacturing Order, and one where you can use the Alternate in place of the Primary, but not both at the same time. Often when items can be measured in decimals, there is not a good way for the software to determine if one can be used to meet a shortage of the other, or if it must be used in place of the other. There is now a default “alternate item usage” setting, and also the ability to specify that setting per Primary-Alternate Item relationship. Color coding in the window now uses colored Dots (for Primary-Use Up Item relationships) and colored Squares (for Primary-Alternate Item relationships). The color coding has been refined to provide more information about the availability and/or shortage of the Primary-Alternate/Use Up items. NEW SETUP IS REQUIRED BEFORE USING BOM ALTERNATES.
* Item Class Serial/Lot Mask: The setup window has been updated so that when a new Template Item is used the window will generate the next available serial/lot number and use that as the starting point for all items in the Item Class. Previously it attempted to retrieve that “maximum” existing last generated serial/lot number, which could cause it to inadvertently flip to an incorrect last serial/lot.
MFG Import 2022-10-25
Release Date: 25-OCT-2022
GP Versions: 12/14/16/18
MFG Import Build: 3.55
* Updated for GP18.5
MFG Data Archive 2022-10-25
Release: 25-OCT-2022
GP Versions: 12/14/16/18
MFGDA Build: 1.30
* Compatibility Release for 18.5
LabelLink 2022-10-25
Release Date: 25-OCT-2022
GP Versions: 12/14/16/18
LabelLink Build: 2.44
* Updated for GP18.5 Release
LeanMFG 2022-10-25
Release Date: 25-OCT-2022
GP Versions: 12/14/16/18
LeanMFG Build: 3.54
* Updated for GP18.5 Release
Item Process Tracking 2022-10-24
Release Date: 24-OCT-2022
GP Versions: 12/14/16/18
IPT Build: 2.19
* Updated for GP18.5 Release
* Data Record Entry: fixed issue that affected Items assigned to multiple Data Sheets for the same transaction. When this situation exists, the Data Record Entry window would only create a Data Record for the alphaneurically “first” Data Sheet assigned to the Item.
* Item Data Sheet Maintenance: fixed issue where the Data Sheet Description would not populate when entering a new Data Sheet ID into the scrolling window.
GP18.3+ Delete/Void Bug
DATE: 20-OCT-2022
Summary: Deleting partial Invoice corrupts originating Order on GP18.3+
In GP18.3 a change was made to how SOP deletes/voids a document. It appears that the objective was to “rollback” the QTY Invoiced on the Originating Order when the linked Invoice is deleted or voided. The scenario the change appears designed to address is this:
- A Sales Order with one or more lines has a partial quantity change to QTY To Invoice
- The quantities are transferred to Invoice
- The Invoice is the voided or deleted
It appears that an attempt was made to “reset” the Order so that those same quantities could be invoiced again.
However, the Quantity Previously Invoiced is incorrectly updated as follows:
- EVERY line on the Originating Order is updated (not just the lines from the Voided/Deleted Invoice)
- The calculation is wrong. It is decreasing QTY Previously Invoiced by (QTY – QTY To Invoice – QTY To Back Order). Since this is not considering the lines and quantities on the Voided/Deleted Invoice, by subtracting the values from the Originating Order from itself, it wipes out all previously Invoiced line quantities. Subtracting QTY To Backorder is completely incorrect.
When you Void/Delete an invoice it makes the quantities on the originating order incorrect. If you then run SOP/INV reconcile it further exacerbates the problem because it attempts to adjust the sales order and inventory to reflect the incorrect QTY Previously Invoiced.
As of 20-OCT-2022 (GP18.5) this issue has not been fixed.
NOTE: The specific dexterity procedure involved is SOP_DeleteVoid_PreInit. Comments indicate that this is used by Credit Card Processing applications. If you need this bug fix AND you are using Credit Card processing, please use caution when enabling the bug fix to ensure the Credit Card application still responds correctly when deleting/voiding documents.
Our GP PowerPack release on 20-OCT-2022 contains a SOP-Tweak called “Fix GP18.3+ Delete/Void Bug” that will prevent the issue.
GPPowerPack 2022-10-20
Release Date: 18-OCT-2022
GP Versions: 12/14/16/18
GP PowerPack Build: 5.161
* Updated for GP18.5 Release
* PO Document IDs: Updates so it works better with WilloWare’s Blanket PO module. BPO uses the title bar of the PO Entry window to display information about the Blanket PO, and PO Doc IDs also tries to put the current PO Doc ID into the title bar. Now if BPO is enabled (the PO Entry window is in Blanket PO mode), you can still use PO Doc IDs but the current Doc ID will not be displayed in the PO Entry title bar.
* SalesPro Item Lookup: added option on the window to control, per user, whether or not SalesPro opens instead of the normal GP Item Lookup from Sales Transaction Entry.
* Select Checks Filters: added a date filter option of Today + Days. This allows creating a filter that retrieves all documents with a Due Date On or Before the current date + 30 days.
* NEW SOP Tweak: “Fix GP18.3+ Delete/Void Bug”. In GP18.3 a change to how SOP handles Deleting/Voiding an Invoice can corrupt the originating order, which then can corrupt inventory when SOP/INV reconcile are run. This Tweak fixes the bug. Please see the document and/or our website for details. Read More Here.
MOGenerator 2022-10-19
Release Date: 19-OCT-2022
GP Versions: 12/14/16/18
MOGenerator Build: 4.108
* MORI: addressed issue with the call to Manufacturing Make_WO_Router that could result in the working routing (WR010130) not being created with single-step integrations. This would also affect MO Scheduler and MOGenV2.
EZImport 2022-10-17
Release Date: 17-OCT-2022
GP Versions: 12/14/16/18
EZImport Build: 1.17
* Updated for GP18.5 Release
Engineer to Order (ETO) 2022-10-17
Release Date: 17-OCT-2022
GP Versions: 12/14/16/18
ETO Build: 2.41
* Updates for GP18.5 Release
CompleteCount 2022-10-14
Release Date: 14-OCT-2022
GP Versions: 12/14/16/18
CompleteCount Build: 3.54
* Updated for GP18.5 Release
* Mass Add: (1) added Item Inactive flag to the selection criteria, (2) window clears everything when changing the Task, (3) Stock Count ID field now prompts to Add Count if the Count ID does not exist (4) Added Stock Count ID zoom
* Print Tags: Use Item Qtys Bin now only enables if multi-bin is not enabled
* Tag Reports: (1) All reports can now be sent to Excel, (2) Addressed issued in Variance to Report that could cause it to exclude captured not counted items.
* Tag Inquiry & Tag Entry: Added option on the bottom of the windows to change how the Captured Quantity is calculation, such as By Item Number, By Item-Site, By Item-Site-Bin, by Item-Site on Tag, by Item-Site-Bin(s) on Tag, etc.
* Tag Submit: This only affects situations where Count IDs are reused–added a control on HxNum in the CompleteCount history tables to keep it in sync with SEQNUMBR in the Stock Count history tables to help ensure that inquiries on historical counts/tags are able to tie Tags to the originating Stock Count when Stock Count IDs are reused. It is possible to submit tags, which increments the HxNum, but then delete the Stock Count before posting, which leaves HxNum +1 over SEQNUMBR. Alternatively, it is possible to reuse a Count ID, manually enter a count and post that which would cause SEQNUMBR to be +1 over HxNum. To prevent this, manually entered counts should not re-use Stock Count IDs.
BlanketPO 2022-10-07
Release Date: 7-OCT-2022
GP Versions: 12/14/16/18
BlanketPO Build: 1.42
* Update for GP18.5 Release
* The Shipping Method on Control Lines can now be changed and rolled down to all unfirmed release lines.
DS1333 ATP Demand Planning
DS1333
ATP Demand Planning
Problem Definition:
ACME uses WilloWare’s PowerATP window and MRP. The approach with MRP is that it detects a shortage and suggests creating a new supply (i.e. a PO) or changing the date/quantity of an existing supply transaction (i.e. moving a PO date earlier). In a distribution environment it is more common to have fixed supply transactions and you need to change the demand transaction to account for the timing/quantity of the supply.
ACME would like a way to run PowerATP calculations for a large number of items and then have a report (or some way to view the results) that shows ONLY the negative ATP lines. One of the selection criteria needs to be LLC because they will start by running this at the lowest level first. If shortages are detected, they will use PowerATP to view the item and adjust the transactions (i.e. manufacturing orders).
For example, if a Vendor moves a PO Ship Date out, this would cause a shortage in an MO that needs the purchased part. The PowerATP utility would report the MO as being short. They will adjust the start date on the MO, then run the PowerATP utility again for next LLC up (i.e. if the first run was for LLC 3, the next run will be for items at LLC 2).
The output from the PowerATP utility should be:
- Site ID/Location
- Item Number
- LLC
-
From the PowerATP calculations:
- Document Type
- Document Number
- Quantity Out (demand)
- ATP
- Date
- Transaction Information
Design Features:
ATP Demand Planner
Navigation: Inquiry >> Manufacturing >> ATP Demand Planner
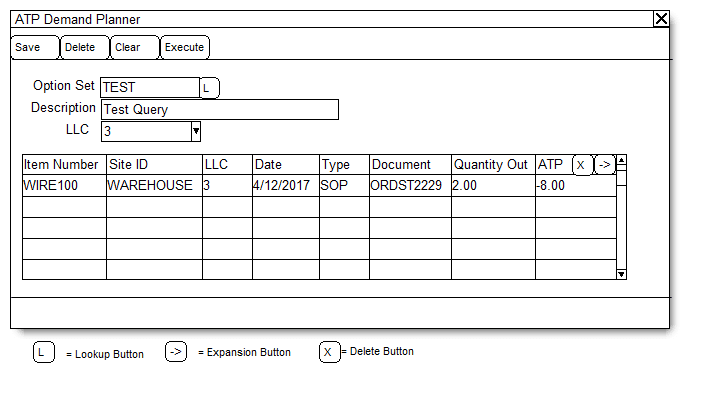
|
Field |
Function |
|
Option Set |
An Option Set ID from PowerATP |
|
Description |
A Description of the Query |
|
LLC |
The Low Level Code included in the query. The LLC dropdown will be populated with a list of LLC codes from the Item Engineering table (IVR10115). A LLC must be selected. |
The ATP Demand Planner is used to set up a set of selection criteria that identifies a list of Items to run through the PowerATP calculations. It uses a combination of LLC specified here, plus any Item and Item-Site restrictions specified on the PowerATP Option Set.
For example, if the Option Set does not have any Item or Site restrictions the ATP Demand Planner will run for all items in Item Engineering that have the specified LLC. If the Option Set includes Item or Item-Site restrictions, those will reduce the number of items included in the process (i.e. items that have LLC 3, where the Item Number is in the Items list, which also have one of the specified Item-Site associations).
Click EXECUTE to run the utility.
The utility will first confirm you are ready to delete the existing ATP Demand Planning information. The information displayed in the scrolling window is stored by User ID. It is retained after the window is closed. When you open the window again the scrolling window will display the last Demand Planning results you generated (multiple users can have different sets of data). When you click EXECUTE it clears your Demand Planning results and repopulates it with the criteria.
The EXECUTE process will identify a list of items to process then:
- Open the PowerATP window and enter the Option Set
- Feed an Item Number into the PowerATP window and run the ATP calculation
- Scan the results for any negative ATP values. If any are found, it will store them in the Demand Planning Results table (which fills the scrolling window in the ATP Demand Planning window).
NOTE: While this process is running it will completely occupy the users Dynamics GP client. No other work can be done with the client while the process is running.
Double-click on a row to open the item in the PowerATP window (or click on a row then click the Expansion button). When the item is loaded in the PowerATP window all of the ATP data can be viewed for the item, and changes can be made to the shortage documents.
Remove lines from the Demand Planning window by clicking on a row and clicking the DELETE ROW button (Edit >> Delete Row). Remove rows from the window as you adjust the shortage documents. Removing a row does not affect the shortage document.
Assumptions/Requirements:
- The functionality described above will not work with eConnect, any software that uses eConnect, or any software that directly writes to, updates, or deletes from SQL tables.
- The functionality described above is intended for the GP Desktop client.
- National Accounts functionality is NOT used.
- Advanced Distribution functionality is NOT used.
- Unless otherwise noted in this document, reporting is not included in this estimate.
- Unless otherwise noted in this document, Word Template functionality is not addressed.
- Unless otherwise noted in this document, the enhancement will not integrate with 3rd party products. Some examples of 3rd party products would be:
- An ISV plug-in product including WilloWare products
- A dexterity customization designed by another developer
- Dynamics GP Modules including, but not limited to:
- Project Accounting
- MDA
- Analytical Accounting
- Copy functionality found in SOP, POP and Inventory
- Field Service
- Extended Pricing
- Manufacturing
For information on this design spec, or any other WilloWare customization or product, please contact us at:
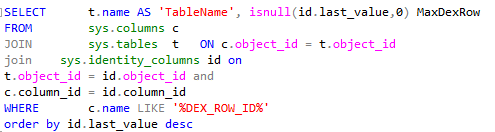
Prevent DEX_ROW_ID Overflow
You may not have given this a thought, but every Dynamics GP database table has a DEX_ROW_ID column, and there is a maximum value for that field. It is 2,147,483,647. Just over 2 billion.
Every time you add a record to a GP table the DEX_ROW_ID increments by one. It does not decrement when you remove a record. If you delete a record, then add another one, it will have DEX_ROW_ID of two.
Some tables, particularly with GP Manufacturing, see a very high volume of data, although this is not just a Manufacturing related issue. At some point, when the DEX_ROW_ID becomes too large for the datatype (SQL int), you will receive an error like the one shown below.
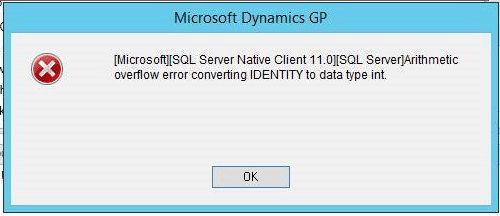
Arithmetric overflow error converting IDENTITY to data type int.
When this occurs data can no longer be added to the table. If this were to happen on a GL table, it would render GP non-functional until the issue was resolved.
We are not going to cover how to address this because there can be unique issues with each table that require a different approach, addressing it requires SQL scripting, and it has the potential to result in data loss and damage to the database if not done correctly.
However, it is worth checking now to see if you might have a problem brewing so you can take steps now to prevent an issue.
Download a ZIP of a SQL script to find GP tables with the largest DEX_ROW_ID (note: this is not the same as tables with the most records). The ZIP file contains a text file with the SQL script. Below is also an image of the script. If tables are getting close to the 2 billion number shown above, contact a GP & SQL expert for assistance.
DS1173- Rental Inquiry
DS1173
Rental Inquiry
Problem Definition:
ACME provides floral arrangements and event planning services. An important aspect of planning an event is managing their rental equipment inventory. This is currently a paper process which does not provide good visibility into the availability of equipment on a given date.
ACME needs a solution in Dynamics GP that provides the ability to see availability of rental inventory, and to reserve it for specific dates.
Solution Overview:
ACME will use Dynamics GP Sales Transactions to manage their rental inventory. That process is described in detail below. The proposed customization will add a Rental Inquiry window, which is described in the following section.
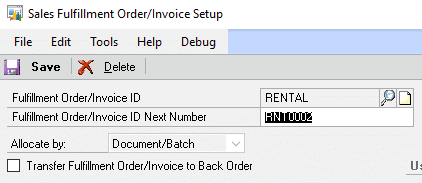
All rental invoices will be kept in a Batch called RENTAL. These invoices will NOT be posted. They are used solely for allocating inventory. The Sales Invoice ID will be set to Allocate By Document/Batch.

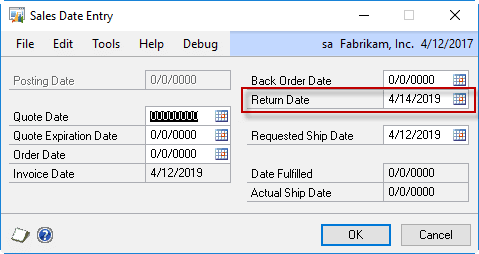
The Sales Invoice will be created as shown above. The DATE field will be used to record the date on which the inventory is first needed. In the example above, the inventory is required on 4/12/2019.
NOTE: The Invoice Note (the note button to the right of Document No.) can be used to record descriptive information about the rental. And the Document Attach feature (the paperclip at the top right) can be used to attach other documents to the Rental Invoice.
The Sales Date Entry window will be used to record the RETURN DATE (shown below):
Rental inventory will be added to the transaction as shown below:

ACME will use a SmartList called Rentals to see all of the pending rentals:
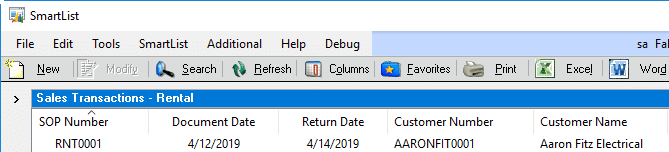
This SmartList can be used to quickly find rentals due to be delivered on a particular day. The rental can be opened by double-clicking on it in this window, and a Picking Ticket printed.
When the inventory is Picked, ACME will “allocate” the transaction via the Options >> Allocate/Fulfill menu on Sales Transaction Entry. Allocating the transaction will allocate the rental equipment in the inventory module so WF can look at the Item Inquiry window (or other reports) and see the expected quantities of inventory that are physically available at any given time (i.e. what is in the warehouse vs out at a rental site). In other words, if the inventory count it accurate, On Hand – Allocated = current quantity in warehouse.
When the rental inventory is returned, ACME will print another packing slip which will be used to confirm the correct quantities of all items have been returned. This completed document will be the “trigger” to complete the final step of the rental process in Dynamics GP: Voiding the Invoice. Voiding the invoice will unallocate the inventory and move the document to history.
Design Features:
Navigation: Inquiry >> Inventory >> Rental Inquiry
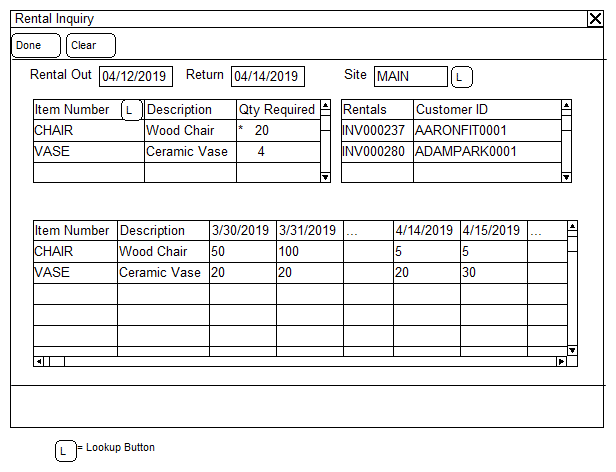
The Rental Inquiry window is used to check availability of all items needed for event.
Rental Out/Return: enter the dates for which the inventory will be required.
Site: Enter the location code from which the rental inventory will be sent. Leave blank to have the window consider “all sites”.
Rental Items Window: The top left scrolling window is used to enter one or more rental items needed for the event. Enter the Item Number and Quantity Required. After entering the Qty Required and tabbing out of the field the following will occur:
- If the Qty Required is greater than the Quantity Available on any day from the Rental Out to the Return, a red icon will display next to the quantity.
- The Availability Window (bottom) will refresh.
Availability Window: The Availability window will display the items entered into the Rental Items window, showing the Quantity Available for a 31-day period beginning 15-days before the Rental Out Date and continuing 15-days after the Rental Out date. There will be one column for each date.
After one or more Items have been entered into the Rental Items window, clicking into one of the existing rental Item lines will cause the Rental Invoices window (top right scrolling window) to refresh. The Rental Invoices window will show all invoices that also need the selected item during the same time period covered by the Rental Out to Return dates. Double-clicking on an invoice in this window will open it in the Sales Transaction Inquiry window
Item Usage Inquiry:
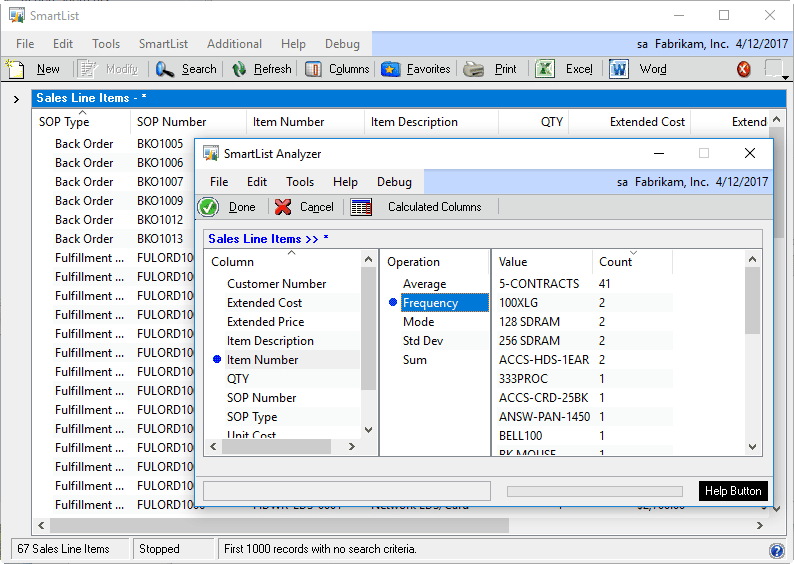
Using SmartList and WilloWare’s SmartList Analyzer, ACME can perform a quick “Item Usage” report for any Search parameters available in SmartList (i.e. such as a date range, or Customer ID, or Zip Code, etc).
(SmartList Analyzer is a module within the GP PowerPack Suite. SmartList Analyzer is $500 + $90/year Annual Enhancement. The cost of this module is not included in this estimate.)
Assumptions/Requirements:
- The functionality described above will not work with eConnect, any software that uses eConnect, or any software that directly writes to, updates, or deletes from SQL tables.
- The functionality described above is intended for the GP Desktop client.
- Unless otherwise noted in this document, reporting is not included in this estimate.
For information on this design, or any other WilloWare customization or product, please contact us:
MOP-SOP Links and MO Receipts
Posted: 17-SEP-2022
Keywords: Dynamics GP Manufacturing, MOP-SOP Links, MO Receipt Entry
The issue discussed below applies to all current versions of Dynamics GP. We released an update today for MFG PowerPack that has a new Tweak called “MO-SO Receipt Warning” that is intended to address the issue.
We recently discovered problem with Dynamics GP Manufacturing Order Receipt Entry window where it allows creating and posting an MO Receipt when the MO is linked to a SOP Document and that document is currently in use (i.e. open in Sales Transaction Entry). Normally manufacturing will allocate the inventory to the linked SOP line, and update SOP Line quantities accordingly.
What happens is the following:
- The finished good inventory correctly posts to the Inventory Module
- The quantity is allocated in the Inventory Module (Manufacturing assumes that it will be updating the SOP Line to reflect the allocation)
- Since the SOP Document is locked, Manufacturing cannot update the SOP Line
- The SOP Line then cannot be manually allocated/fulfilled because it is still linked to the MO.
- The inventory cannot be used because the Inventory Module sees it as allocated
The only way to address the situation is to (1) break the MOP-SOP link and (2) run inventory reconcile. At that point the SOP Line can be manually allocated/fulfilled.
The new Tweak in MFG PowerPack hooks into an existing check performed by the MO Receipt Entry window and forces the warning below if the linked SOP Document is in use.

The reason we took this approach is that there are 3rd Party products (such as Warehouse Management Systems) that integrate into this window to create MO Receipts. Since the warning above, and the condition that creates it, is a normal behavior of the MO Receipt Entry window, our hope is that such integrations will already have a method to handle this warning. Where if we had added an additional warning specific to the MOP-SOP condition, that might cause the 3rd Parties to fail. If you do deploy this Tweak in a system that has an integration, please test carefully before enabling it in a live system.
MFG PowerPack 2022-09-16
Release Date: 16-SEP-2022
GP Versions: 12/14/16/18
MFG PowerPack Build: 11.202
* Actual Cost Rollup: changes to the stored procedures to correct a case sensitivity issue for binary sort databases (#202201726). If you are binary sort and received an install error, dr0p table WCT00003 then rerun the full install routine to automatically recreate the table and stored procedures. This issue affects binary sort SQL installs only.
* MO Split: addressed issue that could cause a duplicate key error on MOP10223 when doing MO Receipts with Split MOs (#202201737)
* Vendor Pricing: addressed issue in the PO Item Detail Entry window where it was not picking up changes to the Release By Date so it continued to use the Document Date for pricing. This build adds a feature to the Release By Date field so that when you enter it date it will automatically update the Required Date (if needed) so it is the same as the Release By Date. This prevents a warning from GP that the Required Date cannot be before the Release By Date, and it means you can enter only the Release By Date if desired.
* NEW Tweak: MO-SO Receipt Warning- this Tweak is intended to fix a big with the Manufacturing Order Receipt Entry window. If an MO is linked to an SO, and the SO is in use (i.e. open in Sales Transaction Entry), the MO Receipt window will allow creating and posting a receipt. This results in the finished good inventory being added to inventory and allocated (because manufacturing thinks it will be allocating the inventory to the SO). However, the SO is locked so it cannot be updated. The SO then cannot be manually fulfilled because it is linked to the MO, and the inventory module incorrectly shows the inventory as allocated so it cannot be used. The only way to fix the situation is to (1) break the MO-SO link and (2) run inventory reconcile. This Tweak will warning users that the MO is in use and prevent creating the MO Receipt.
DS0852 Sales Entry Enhancements
DS0852
Sales Entry Enhancements
Problem Description:
Drop-Ship
ACME brings Sales Orders into Dynamics GP via EDI. It is not known when the order is integrated whether or not it will be processed as a Drop-Ship. When ACME manually reviews Orders after integration, a decision is made that an Order should be a Drop-Ship.
Currently they are manually removing each sales line, and re-entering it as a Drop-Ship. A Sales Order is always either completely Drop-Ship, or not. There is never a mix of Drop-Ship lines and regular lines. If there were a mix, they would manually set each line as needed.
Additionally, the Shipping Method on each line is changed to DIRECT SHIP.
ACME would like a way to quickly convert an entire order to Drop-Ship, and change the Shipping Method to DIRECT SHIP.
Exceptional Demand
ACME uses Sales Demand in their Sales Forecasting and sometimes needs to exclude a Sales Order from forecasting. Currently this is done by manually marking the Exceptional Demand checkbox on the Sales Item Detail Entry window, for each line on the order.
ACME either excludes all lines from forecasting (marks the Exceptional Demand box on all lines), or all lines are included. There is never a mix of some lines excluded and some lines included. If there were a mix, they would manually set each line as needed.
ACME would like a way to quickly set the Exceptional Demand flag on all lines on a Sales Order (or to unmark it on all lines).
Design Features:
Drop-Ship
Navigation: Sales Transaction Entry >> Additional >> Convert to Drop-Ship
Conversion to Drop-Ship will only be allowed if the SOP Type = Order.
The user will be prompted to confirm they want to convert the entire Order to drop-ship. If they answer yes:
-
The system will confirm that:
- multi-bins is NOT enabled
- the order does NOT contain serial/lot controlled items
If either is true, the user will be warned and the Convert to Drop Ship process will stop.
- Each line on the order will be converted to Drop-Ship.
- Inventory will be unallocated at the Item-Site.
- The Shipping Method will be changed to “DIRECT SHIP” and the user will be prompted to roll the change down to the lines.
Exceptional Demand
Navigation: Sales Transaction Entry >> Additional >> Toggle Exceptional Demand
Selecting the navigation above will have the follow effect on the Exceptional Demand checkboxes on the sales lines:
- If none are currently marked, all will be marked
- If some are currently marked, all will be unmarked
- If all are currently marked, all will be unmarked
Since the Exceptional Demand checkbox is always available regardless of SOP Type, the Toggle Exceptional Demand optional will work on any SOP Type.
The Title Bar of the Sales Transaction Entry window will display the Exceptional Demand status.
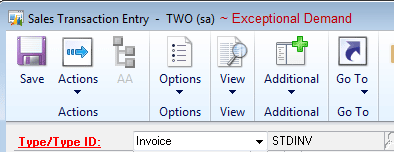
When all of the lines on a Sales Transaction have the Exceptional Demand checkbox marked, “Exceptional Demand” will appear in the Title Bar of the Sales Transaction Entry window (as shown below).
If some of the lines are NOT marked (and some are), it will display: Exceptional Demand*
If none of the lines are marked, Exceptional Demand will not display.
The example below is just to emphasize the LOCATION of the text—it will NOT be red. It will appear in the same font/color as the title of the window.
Assumptions/Requirements:
ACME does not use Multi-Bin
ACME does not use Serial/Lot Tracking
GPPowerPack 2022-08-29
Release Date: 29-AUG-2022
GP Versions: 12/14/16/18
GP PowerPack Build: 5.160
* Bank Deposit Filters: addressed table key issue that caused long fill time for Mark All when filters have been applied (#202201519)
* TWK-POP: PURCH Distribution Override – added check for Allow Account Entry
SOPPOP Multi-Link 2022-08-10
Release Date: 10-AUG-2022
GP Versions: 12/14/16/18
SOPPOPMultiLink Build: 1.8
* Add scrolling buttons to PO Review and Item PO-SO Assignment
MFGImport 2022-08-09
Release Date: 9-AUG-2022
GP Versions: 12/14/16/18
MFG Import Build: 3.54
* FULL INSTALLATION ROUTINE REQUIRED
* This build adds a new table for tracking errors in the integration
* Added support for table-driven integrations into the BOM and Routing.
* Added an external integration point (API) for use with GP web services and dexterity-based integrations.
SOPPOP Multi-Link 2022-07-29
Release Date: 29-JUL-2022
GP Versions: 12/14/16/18
SOPPOPMultiLink Build: 1.7
* Addresses issue related to the Drop Ships functionality (build 1.5) that can create duplicate receipts, and over-allocate the sales line, when a line is only partially received and then invoiced.
GPPowerPack 2022-07-28
Release Date: 28-JUL-2022
GP Versions: 12/14/16/18
GP PowerPack Build: 5.159
* Bank Deposit Filters: addressed issue that could cause a very long delay when clicking the Mark All button when filters have been applied.
* TWK-POP: PURCH Distribution Override – added check for Inactive account. User will now be warned if the selected account is inactive and the window will revert to the previous account.
MFG PowerPack 2022-07-07
Release Date: 7-JUL-2022
GP Versions: 12/14/16/18
MFG PowerPack Build: 11.201
* Sales Forecast Integration (SFI): addressed issue that started with build 196 which caused SFI to fail to create a valid SQL connection when importing costing & pricing (#202201283)
MFG PowerPack Actual Cost Rollup

The Actual Cost Rollup in MFG PowerPack does a roll-up using Actual Cost (FIFO/LIFO PERPETUAL) items or Standard Cost (FIFO/LIFO PERIODIC) items. Since its pending cost tables are completely separate from Inventory and Manufacturing you can play with costing changes with no concern for accidentally impacting the live costing of an item.

Actual Cost Rollup integrates into Bill of Materials View window in GP Manufacturing to provide an inquiry that shows the entire costed BOM using the Actual Cost information. A toggle on the Actual Cost window allows for changing the costing view in BOM View to show either material cost only or the total manufacturing cost (which includes the routing).
The Actual Cost Rollup utility provides a place to set a pending cost change and date for actual cost raw materials, perform an Actual Cost Rollup, and view items that have a new cost because of the rollup.
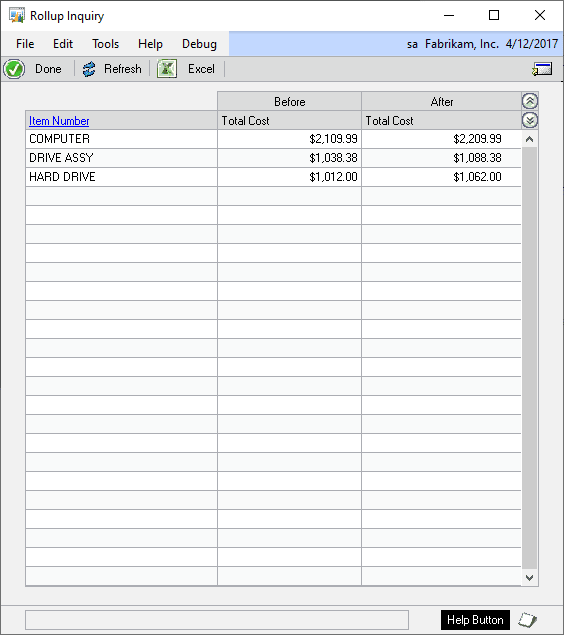
The Actual Cost Rollup follows the same logic as the GP Manufacturing Standard Cost Rollup, so the rollup includes:
- Labor rates and overheads
- Machine rates and overheads
- Routing Times
- Bills of Material Component Quantities and Shrinkage
- Item Engineering Standard Cost Shrinkage
- Item Resource Planning Shrinkage Factor
- In dates/out dates/Effective Dates
Since Actual Cost Rollup does not have the ability to CHANGE the cost of standard cost items it can be used to perform planning activities without the chance of accidentally revaluing inventory.